Floating Floor Pop Up | GSD

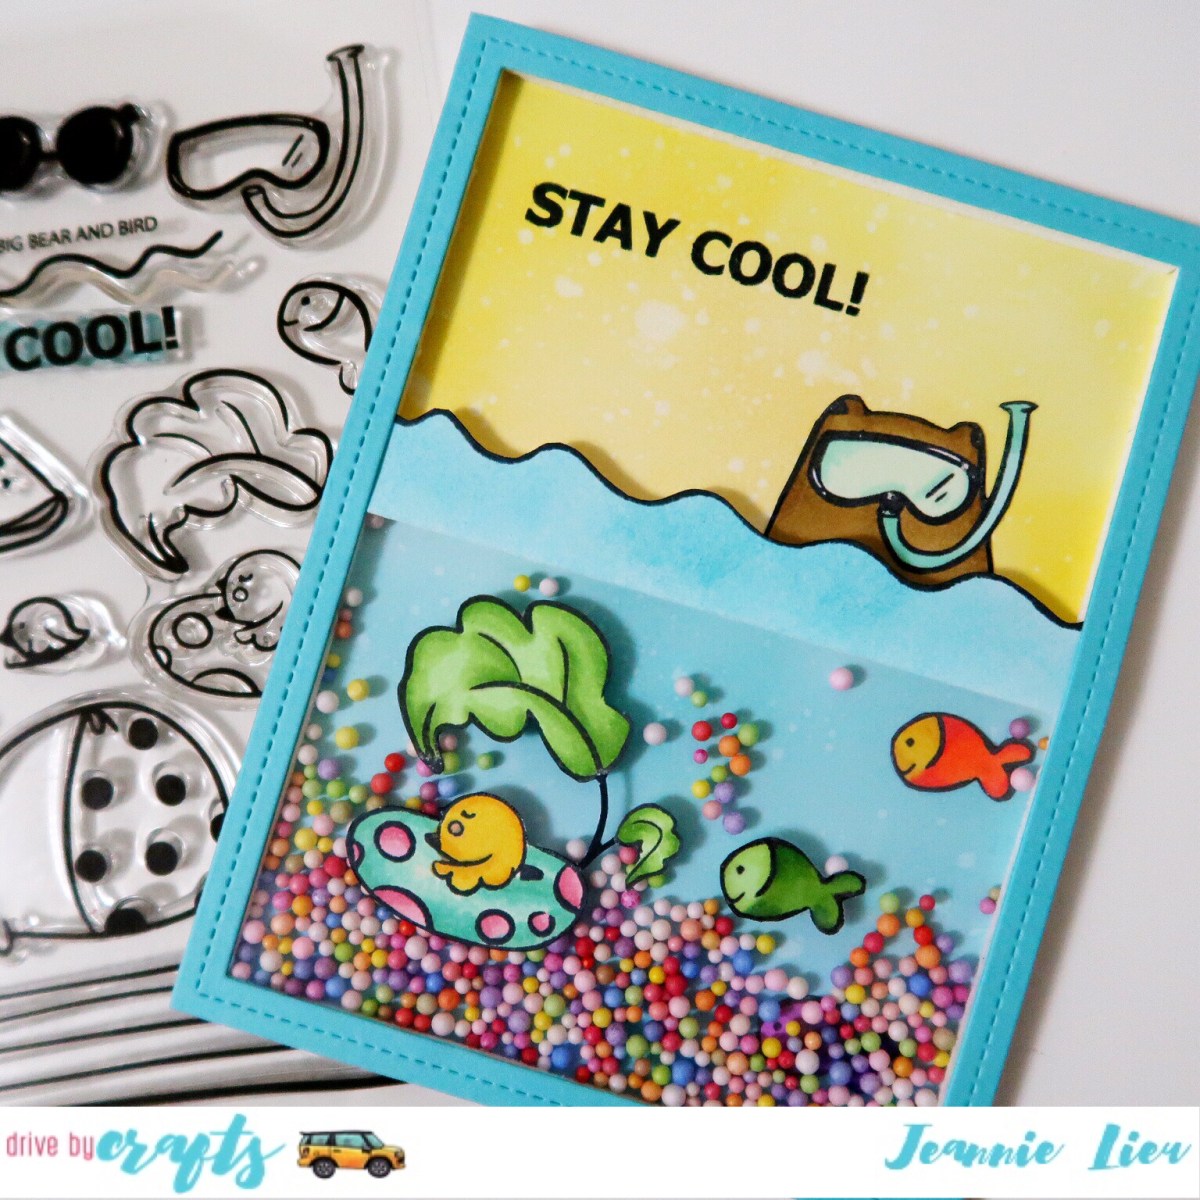
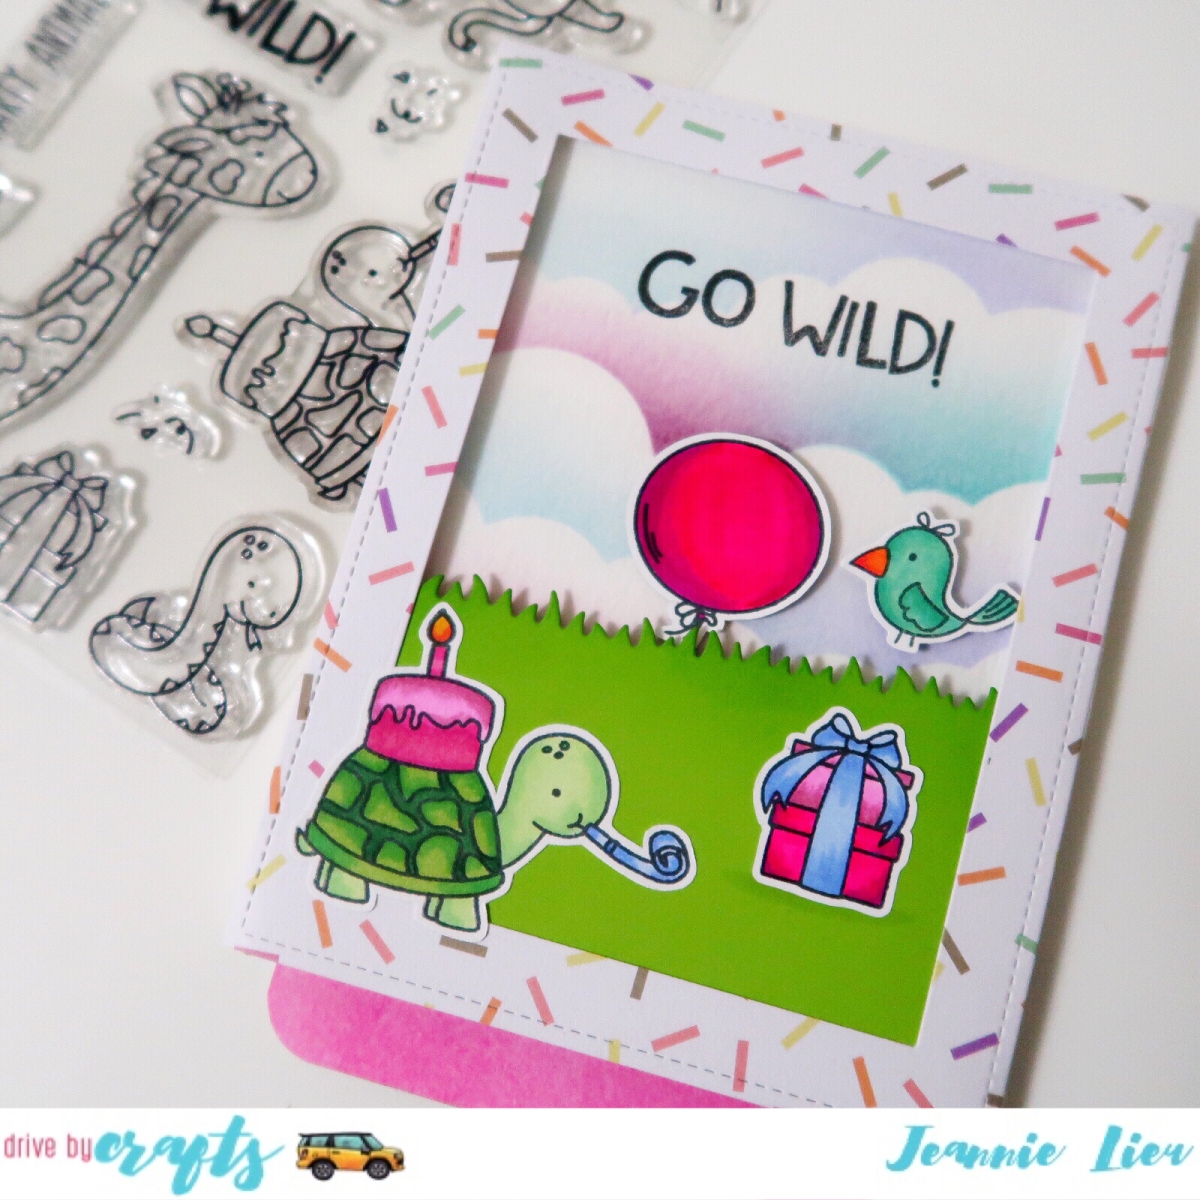
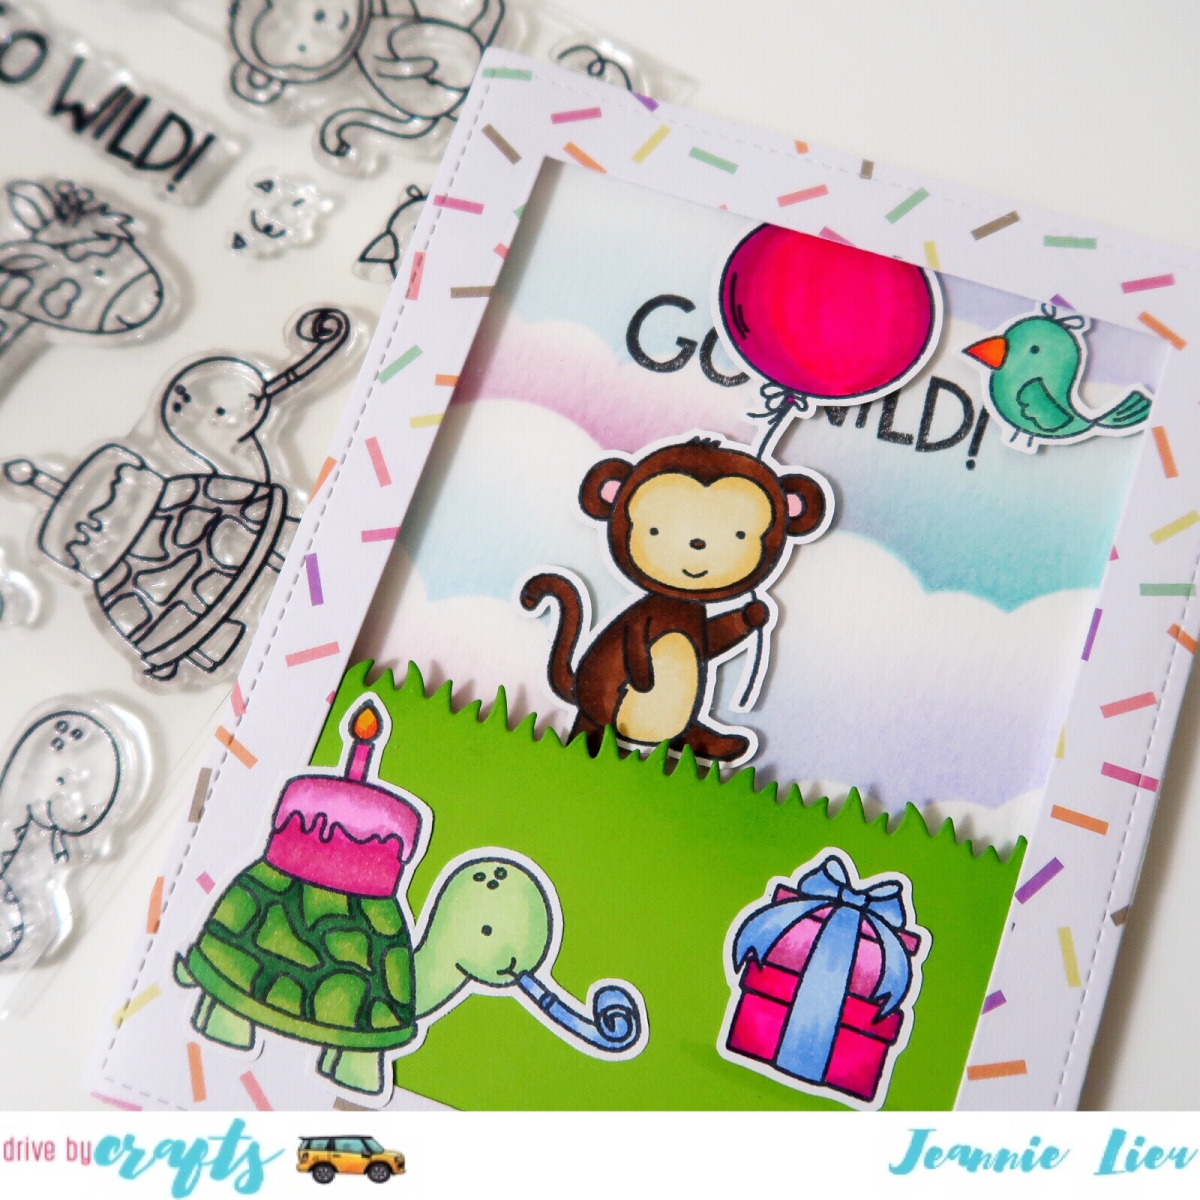
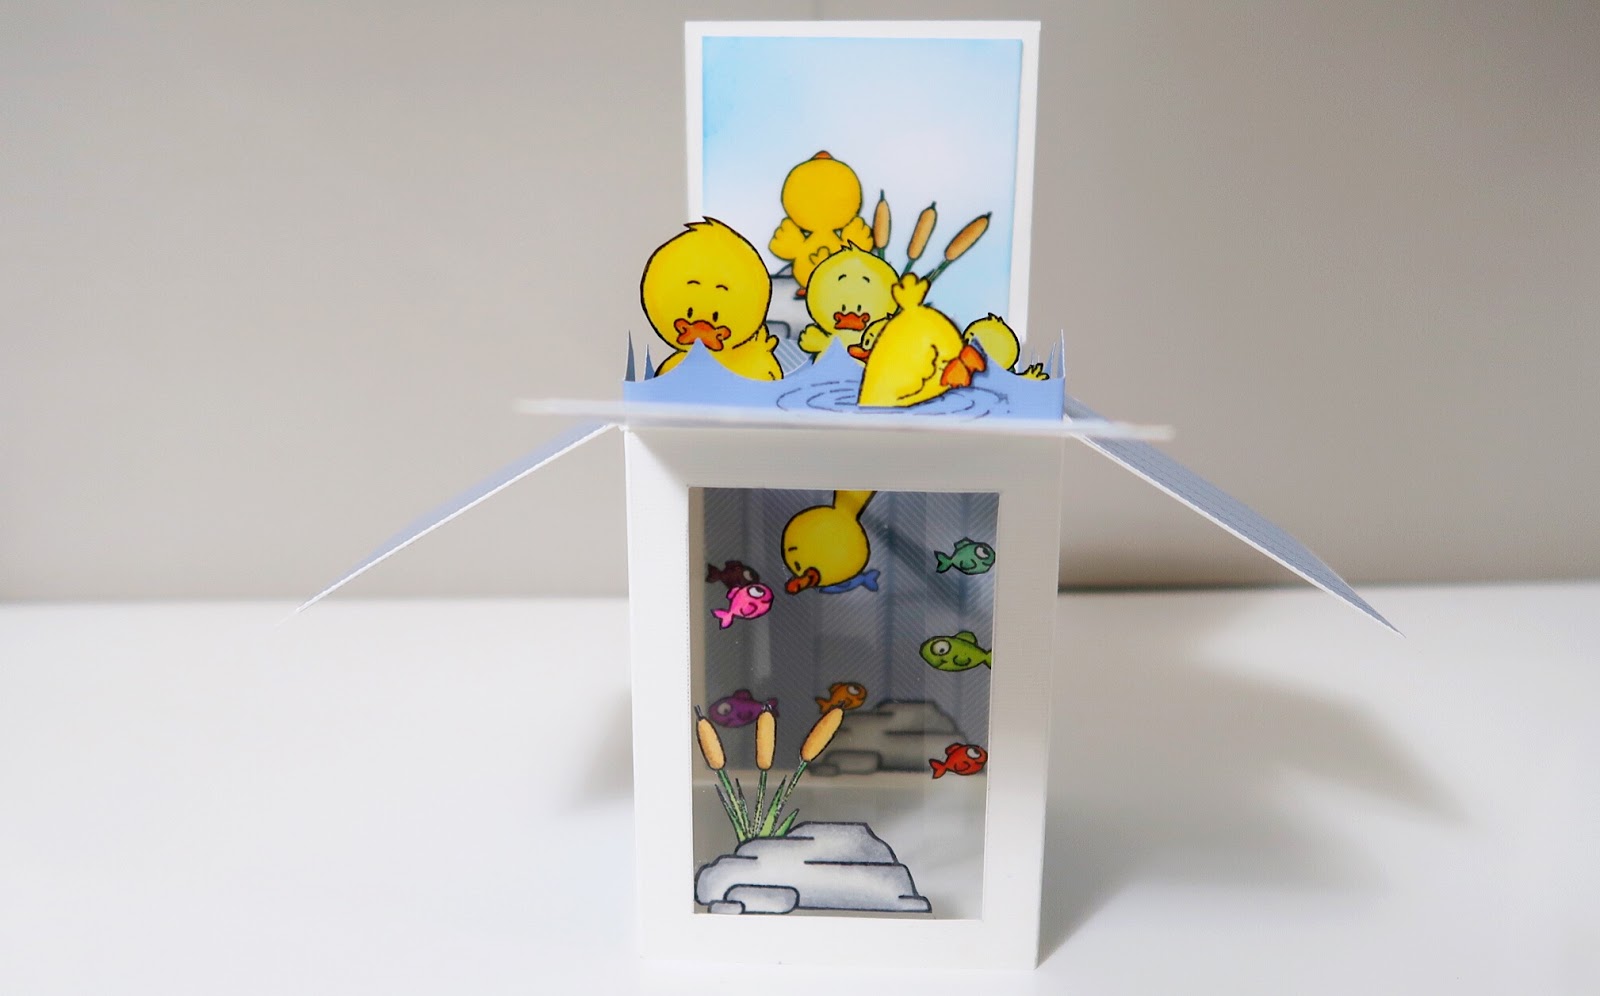
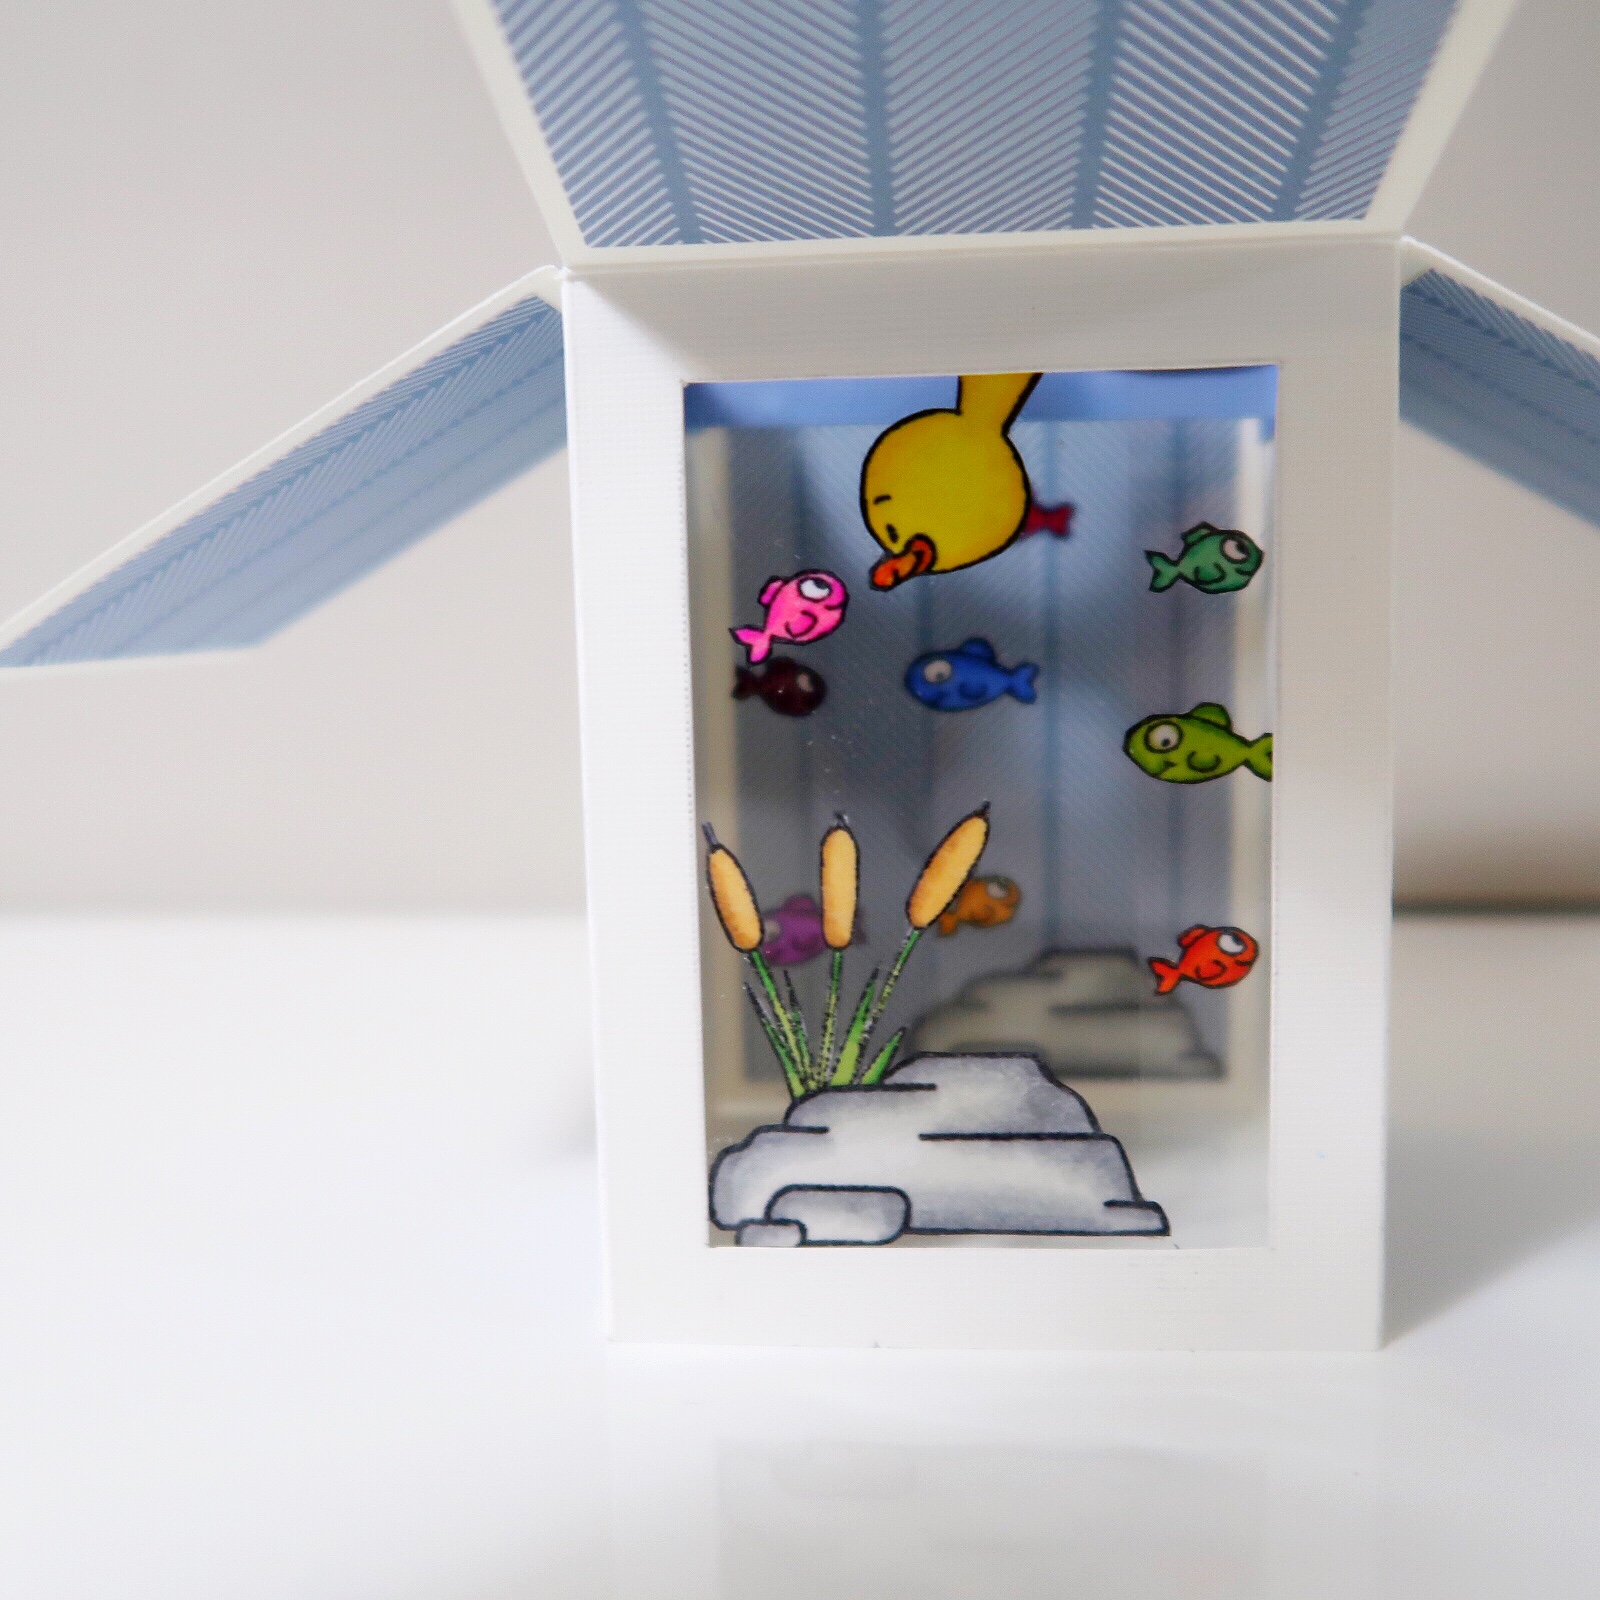
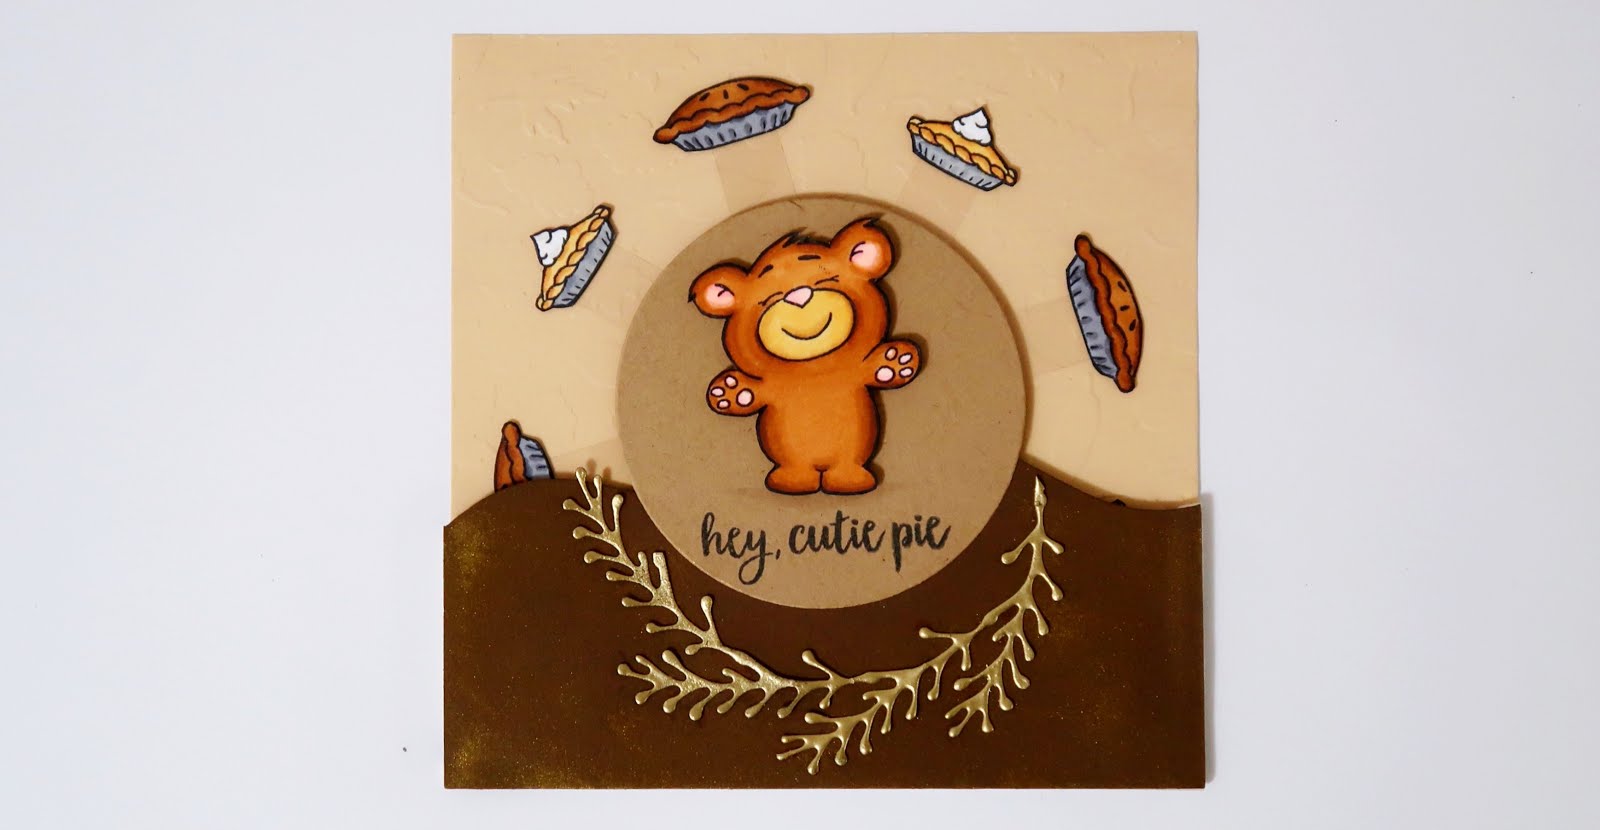
Hey there! I’m sharing this Floating Floor Pop Up card today using Gerda Steiner Designs Go Wild stamp set. Going on a safari is on my bucket list, but I haven’t gone yet so I like the idea of creating a card to pretend I’ve been.

IMG_1332

I have a video to describe my process and it does seem a bit overwhelming at first. I think once you have all the moving parts ready to go, it is pretty easy to put together.

As always, my supplies are listed below.

SUPPLIES
Items marked with an asterisk (*) were provided by a store or the manufacturer. All other items were personally purchased.

DISCLAIMER
Some products are provided by manufacturers for review and use. Affiliate links may be used at no cost to you.

Have a Ball! | Gerda Steiner Designs

Hello everyone! It’s been awhile since I’ve shared one of my cards and I really am loving this one. If you’re a fan of animals, especially doggies, this Dachshunds stamp set is for you! You’ll see that I used the Hoppiness stamp set as well to add a few extra elements to the card as well.

I used a grassy hills die to create a stencil. Using distress inks, I colored two layers of the grass. I definitely wanted to use two of the dogs in the set. I like how the first dog is looking back. I can’t really tell if he’s looking at that butterfly on his tail or the other dog chasing the tennis ball.

Since the second dog looked to be moving, I wanted to put him in action. And what dog doesn’t love chasing balls? I just had to have him chase the tennis ball included in this set. I create a pull tab channel so he could run towards the ball.

I used two sentiments in this card: It’s Your Birthday and Have A Ball. The first one is prominent on the front of the card, but the second one is hidden until the dog fetches the ball. It’s a small surprise for the card recipient.

I used the hearts and the butterfly from the Hoppiness set so I could add pop of color to the card. It looked a little too plain with just the doggies. I think it helps add that special something to the card.

I hope you enjoyed this card and picked up the set. It’s so fun! Thanks for stopping by!

Beam Me Up | Lawn Fawn

Happy Wednesday everyone! I hope the week has been treating everyone well so far (halfway to the weekend!). Today, I’m sharing a card from one of my favorite sets from the newest Lawn Fawn collection, Beam Me Up. Of course, when I first saw this set, I wanted to do a pull up slider tab with the spaceship beaming up aliens. I’ve seen a lot of these wonderful cards, so I wanted to do something a little different.


Be sure to check out how I created it over at Drive By Craft’s blog.

And as an added bonus, I have a video as well.

SUPPLIES
Items marked with an asterisk (*) were provided by a store or the manufacturer. All other items were personally purchased. 

DISCLAIMER
Some products are provided by manufacturers for review and use. Affiliate links may be used at no cost to you.

Pop Up Spinner Card | Sunny Studios

Happy Friday!

When I first saw this Sunny Studio stamp set, my  mind raced back to the pop up spinner card I did awhile back and I really wanted to redo that card using this set. It’s more or less the same card, but this time, I have a video for it to help anyone recreate the same card.

IMG_0062

There’s quite a few steps to this card because I wanted to use three images, but using just one is just fine as well. The techniques involved is reverse stamping, pop up, and a spinner. It’s a three in one for this card! If you watch the video, you get the basic idea behind the card, and hopefully you can make a similar card as well!

SUPPLIES

Items marked with an asterisk (*) were provided by a store or the manufacturer. All other items were personally purchased. Items below are shown in the order they appear in the video.

DISCLAIMER

Some products are provided by manufacturers for review and use. Affiliate links may be used at no cost to you.

Vellum (or Acetate) Shaker Card

Hi all, I’m up on the Drive By Craft’s Blog today sharing this fun shaker card using their Itty Bitty Shaker Fun shaker bits, and Waffle Flower’s Stay Cool stamp set.

IMG_9575.JPG

I created a half shaker card and used vellum… but once I was done, I wasn’t so sure about it and recreated it using acetate.

IMG_9576.JPG

Head over to Drive By Crafts blog to see how I created this card.

And check out the video I have for this card as well:

SUPPLIES
Items marked with an asterisk (*) were provided by a store or the manufacturer. All other items were personally purchased. Items below are shown in the order they appear in the video.

DISCLAIMER
Some products are provided by manufacturers for review and use. Affiliate links may be used at no cost to you.

Floating Slider Card | Neat and Tangled Wild Ones

Hi all, I am sharing this card that I created for Drive by Crafts and I had gotten a lot of questions about this type of card so I finally got around to filming it. I really love interactive cards, so please check out my post for all the details Drive by Crafts’s blog.

IMG_9347.JPG
To create this card, you will need the following: 

  1. 4.25 x 5.5 card base with a .75 inch border
  2. Slider mechanism – 4.0 x 5.5, with two slits (1/4 from the edge)
  3. Pull tab – 3.75 x 6 inches
  4. Acetate piece, 3.25 inch in width
  5. Folded card base
  6. Foam tape

Spectrum Noir colors:
Monkey: EB1, TN 2, TN7, EB5, PP3
Balloon: BP2, BP4, BP5
Turtle: LG3, LG4, LG5, TB1, TB2
Bird: GT2, BT4, OR2, OR1
Cake: OR1, OR2, PL2, PL1, PP6, PP4
Present: TB3, TB1, BP6, BP4, PL2, PL1

IMG_9348.JPG
For full instructions on how to create this card, please check out my YouTube tutorial.

SUPPLIES
Items marked with an asterisk (*) were provided by a store or the manufacturer. All other items were personally purchased. Items below are shown in the order they appear in the video.

DISCLAIMER
Some products are provided by manufacturers for review and use. Affiliate links may be used at no cost to you.

Love Cynthia – Hidden Slider

Hi everyone! I just had to share this fun card I made. It was one I created for my coworker who is leaving. She loves all the superhero movies, and why not make her into one! The best part is that she flies!

I used distress inks to color the background and the cloud on top. Using a white gelli pen, I scattered stars everyone. I die cut a retired Clearly Besotted item for the cityscape, so it was so easy to put this card together. The clouds on the top of the card hide the slider, so the little girl can move freely and look like she’s flying.

IMG_9080.jpg

Here is the video tutorial too:

Hope you enjoy this card. I think it’s one of my favorites so far!

SUPPLIES

Items marked with an asterisk (*) were provided by a store or the manufacturer. All other items were personally purchased. Items below are shown in the order they appear in the video.

DISCLAIMER

Some products are provided by manufacturers for review and use. Affiliate links may be used at no cost to you.

Warning! This Set Contains Magic

I’m back to share a fun, magical card, using the Planner Street set,  “Warning: This Set Contains Magic”. I’m definitely bit of a girly girl who loves unicorns and glitter. Naturally, when I first saw this set, I just knew I had to combine the two!

In creating this card, I started by coloring and fussy cutting three of the images and heat embossing the sentiment onto my pink background. I chose a glitter cardstock for the frame. After all, there’s no such thing as TOO much glitter.

Inline image 2I wanted the unicorn to move around in the card but only in the middle of it. By using clear thread to hold the unicorn, you can’t really see it and it makes the unicorn look magical since it moves on it’s own in the middle of the card. I added foam tape around the card, which will be hidden by the glitter frame. The string will be sandwiched between the layers of foam tape.

Inline image 3Since I’m using pretty small glitter, I want to make sure the foam tape isn’t sticky so I made sure to use a powder tool around the frame. Once it was ready to go, I added sequins and glitter. As all crafters know, glitter is naturally clingy and gets everywhere. It still got everywhere but it wasn’t as bad as I anticipated.

Inline image 5I attached acetate to the frame and placed the frame on top of the foam tape. Once that was complete, i just needed to decorate the front with my remaining images. To make things easier, I used a Xyron sticker maker which adds adhesive to the back of my images, essentially creating a sticker.

Inline image 6

Voila! This fun card has glitter and sequins shaking throughout AND the unicorn moves. It’s a super fun card, don’t you think?

Inline image 7Hope you all enjoyed this fun, glittery card! Until next time…

SUPPLIES

Items marked with an asterisk (*) were provided by a store or the manufacturer. All other items were personally purchased. Items below are shown in the order they appear in the video. 

DISCLAIMER
Some products are provided by manufacturers for review and use. Affiliate links may be used at no cost to you. 

Fall Coffee Lovers Bloghop | Coffee Monster

Happy Friday everyone! Can you smell Fall in the air? It’s almost here and I’m really excited because Fall is my FAVORITE season. I love chunky sweaters, cute scarves, the Fall chill in the air, and my favorite, Salted Caramel Lattes.

I’m participating in this Fall Coffee Lovers Bloghop and wanted to share this super duper cute card featuring one of Gerda Steiner Design’s newest stamp set, Coffee Monster. I’m an avid coffee feen and if I don’t get my morning cup, I’m grumpy.

I created this card with the new set:


It’s a shaker card! In addition to using sequins, I wanted to make this a little special and use coffee beans… and let me tell you, it smells amazing! For this card, I had to use four layers of foam to create the shaker compartments and used the sentiment to hide the foam tape. I wanted two compartments for the coffee beans so they just didn’t just fall to the bottom.

For the back of the card, I used distress ink with some water and used an actual coffee cup to create the cup imprints. It looks like I used that paper to set my coffee cup on!

These little monsters are so adorable! Pair them with coffee and this just may be one of my favorite set! Now if only coffee shops made their Fall coffee drinks all year… mMm…

Thanks for stopping by. Until next time!

Pop Up Box with Bottom Panel

Hello everyone! I had made this pop up box awhile back and there were a lot of questions about how to go about doing it.

It’s actually a pretty simple card, especially now since there are pop up box dies out there. I, however, did it the old fashioned way and made mine from scratch. It’s actually bigger than the pop up box dies since those are A2 sized so it’s a really good card for a special person.It’s quite hard to explain how I created it since there’s a lot of steps, so I made a YouTube tutorial on the steps and all the measurements are listed at the end of this post.

The bottom window, which is the main feature, is one I cut out with an Xactoknife. Using acetate and a xyron sticker maker to adhere the images, it adds a special element to the card. The fish hang from the waves above and appear to be floating in the “aquarium”. Don’t you just love acetate?!

 I hope you all enjoy this card! It’s a really fun one. It has a lot of moving parts but if you pre-cut everything out first, and then assemble, it actually goes pretty quickly. 

→ Dimensions  

Card base: 6.5” x 12”

Score lines on the long side: 2.75”, 5.5”, 8.25”, 11”

Score lines on the short side: 2.75”

Inside Panels: (1) 2.5” x 6.25”; (3) 2.5” x 2.5”

Outside Panels: (1) 2.5” x 6.25”; (3) 2.5” x 2.5”; (2) 2.5” x 3.5”

Acetate: 2.75” x 3.75”

Inside strips: 4.75” long, scored at 1” on each side

 Supplies 
Gerda Steiner Designs: Lucky Duck: https://goo.gl/N3MmKf
Lawn Fawn: Mermaid for You: https://goo.gl/JwYahT
My Favorite Things Stamp: https://goo.gl/RYQ8UV
Memento Tuxedo Black Ink : http://amzn.to/2vL72O0
Teflon Bone Folder: https://goo.gl/vzkVno
Fiskars Trimmer (mine is discontinued): http://amzn.to/2gm34EW
T-Ruler: http://amzn.to/2vIWyOZ
Xactoknife: http://amzn.to/2vMMJii
Acetate: http://amzn.to/2xjme9s
Scor-Pal double sided tape, 0.25: http://amzn.to/2emogdu
ATG Gun: http://amzn.to/2eUvmWD
Sizzix Big Kick: http://amzn.to/2wOvUXT
Xyron sticker maker: http://amzn.to/2y41ak7
Tonic Craft Pick: http://amzn.to/2xjn5aa
Reverse Tweezers: http://amzn.to/2wYZGJu
Salty Ocean Distress Ink: http://amzn.to/2y41fnV
Distress Ink Blending Tool: http://amzn.to/2wMmeOi

Spinning Card – More Than Pie

Hey everyone, today I’m using the More than Pie stamp set. I noticed the bear that wasn’t holding any pie and wanted to surround him with pies!

Using acetate, I created a spinner wheel for the pies to stick to and spin around the bear. For the bear to be in front, I had to create a stationary piece that the pies can move freely behind. That’s where foam tape comes in handy.

It’s a bit hard to explain in words, so I’m also including my YouTube Video Tutorial for it.

Regardless, I think the card comes out to be really cute and it’s an easy card made interactive by adding a brad to it. The acetate also makes it look like the pies are floating as long as you don’t look too closely.

Hopefully, you enjoyed this card and checked out the video to learn how to create one as well. Supplies are also listed below.

Thanks for visiting and I’m sure I’ll be back with another card for you guys soon.

SUPPLIES

Items marked with an asterisk (*) were provided by a store or the manufacturer. All other items were personally purchased. Items below are shown in the order they appear in the video.

DISCLAIMER

Some products are provided by manufacturers for review and use.