This is one of my favorite hot foil dies for the holiday season and beyond because I think it’ll be pretty versatile. I thought it would be the star of the show, but honestly, I think the Polar Party image stole the spotlight. I no line colored it up with copic markers and die cut it out with the coordinating die because there was no way I would fussy cut this out. I don’t always love that outline around a die cut, so I just used my go to trick to hide it!
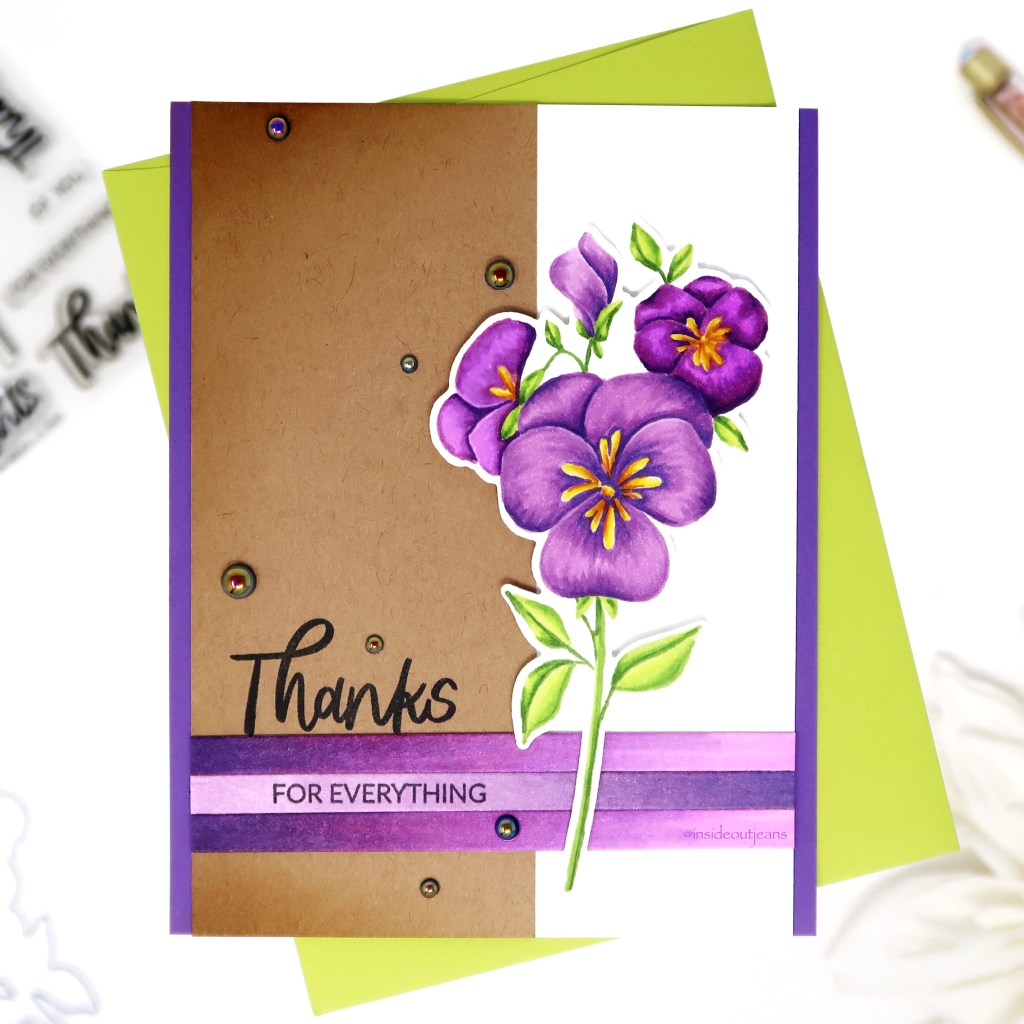
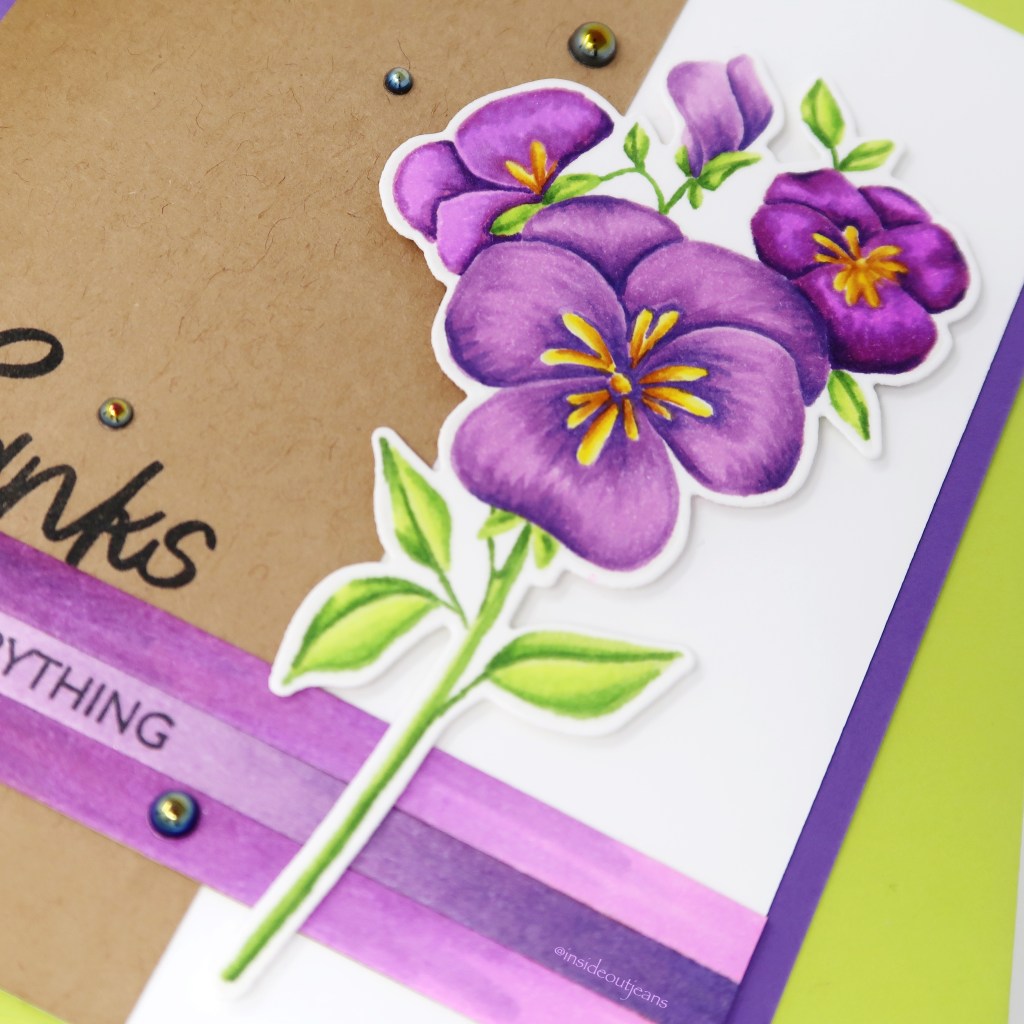
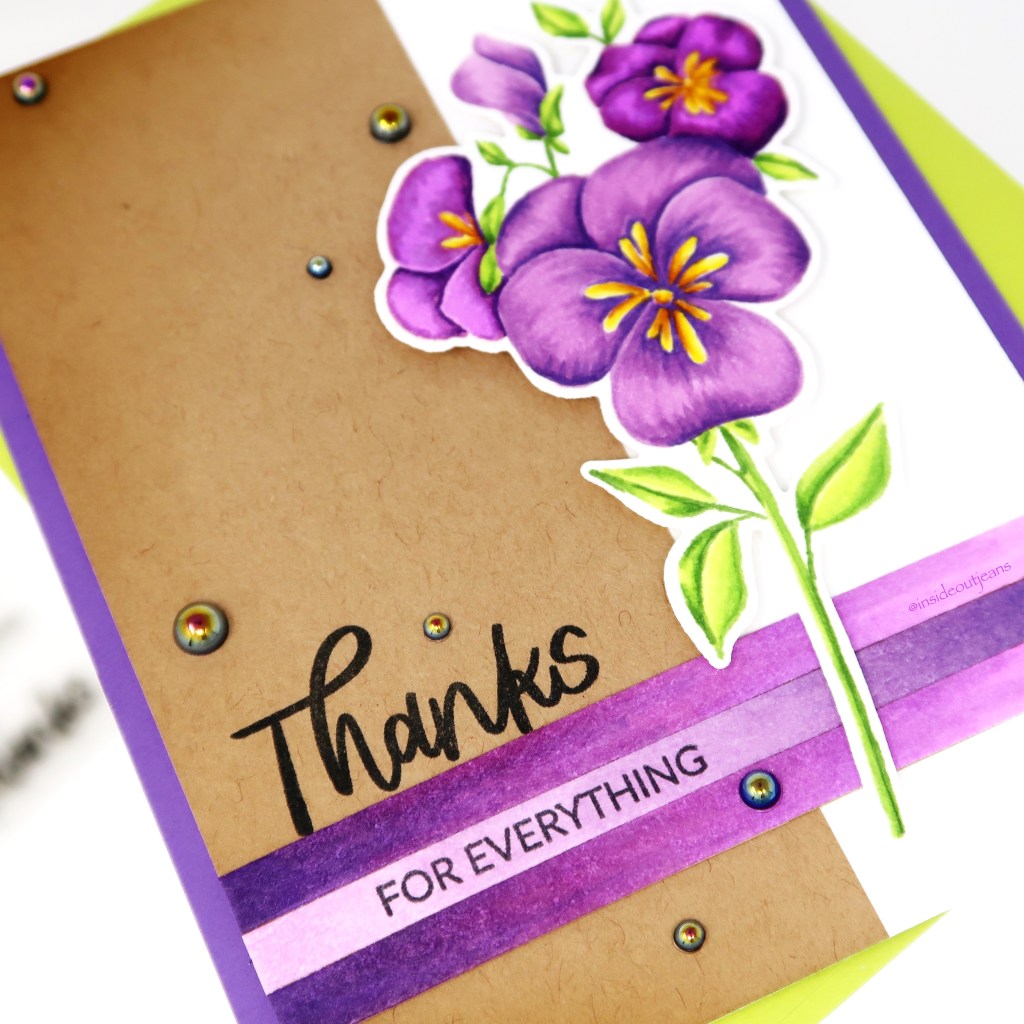
Happy Friday everyone! TGIF! I’m sharing a card featuring one of Ellen Hutson‘s new release stamp sets named, Pressing Thoughts. It’s a very simple floral set but perfect for lots of occasions.
All my supplies for creating this card will be listed down below (with multiple sources when available) for your curiosity and convenience. Affiliate links used when possible.
I stamped images from the Ellen Hutson’s Pressing Thoughts stamp set using Ink on 3’s Fadeout ink. Then I colored them up using copic markers. Using the corresponding dies, I cut this out and set it aside.
For the background, I used wanted to tie in the same purple colors so I die cut some stripes of white cardstock using Mama Elephant’s Quick Stripes and used the same copic markers to color them up. I decided I wanted some contrast so I cut down a strip of kraft cardstock and added some dimension by added distress inks around the corners in Walnut Stain. For the sentiment, I stamped it directly on the kraft cardstock and one of the purple strips.
To finish off this card, I added a couple of embellishments from Trinity Stamps called Midnight Ball that filled up the space on the kraft cardstock.
Thanks for stopping by! Happy Crafting!
→ SUPPLIES USED ←
Some products are provided by manufacturers for review and use. Affiliate links may be used at no cost to you.
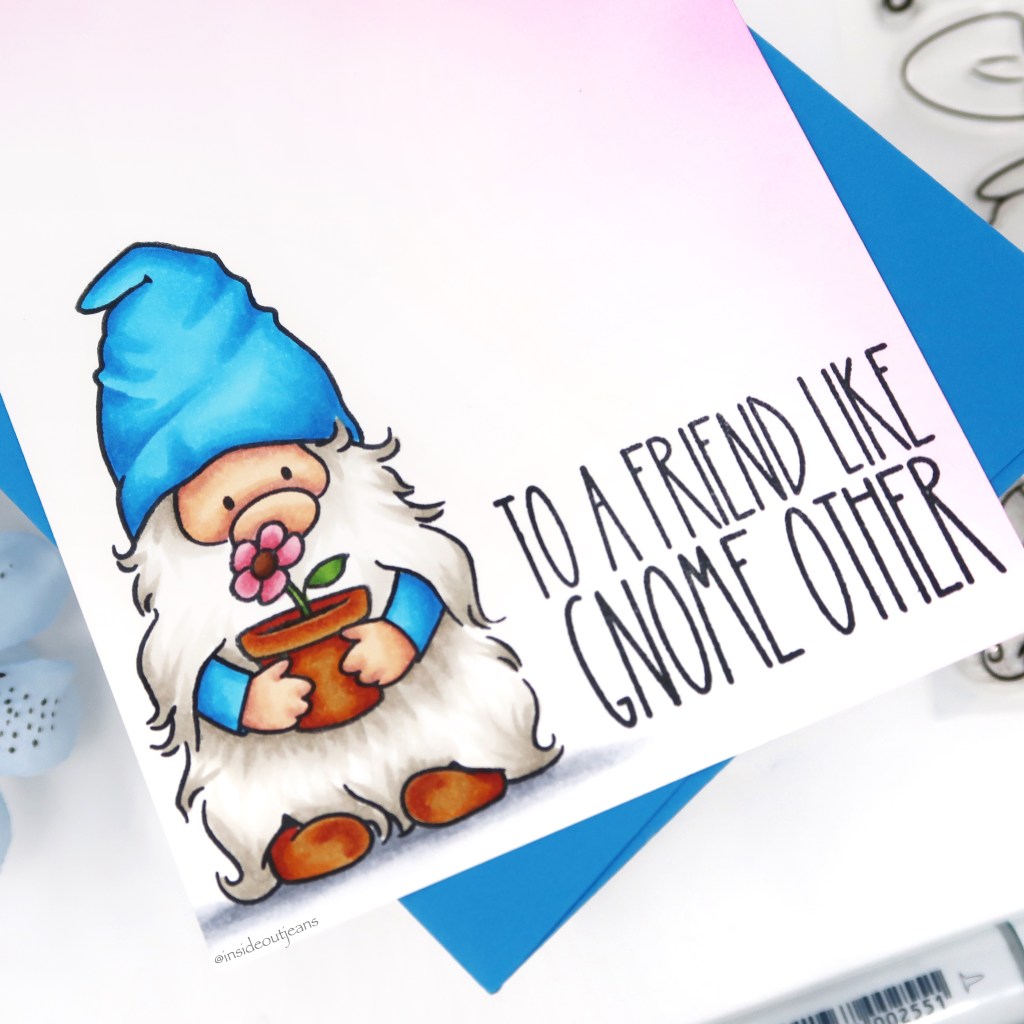
Hi everyone! Today, I’m sharing two cards featuring two stamp sets, Gneal and Gnorah along with Gned and Gnina. These two sets are ones that I won from an instagram giveaway and I love the style. These images are pretty large and perfect for no-line coloring.
I stamped boy gnome image from the Gneal and Gnorah stamp set using Memento Tuxedo Black ink (black outline) and Ink on 3 Fadeout Ink (no-line coloring). Then I colored each of the images using the same copic markers but you can see the difference between the final product. Which do you prefer?
For the background, I used a bit of distress ink to ink up the edges, adding a bit of Picked Raspberry. I added the sentiment from the Gned and Gnina set. It’s a very simple card and these images are great if you want to practice your no-line coloring.
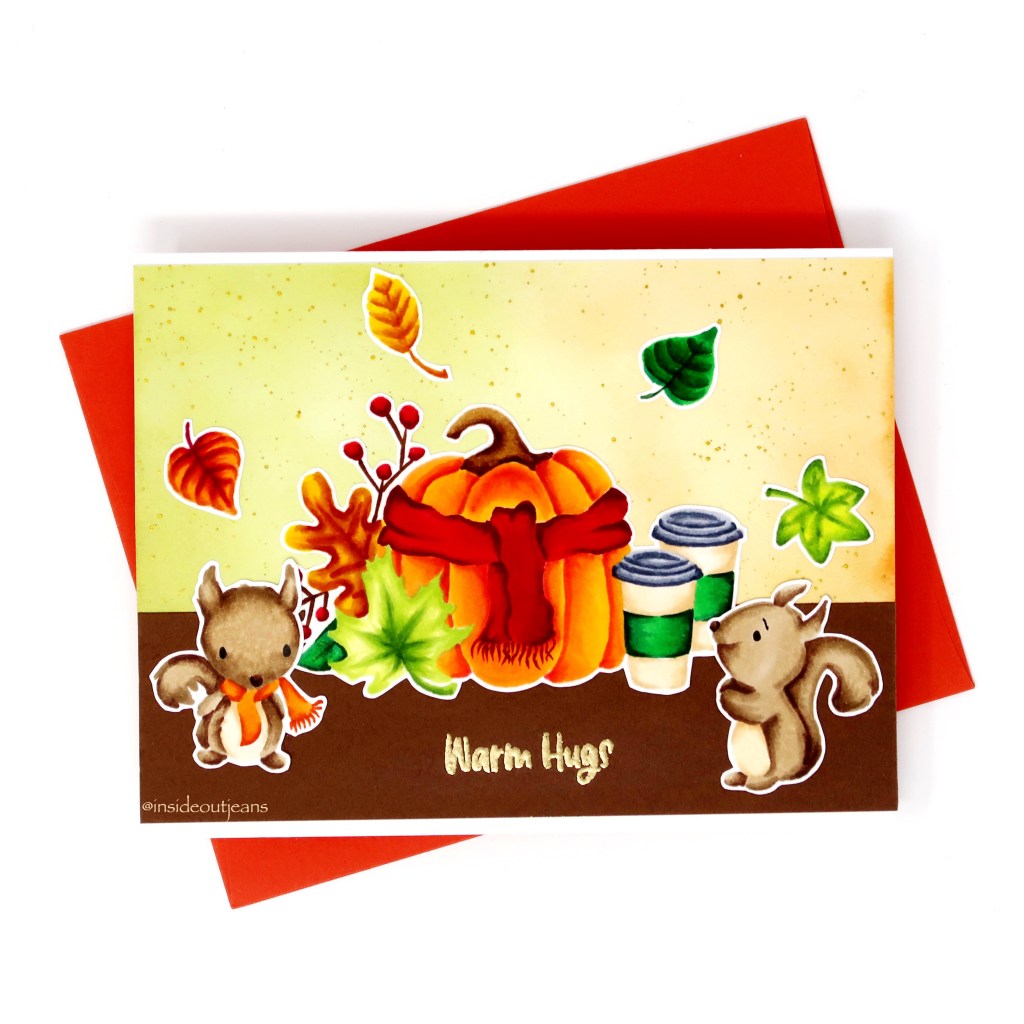
Happy Friday everyone! TGIF! I’m sharing a card featuring two stamps sets from Not 2 Shabby. Both of them have Pumpkin Spice in their name, so of course, they are perfect for fall!
All my supplies for creating this card will be listed down below (with multiple sources when available) for your curiosity and convenience. Affiliate links used when possible.
I stamped the main pumpkin assortment image from the Pumpkin Spice Everything stamp set. There’s two of them in this set but I thought this would look really pretty to no line color. I pulled the little squirrels and leaves from the You, Me and Pumpkin Spice stamp set because I thought they would go so well with the pumpkin. For all the images, I used Ink on 3’s Fadeout Ink, which is a great ink for no line coloring.
I colored them up using copic markers and love the soft look that no line coloring gives the images. For the background, I pulled this out of my stash and can’t really remember how I created it. I’ve been trying to use up a lot of card panels I created but never used for cards — it was perfect though.
For the sentiment, I used a piece of brown cardstock so I could ground all the images. I stamped using Juicy Ink and heat embossed with Gold Rush embossing powder and that finished off the card.
Thanks for stopping by! Happy Crafting!
→ SUPPLIES USED ← Some products are provided by manufacturers for review and use. Affiliate links may be used at no cost to you.
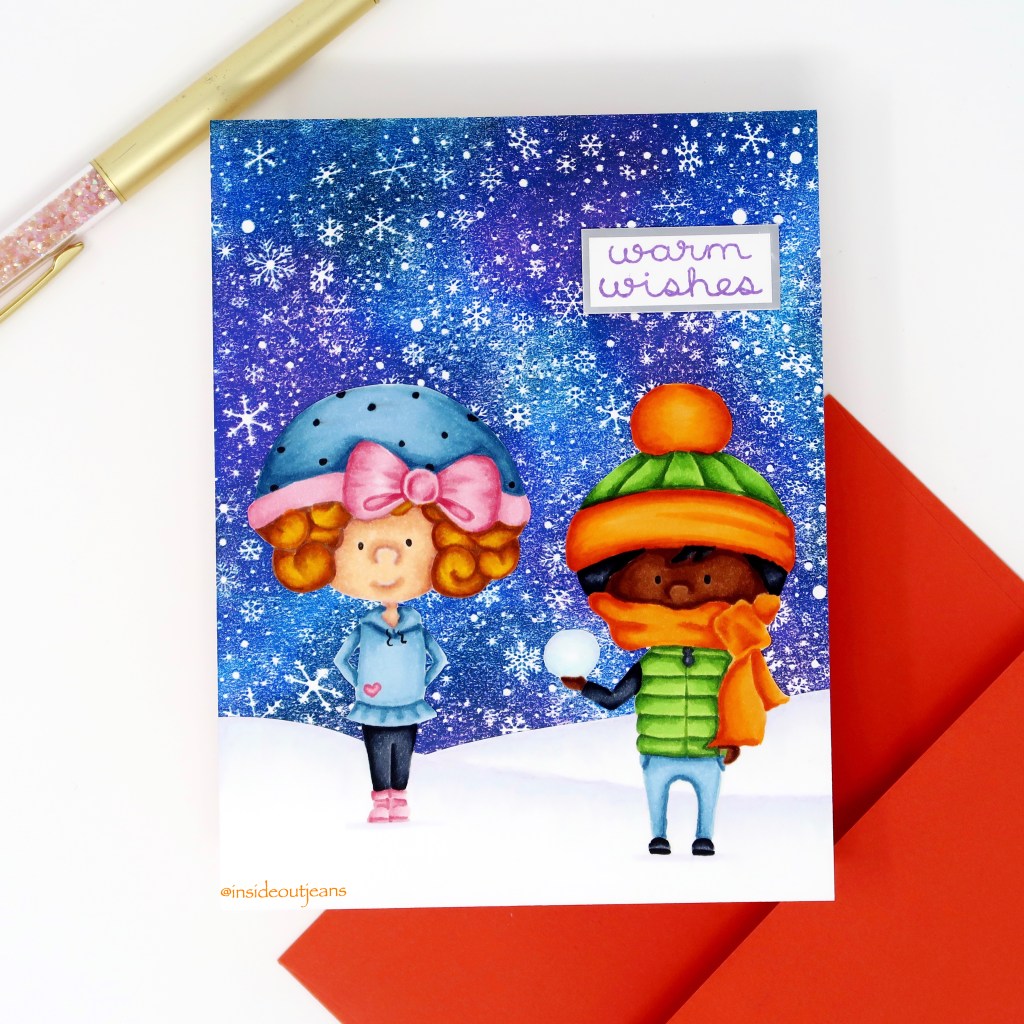
Hi crafty friends! Today, I’m sharing a card featuring Ink Blot Shop’s stamp set called Snow Kids along with Hero Arts Snowflake Swirl Bold Prints.
All my supplies for creating this card will be listed down below (with multiple sources when available) for your curiosity and convenience. Affiliate links used when possible.
I started with the background image by placing it in my Misti. Since this background is a positive stamp that doesn’t stamp the snowflakes, but actually the background. I decided to use Ink on 3’s Atelier Inks, Peacock Blue, My Jam Purple, and Paint It Black with a domed blending tool to place the color everywhere. I did stamp it a few times adding more color to get a darker background to my liking.
For the images, I stamped the two images from Snow Kids using Ink on 3’s Fadeout Ink and did some no line coloring using copic markers. I also ended up adding a snowy ground and fussy cut the image out to place on top of the background.
To add a sentiment, I stamped it using Ink on 3’s Atelier My Jam Purple on a piece of white cardstock and matted it on silver cardstock.
Thanks for stopping by and I hope you got some inspiration to create! Happy Crafting!
→ SUPPLIES USED ← Some products are provided by manufacturers for review and use. Affiliate links may be used at no cost to you.
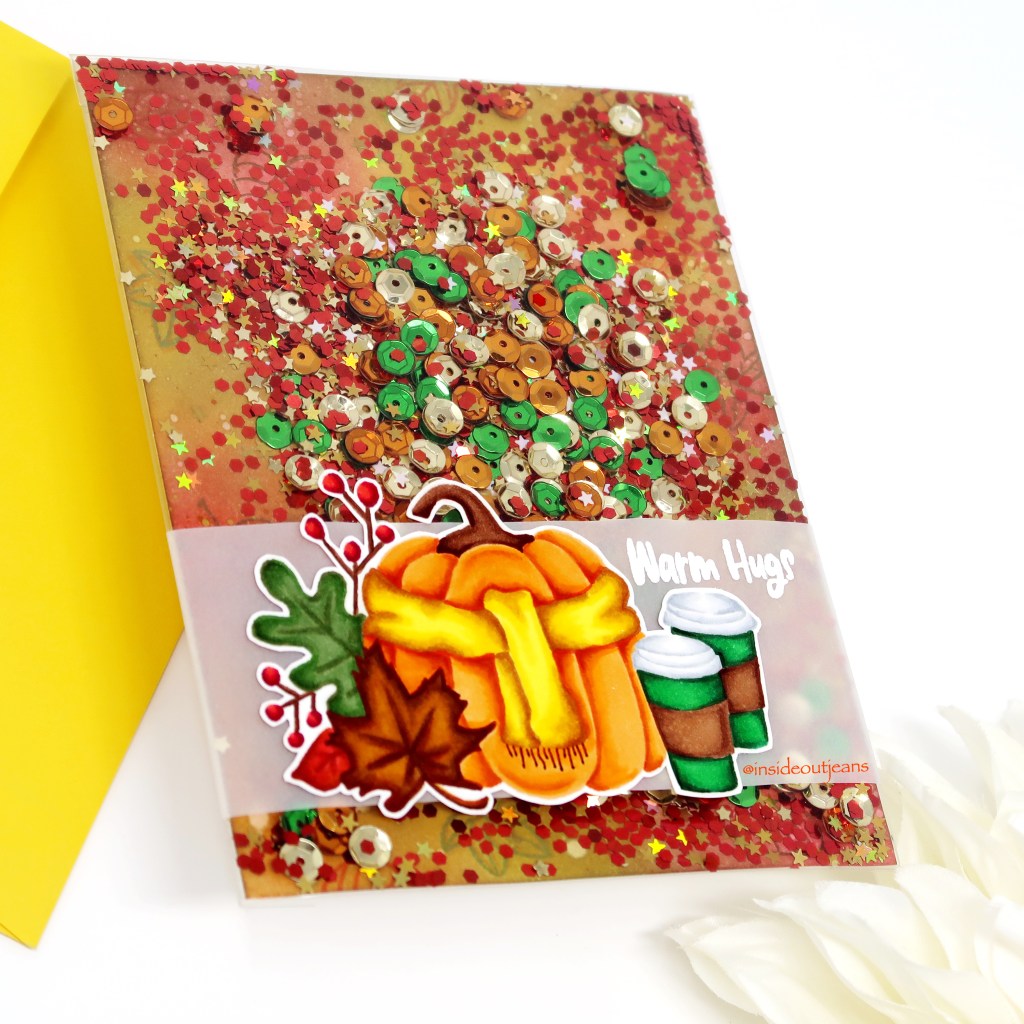
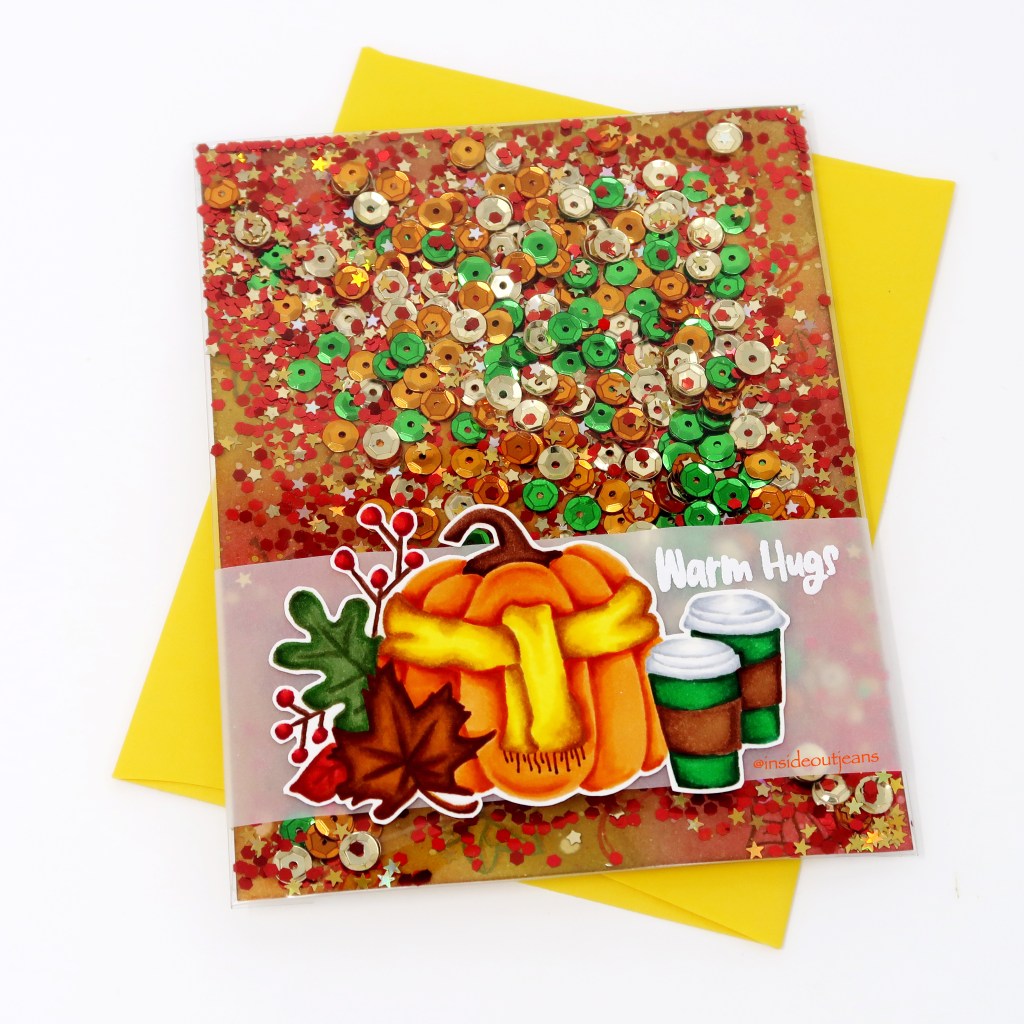
Hi everyone! Today, I’m sharing a card featuring two stamps sets from Not 2 Shabby’s Fall Release. Fall is my favorite time of year and I don’t mind getting a head start on cards to celebrate!
All my supplies for creating this card will be listed down below (with multiple sources when available) for your curiosity and convenience. Affiliate links used when possible.
There’s two larger images in the Pumpkin Spice Everything, and I chose the one that was easier to no-line color. I used a variety of fall colors from my Copic collection (colors listed below) and I love how pretty it turned out. I also went ahead and fussy cut it once I was done.
I create an acetate Using vellum, I stamped the sentiment using Juicy ink and Arctic White embossing powder. For the frameless shaker part assembly, be sure to check out the video.
Thanks for stopping by! Happy Crafting!
→ SUPPLIES USED ← Some products are provided by manufacturers for review and use. Affiliate links may be used at no cost to you.
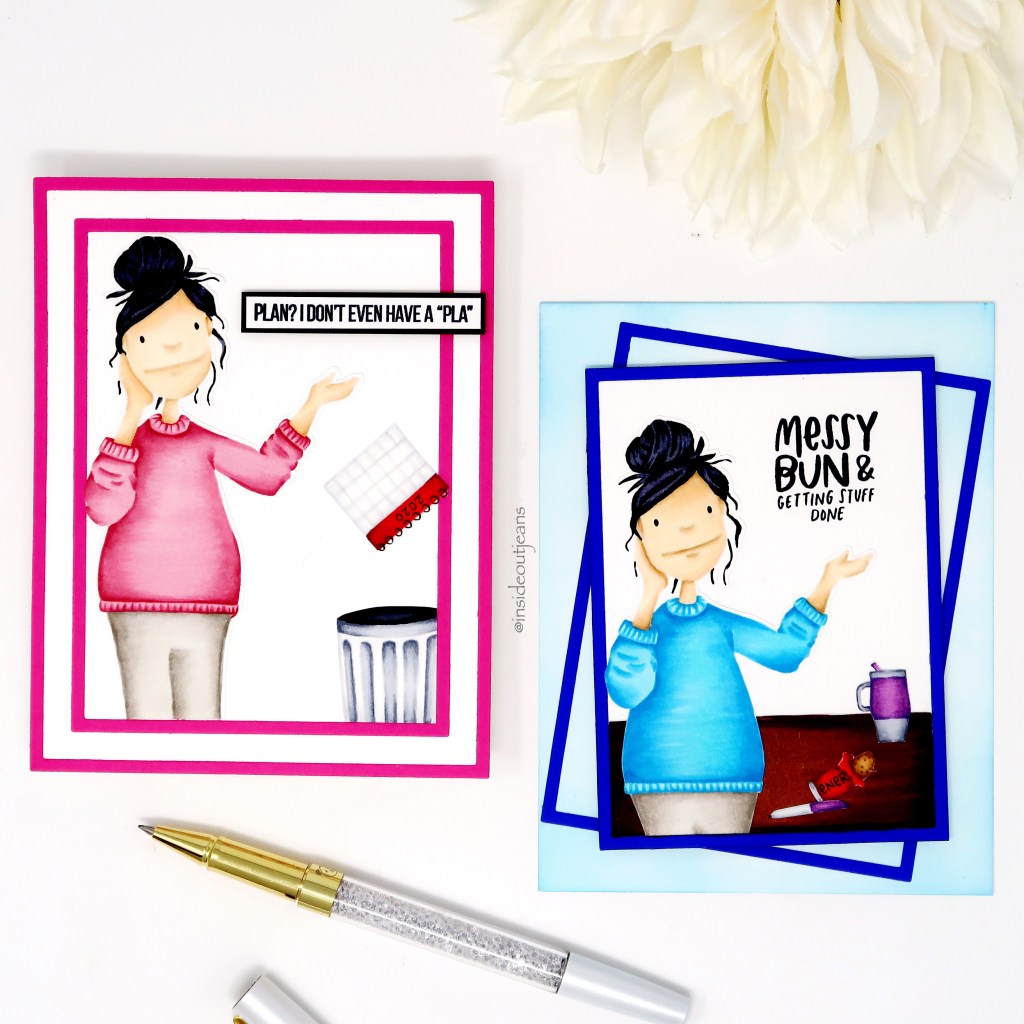
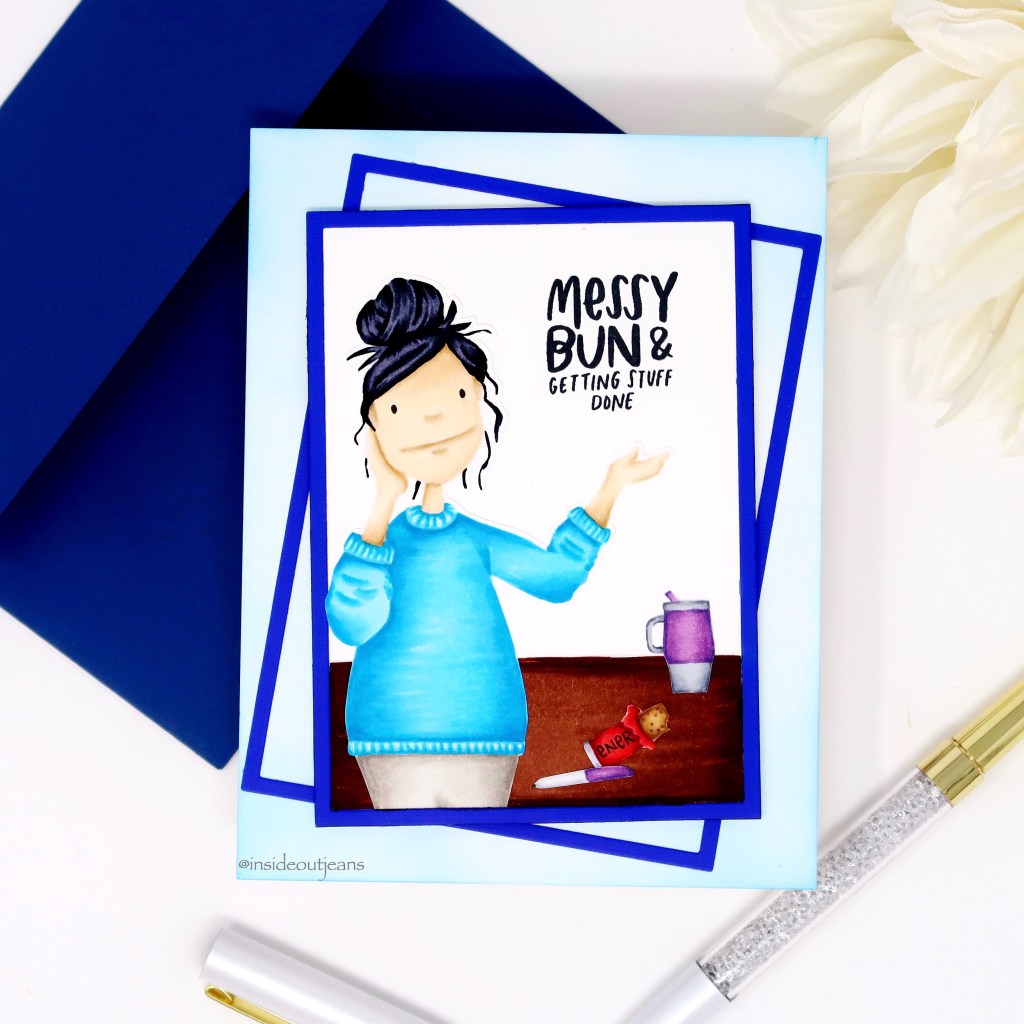
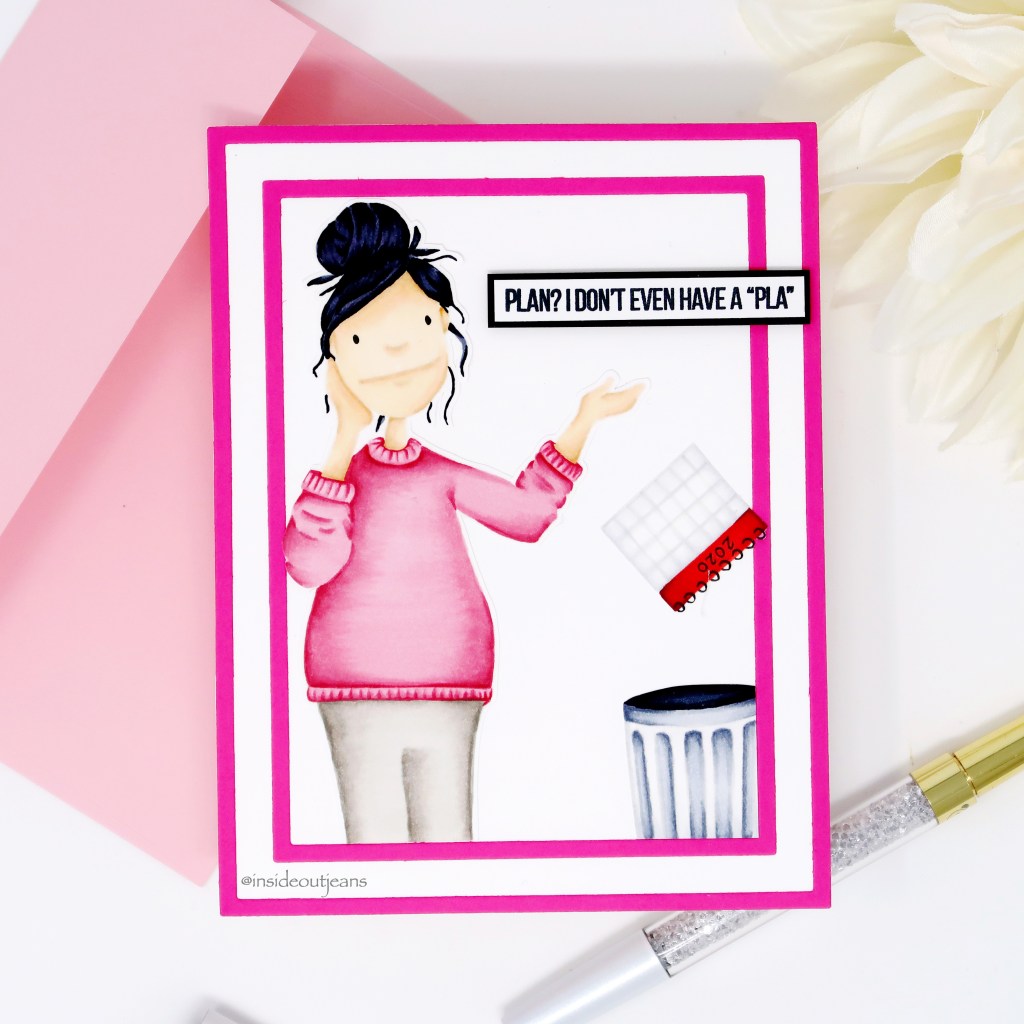
Hi everyone! I’ve been eyeing Essential by Ellen’s Leading Ladies stamp sets for years almost but I never pulled the trigger to buy them because I didn’t know which ones to choose. I finally picked out a few and I’m using Hot Mess Lady for today’s cards.
All my supplies for creating this card will be listed down below (with multiple sources when available) for your curiosity and convenience. Affiliate links used when possible.
I stamped images from the Hot Mess Lady stamp set using Fadeout Ink. Then I colored them up using a variety of copic markers. I really just wanted to sit down and color to de-stress. For me, no line coloring is a lot of fun and always a challenge — it helps me clear my mind. Once I finish coloring my items, I ended up fussy cutting the images.
CARD 2: This one pretty much sums up all my plans I had for the year. I’m a planner so I had all these trips planned out and well, life happens. I added 2020 to the calendar. I also needed a trash can for one of my card ideas, so I stamped the one in Gerda Steiner’s Sneaky Raccoons set and only colored the portion I needed. With Fadeout Ink, I don’t need to mask since the ink is so light anyway, which is also what I did with the calendar. For the sentiment, I used Ink Road’s The One with All the Stamps. Anyone know which Friends’ episode this quote is from? I thought it was perfect.
Thanks for stopping by! Happy Crafting!
→ SUPPLIES USED ← Some products are provided by manufacturers for review and use. Affiliate links may be used at no cost to you.
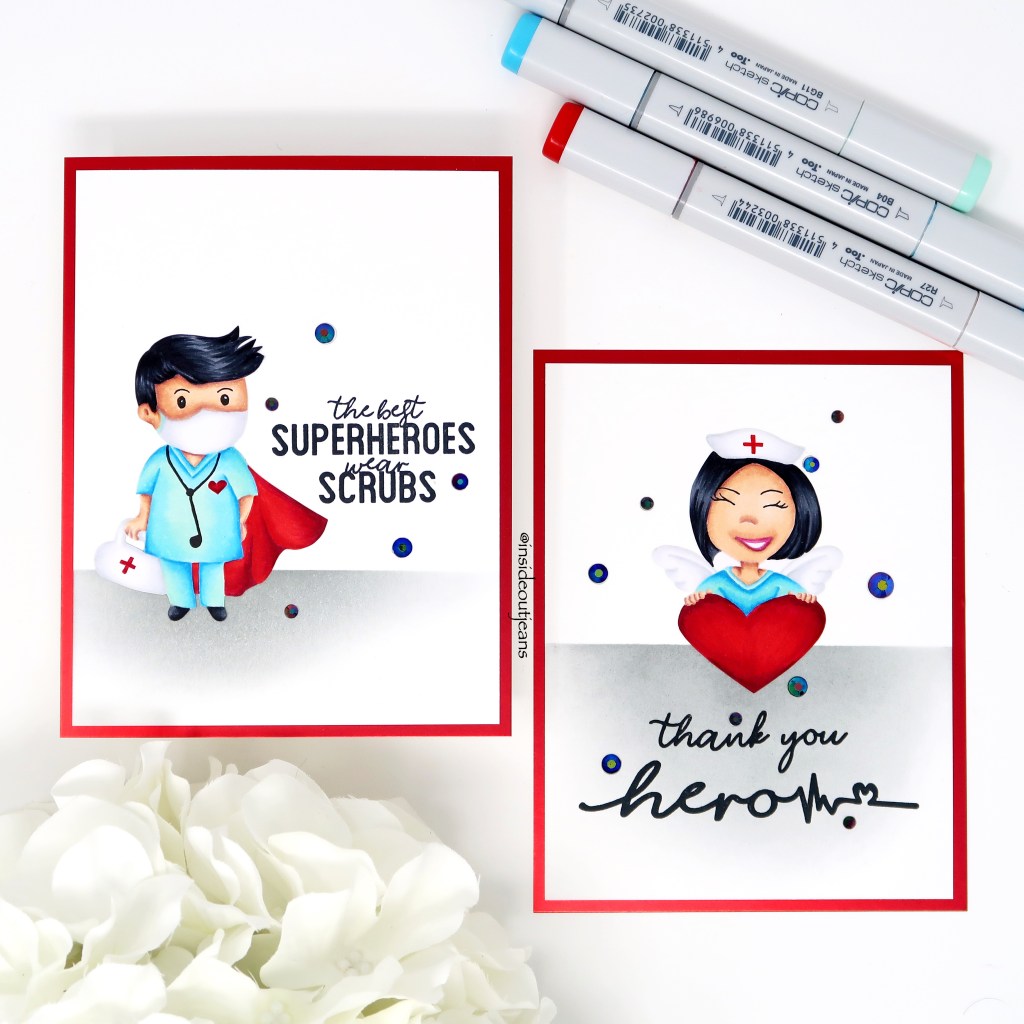
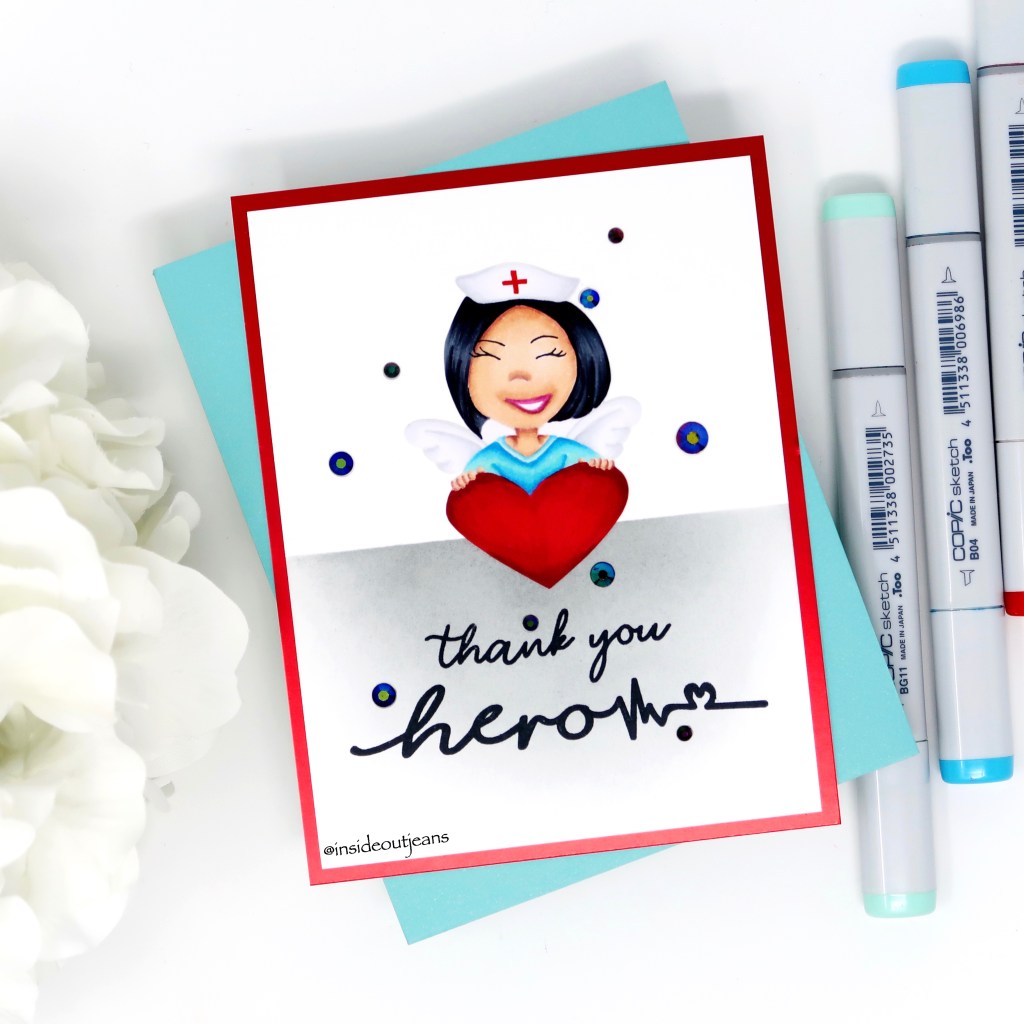
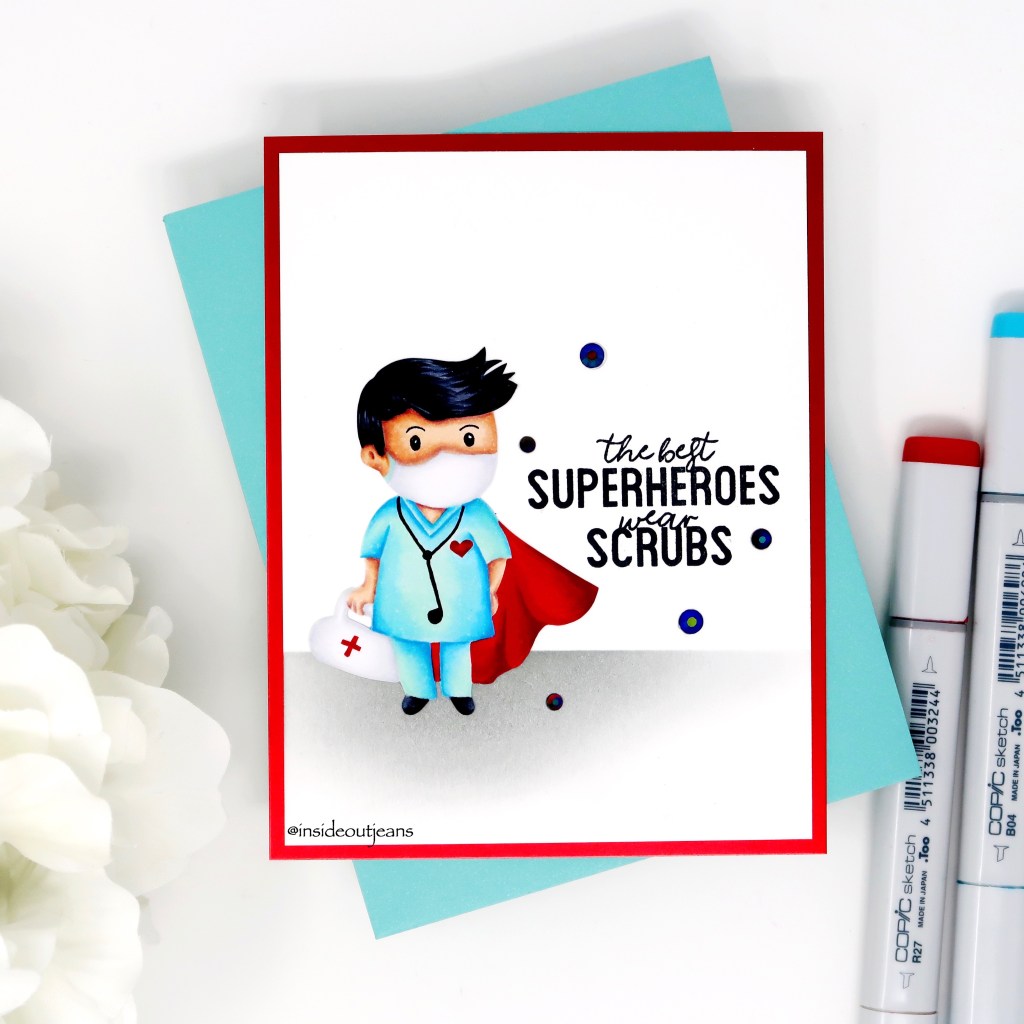
Hi crafty friends! My name is Jeannie (InsideoutJeans) and I’m so excited to be guest designing for Erin Lee Creative today. Today’s post focuses on one of her newest sets, Superhero Scrubs, that is on sale AND a portion of the proceeds go to benefit local Covid-19 relief efforts. Not to mention the fact that they are adorable!
My cards for today are very simple to put together. I stamped these two main images out right away using Ink on 3’s Fadeout Ink and they looked perfect for some no line coloring. I colored both images with similar colors because I wanted to create a two card set. Of course, if you wanted to mass produce these images for essential workers, you could by doing simple coloring but for me, no line coloring is really relaxing.
On both of my card panels, I masked off a line across the card and used dark gray and black distress ink to create a ground for the images. I also trimmed both A2 card panels down a quarter of an inch so it’s 4in x 5.25in so I can mat it on a piece of red cardstock. Since I have a hint of red in both images, it really ties the cards together.
The Superhero Scrubs includes so many fun sentiments that are perfect for creating a card that all you need is the image paired with one of them and that’s what I did here. For the male nurse, I placed him next to the “The Best Superheros Wear Scrubs”. For the female nurse, I used two sentiments: “Hero” and “Thank You”.
To finish off the card, I added a few embellishments just to fill up the white space and I couldn’t help it! I really love how these turned out and I hope you do too.
Thanks for stopping by today and I hope you get inspired to create. Come back again soon for more inspiration and ideas! Happy Crafting!
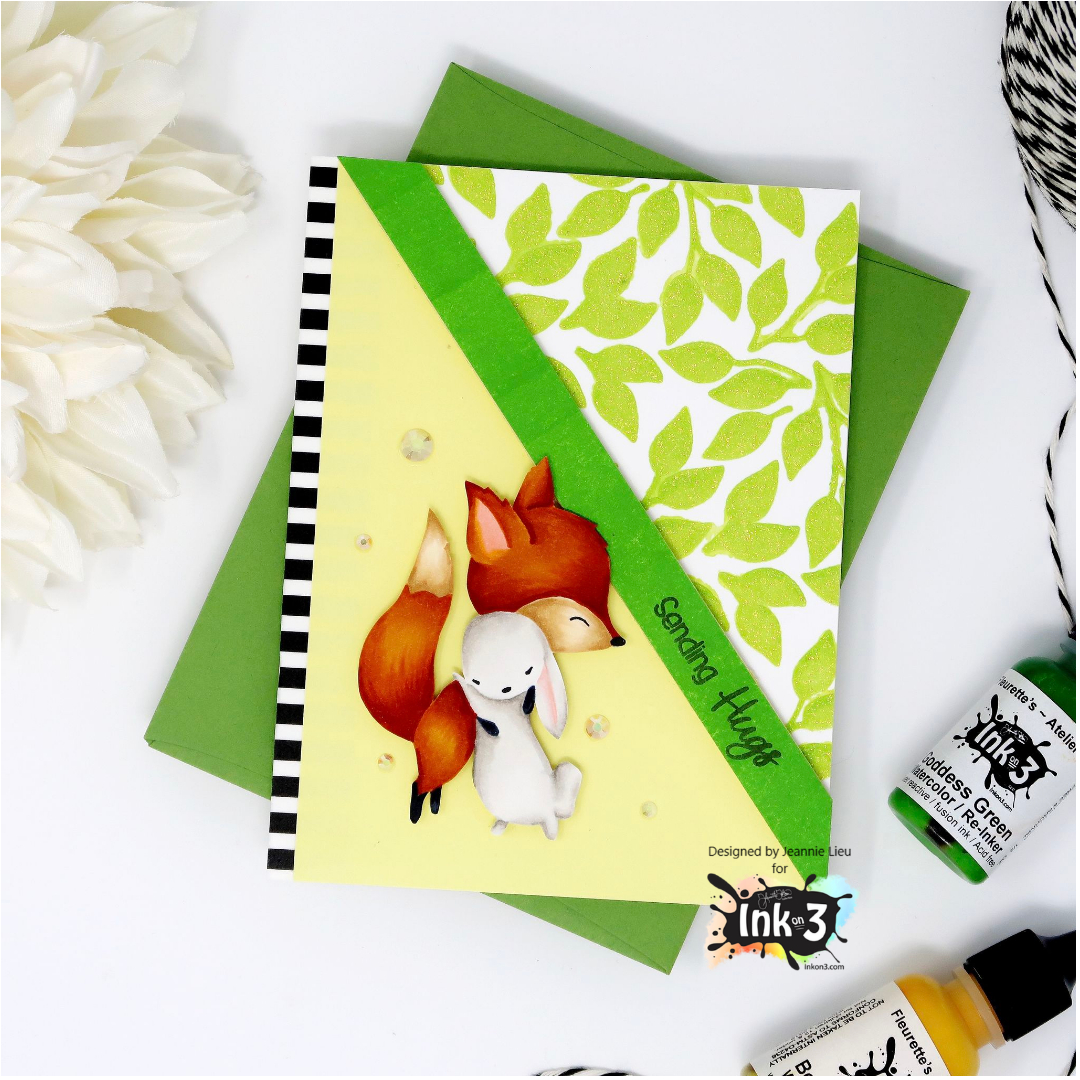
Hi everyone! It’s Jeannie (InsideoutJeans) on the blog today with Ink on 3’s stamp set named Fox and Bunny Hugs stamp set along with the Leafy Forest stencil. These two are part of the new release and there’s a bundle on sale right now, which you can find here.
Also, today is the last day for the 25% sale that Ink on 3 is having in conjunction with the Spread Joy, Not Germs blog hop. Use the code: SPREADJOYNOTGERMS for 25% on the Ink on 3 site.
I have a video for these two cards but generally for both my cards, I decided to use Atelier Inks re-inkers mixed with some shimmer paste, specifically Goddess Green and Bee Sting Yellow with the Leafy Forest stencil. I had leftovers of the shimmer paste mixture so I added the excess a second card.
I colored up the Fox and Bunny Hugs main image stamped in the Blackout ink and Fadeout ink so I could do a normal coloring and no-line coloring. I wanted to create two different looks for the cards.
If you’re interested in all the steps for how these cards came together, come by the YouTube channel for the full process video HERE.
Thanks for stopping by today and I hope you get inspired to create. Come back again soon for more inspiration and ideas! Happy Crafting!
→ SUPPLIES USED ← Items marked with an asterisk (*) were provided by a store or the manufacturer for review and use. All other items were personally purchased. Affiliate links may be used at no cost to you.
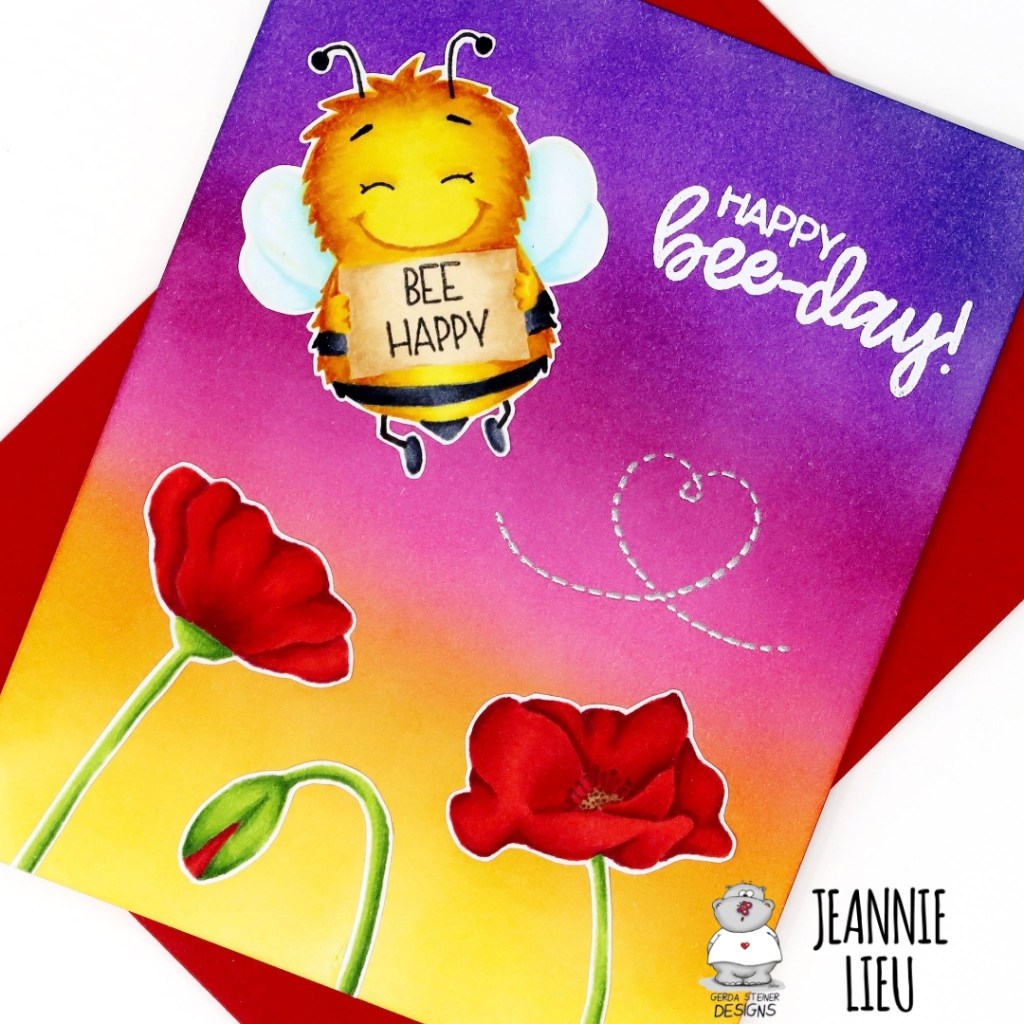
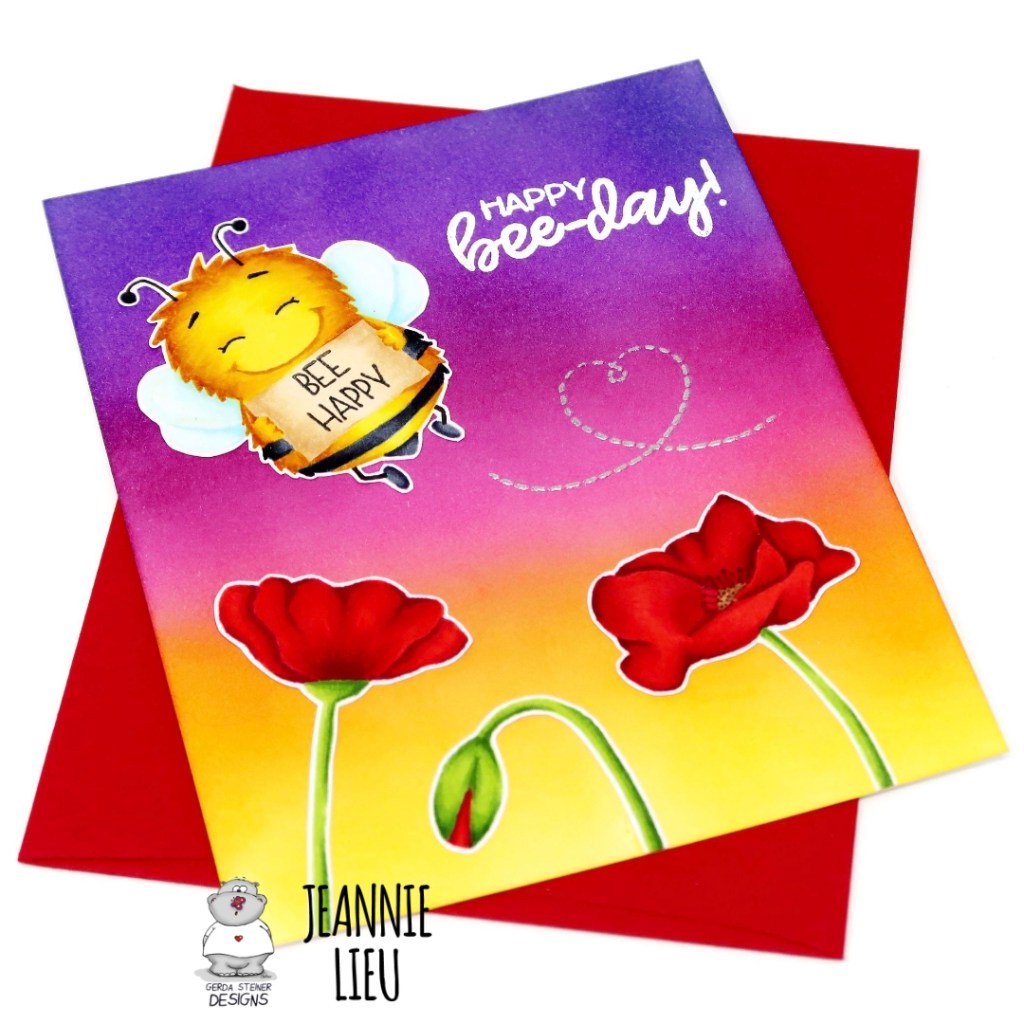
Hi everyone! It’s Jeannie (InsideoutJeans) on the blog today with a preview of a new stamp set one of Gerda Steiner’s newest stamp set named, Happy Bee-Day. It’ll be releasing in a couple of days on March 11.
When I saw this set, I thought that it was already perfectly laid out for a card already and that’s how I decided to create this card. I stamped these out using Ink on 3’s Fadeout Ink for no-line coloring and colored them with Copic markers. Lately, I’ve been really into the no-line coloring and I really like how soft it looks.
I originally was going to have this card as an one layer but with no-line coloring, it was harder to mask. I decided to cut out the images with a thin white border.
To finish off the card, I stamped the sentiment and the little bee trail using Juicy embossing ink along with Artic White and Chrome embossing powder. It made both of them really pop!
Thanks for stopping by today and I hope you get inspired to create. Come back again soon for more inspiration and ideas! Happy Crafting!
→ SUPPLIES USED ← Items marked with an asterisk (*) were provided by a store or the manufacturer for review and use. All other items were personally purchased. Affiliate links may be used at no cost to you.
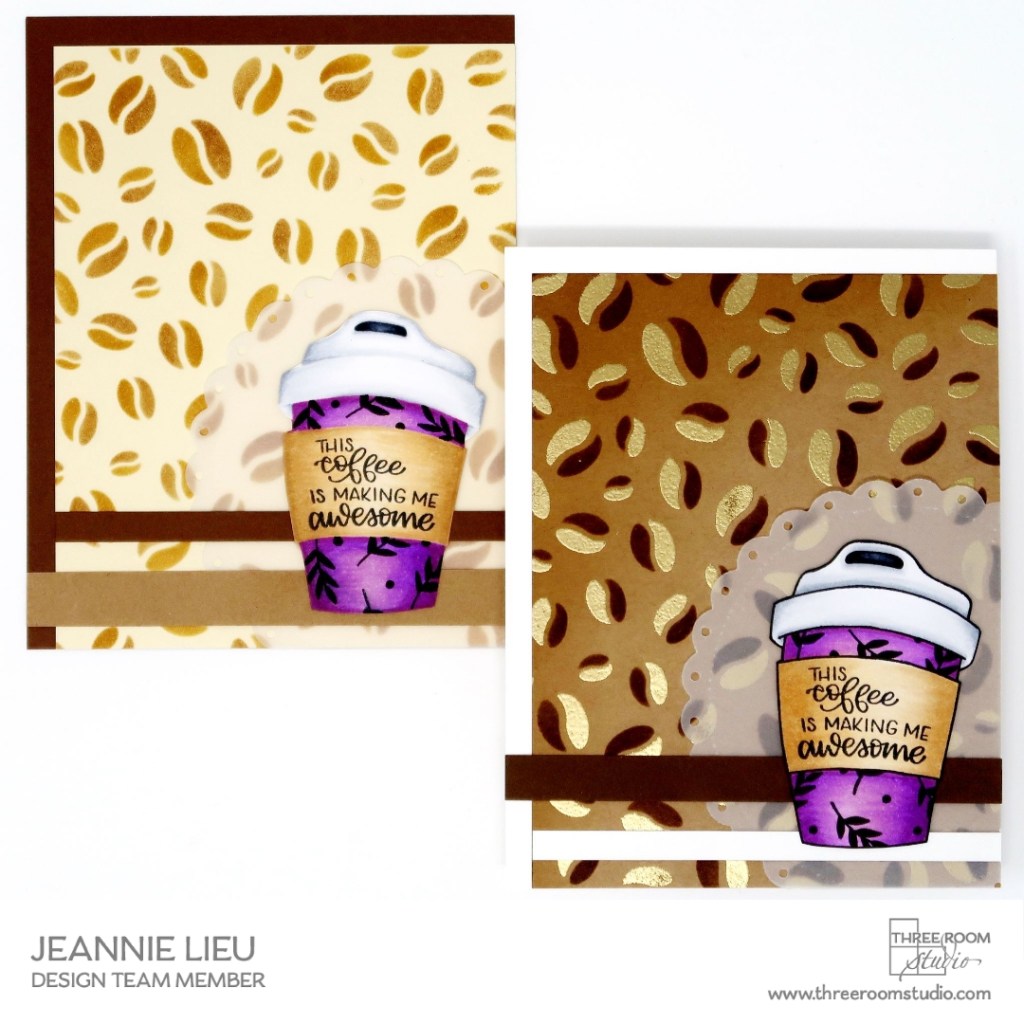
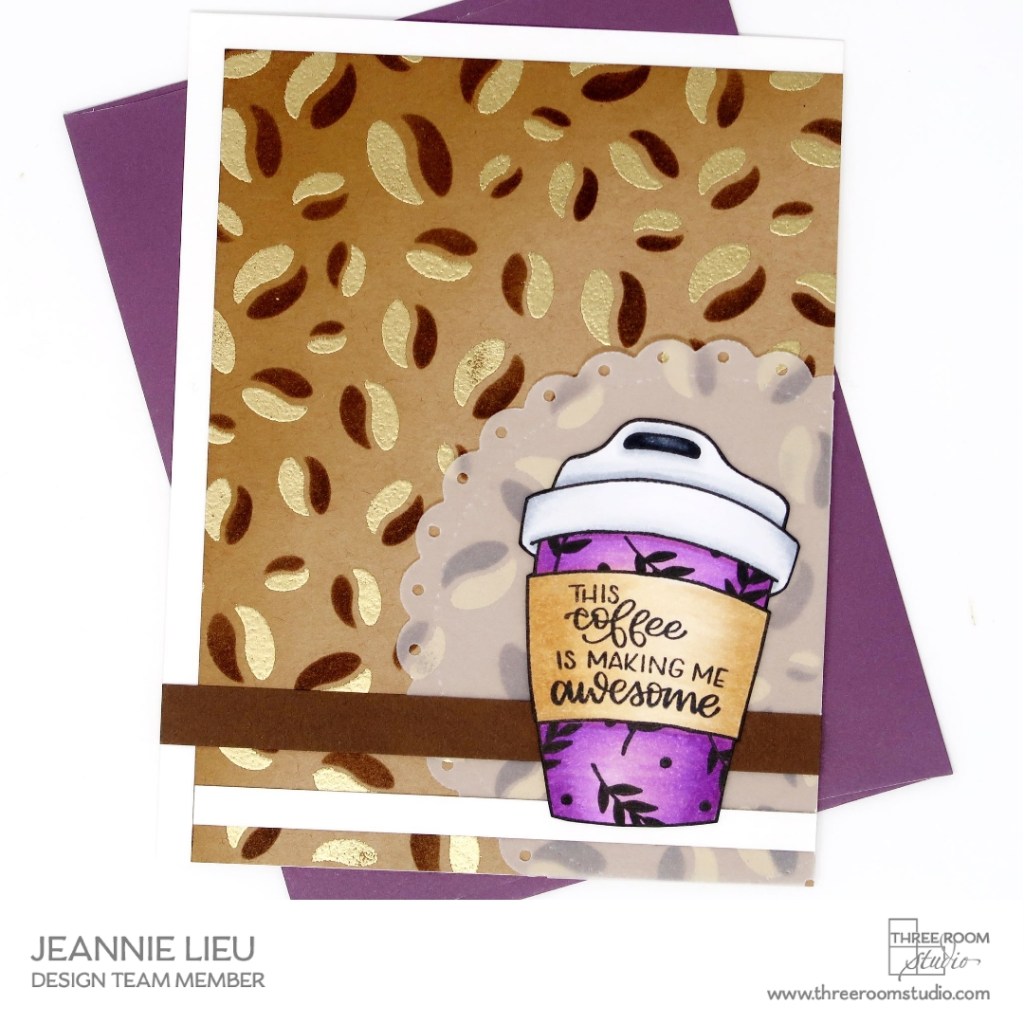
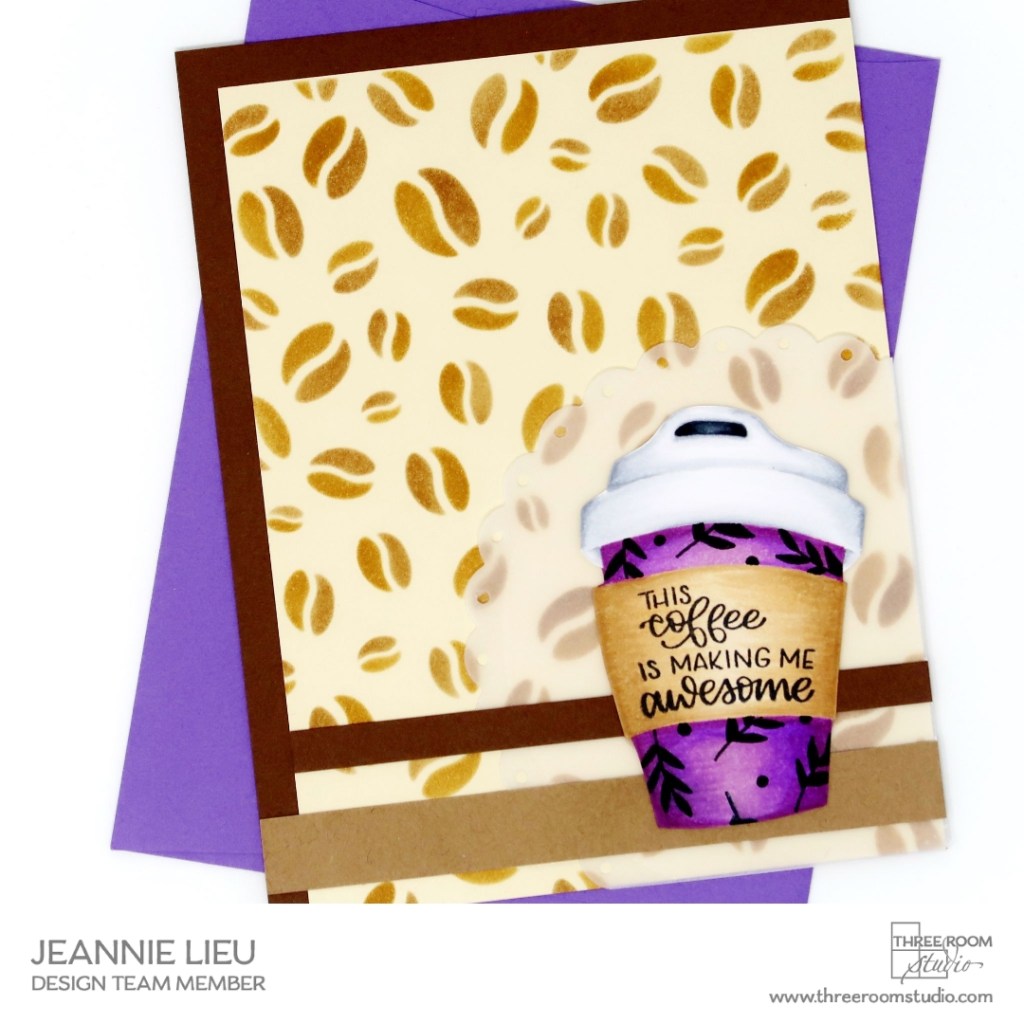
Hi everyone! I’m so excited to join the Three Room Studio design team. I met Sandy, the owner of Three Room Studio, at Creativation and she is such a sweetheart! I’ve admired her stamp designs from afar and finally got a chance to color one of her newest stamp set!
Today I’m sharing a card featuring the Awesome Coffee stamp set, which is a collaboration with The Gray Muse. I’m a coffee lover so I adore this set and you can totally customize it as you see fit!
For today’s card, I decided to stamp out these images in two different ways: Blackout Ink and Fadeout Ink along with a bit of masking to create a design on the coffee cup. I wanted to show you the difference between the two different looks, with a slightly similar card.
For both coffee cups, I used a bit of Eclipse masking paper for the coffee sleeve and for the lid so I could stamp out the little floral images from the Skate Sleep Repeat stamp set.
Anytime I no-line color, I feel like it has a softer overall vibe. For this second background, I wanted to use softer and lighter colors so I went with Brushed Corduroy and Vintage Photo distress inks.
Since both cards have a pretty busy background, I wanted to soften the look of the coffee cup by using Scalloped Frame Circle cut from vellum to go right behind the coffee cup. Aren’t both of these cards awesome?!
I hope you get inspired to create!
Thanks for stopping by! Come back soon!
→ SUPPLIES USED ← Items marked with an asterisk (*) were provided by a store or the manufacturer for review and use. All other items were personally purchased. Affiliate links may be used at no cost to you.
Hi everyone! Happy Valentine’s Day too! I’m generally not a big fan of the holiday, whether in a relationship or not, but I do enjoy the idea of showing someone you love them. So today I’m sharing a card featuring Pretty Pink Posh’s stamp set named, Friends Forever.
I stamped out the images using Ink on 3’s Fadeout Ink because I wanted to do no line coloring with it. I used copic markers for my coloring since I’m most comfortable with them. All the colors will be listed below if you’re interested!
For the background, I wanted an ombre red/pink with a bit of stenciling. I used Ink on 3’s Marilyn Red and blended it using Trinity Stamps’ Blending Buddy. I went in with one light layer, darker on the bottom left corner and blending out to white. Once I finished that layer, I used LDRS Creative’s With All My Heart stencil to add a second layer. I did the same ombre effect with the stencil as well. With the ombre effect, it helped the little couple really stand out.
To finish off this card, I decided to heat emboss the sentiment from the Pretty Pink Posh’s Encouraging Greetings using Ink on 3’s Artic White embossing powder.
I trimmed down my card panel just a quarter of an inch and matted it on a piece of A2 black cardstock.
I love how this card came together and I hope you get inspired to create! Thanks for stopping by! Come back soon!
→ SUPPLIES USED ← Items marked with an asterisk (*) were provided by a store or the manufacturer for review and use. All other items were personally purchased. Affiliate links may be used at no cost to you.