Pop Up Spinner Card | Sunny Studios

Happy Friday!

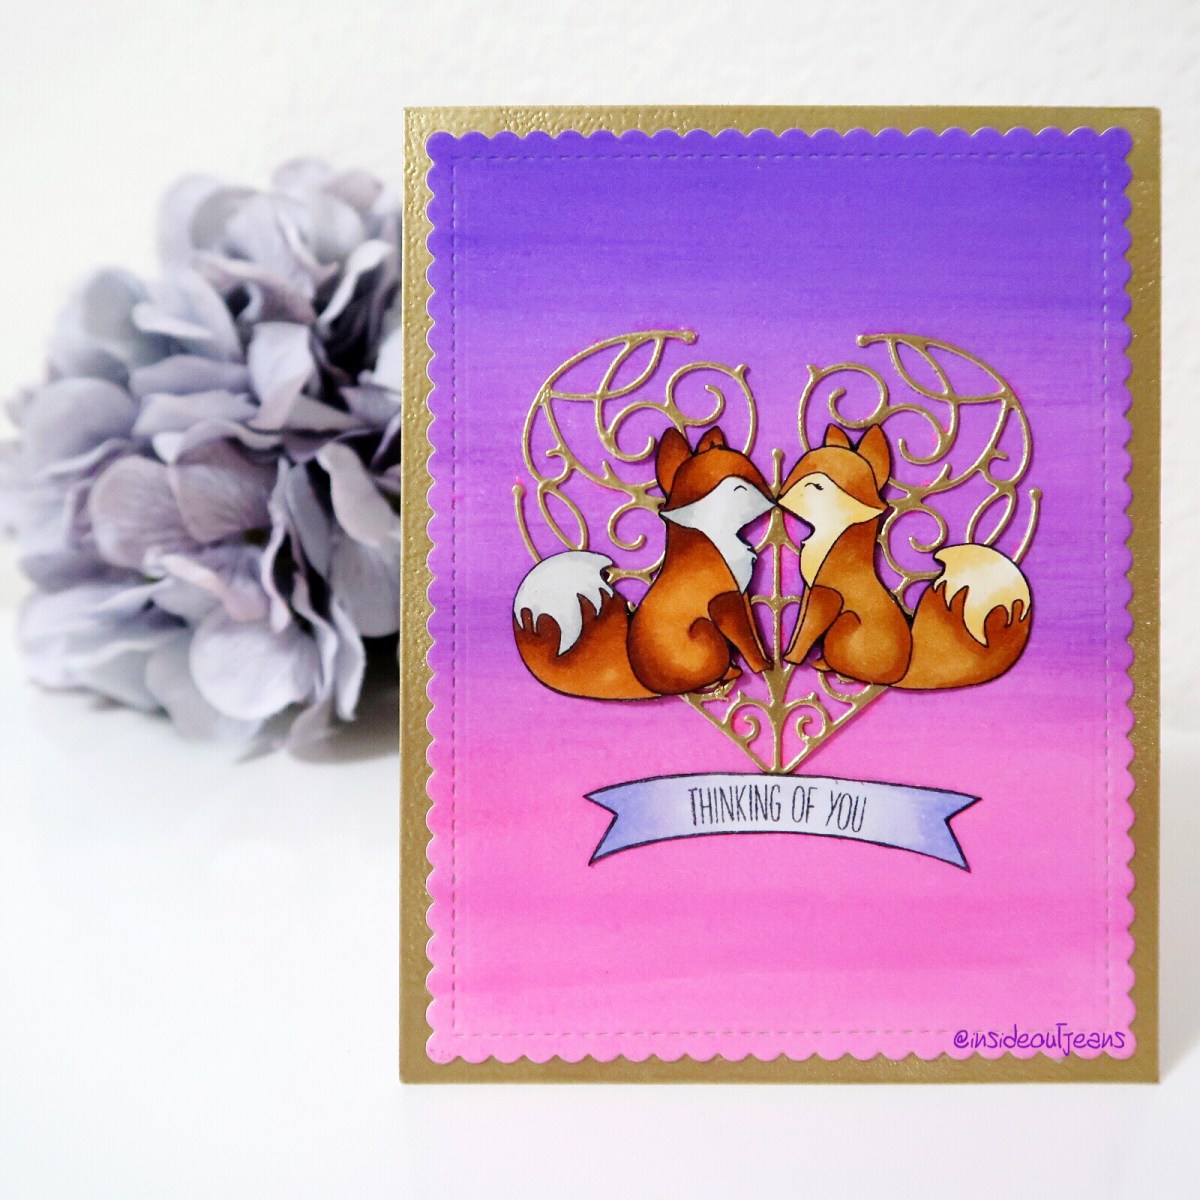
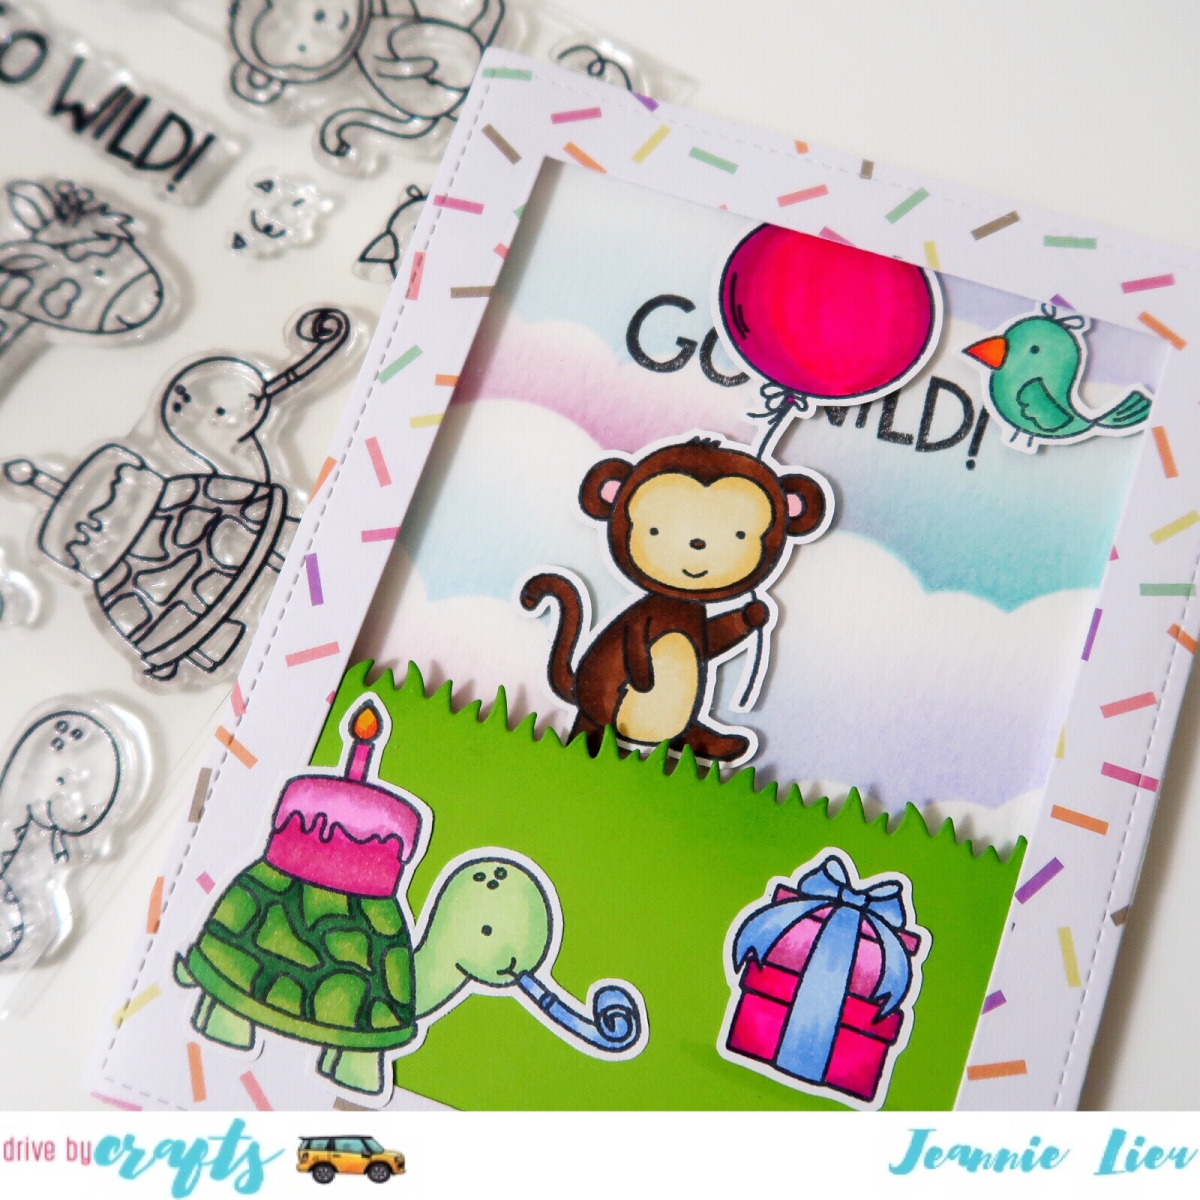
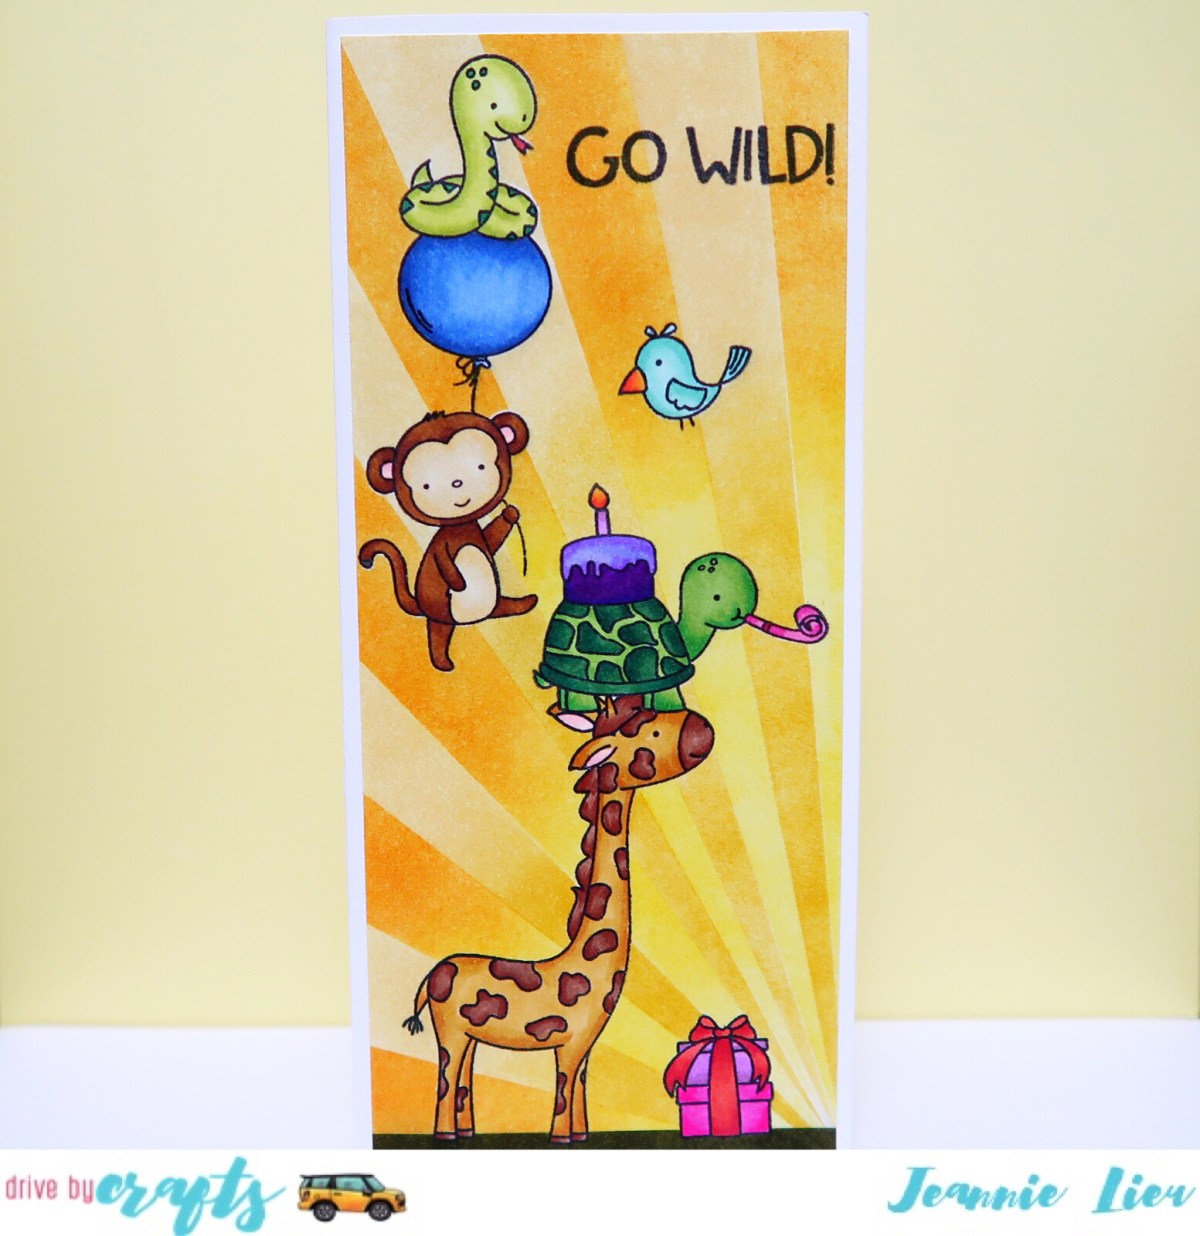
When I first saw this Sunny Studio stamp set, my  mind raced back to the pop up spinner card I did awhile back and I really wanted to redo that card using this set. It’s more or less the same card, but this time, I have a video for it to help anyone recreate the same card.

IMG_0062

There’s quite a few steps to this card because I wanted to use three images, but using just one is just fine as well. The techniques involved is reverse stamping, pop up, and a spinner. It’s a three in one for this card! If you watch the video, you get the basic idea behind the card, and hopefully you can make a similar card as well!

SUPPLIES

Items marked with an asterisk (*) were provided by a store or the manufacturer. All other items were personally purchased. Items below are shown in the order they appear in the video.

DISCLAIMER

Some products are provided by manufacturers for review and use. Affiliate links may be used at no cost to you.

Tri-Fold | MFT Town Bears

Hey there,

Today, I’m on the Drive By Crafts‘ blog sharing this fun tri-fold card. If you wanna see how I came about creating it, check it out here.

007_MFT Town Bear TriFold Folded_WaterMark007_MFT Town Bears TriFold_Watermark

This was a pretty fun card to put together, but there’s definitely more coloring than normal!

Come on back on Friday, when I share a new video and a card I had running in my head for a couple weeks… but never had the time to put it together until now.

Hidden Bookmark Card

Hello all! I’m participating in the Save the YouTuber hop to help out crafters who are affected by new YouTube rules. I’m pretty new to YouTube myself but I enjoy a lot of crafty videos and want to help support everyone. Some of the biggest names in the crafty community along with companies have come together to help spotlight artists that you may have never seen before. After you finishing checking out my video, you can click the link in the video description to move on to the next person. Every video is sponsored so the more videos that you watch and comment on, the better your chances are to win 1 of over 120 prizes. For my video, I’m giving away a $25 Simon Says Stamp gift certificate and 2 Catherine Pooler inks. So be sure to subscribe, like and comment on my video so you have a chance at winning.

I created a hidden bookmark card using Gerda Steiner Design’s Hoppiness stamp set. It’s a card but also contains a bookmark for the recipient to use for a book they might be enjoying. You can remove it from the card and leave the card intact as well so it doesn’t look like anything is missing.

IMG_9670IMG_9669

Check out how I created it at my YouTube and keep on clicking to watch other videos. Thanks for all the support and I hope you enjoy the card and video.

SUPPLIES

Items marked with an asterisk (*) were provided by a store or the manufacturer. All other items were personally purchased. Items below are shown in the order they appear in the video.

DISCLAIMER

Some products are provided by manufacturers for review and use. Affiliate links may be used at no cost to you.

Vellum (or Acetate) Shaker Card

Hi all, I’m up on the Drive By Craft’s Blog today sharing this fun shaker card using their Itty Bitty Shaker Fun shaker bits, and Waffle Flower’s Stay Cool stamp set.

IMG_9575.JPG

I created a half shaker card and used vellum… but once I was done, I wasn’t so sure about it and recreated it using acetate.

IMG_9576.JPG

Head over to Drive By Crafts blog to see how I created this card.

And check out the video I have for this card as well:

SUPPLIES
Items marked with an asterisk (*) were provided by a store or the manufacturer. All other items were personally purchased. Items below are shown in the order they appear in the video.

DISCLAIMER
Some products are provided by manufacturers for review and use. Affiliate links may be used at no cost to you.

Thinking of You

Welcome back! Today I’m sharing a card that I have fallen in love with. I’ve been creating a lot of lovey type cards but these kind of cards can be given at any time to show a person you are thinking of them.

I used The Ton’s Hey Foxy set. It’s a really cute set that features a variety of different foxes paired with a bunch of sentiments. The two foxes that face each other caught my eye. One of them even has eyelashes!

I have been playing around with water coloring. It’s not my go-to medium because I’m a little OCD and watercolors have a mind of their own. It’s hard to predict how a piece will end up and I’m struggling with letting that go. For this card, I decided to use an ombre effect because while I don’t have complete control, I can sort of predict how it’ll turn out. I used four colors from an Artist Loft watercolor palette. This palette is reasonably prices (under $10) and it’s perfect for a beginner like me. I just start by brushing the colors on horizontally from darkest (2 purples) to lightest (2 pinks) and I’ll use my heat gun to dry the paper. Once the paper is dry, I’ll repeat the steps a few times until the color is to my liking. This builds up the color saturation.

When I first saw January’s Hero Arts Kit, I knew the heart die included was something I had to play with immediately. It was just so intricate, delicate and pretty! I die cut this out and inked it up with Versamark ink. Using Hero Arts’s gold embossing powder, I cover it up and heat embossed it. It looks AMAZING!

I wanted the edges of the card to match the heart, so I also heat embossed that. I used My Favorite Things Blueprint 27’s scalloped frame for the watercolor background. It was perfect because it cuts smaller than a typical A2 card and the heat embossed edges peek out.

Once I put this card together, adding a sentiment at the bottom, I knew I was in love with how this card turned out.

image1.jpeg

What do you think!?

I also have a video to show you how I made it:


SUPPLIES
Items marked with an asterisk (*) were provided by a store or the manufacturer. All other items were personally purchased. Items below are shown in the order they appear in the video.


DISCLAIMER
Some products are provided by manufacturers for review and use. Affiliate links may be used at no cost to you.

Floating Slider Card | Neat and Tangled Wild Ones

Hi all, I am sharing this card that I created for Drive by Crafts and I had gotten a lot of questions about this type of card so I finally got around to filming it. I really love interactive cards, so please check out my post for all the details Drive by Crafts’s blog.

IMG_9347.JPG
To create this card, you will need the following: 

  1. 4.25 x 5.5 card base with a .75 inch border
  2. Slider mechanism – 4.0 x 5.5, with two slits (1/4 from the edge)
  3. Pull tab – 3.75 x 6 inches
  4. Acetate piece, 3.25 inch in width
  5. Folded card base
  6. Foam tape

Spectrum Noir colors:
Monkey: EB1, TN 2, TN7, EB5, PP3
Balloon: BP2, BP4, BP5
Turtle: LG3, LG4, LG5, TB1, TB2
Bird: GT2, BT4, OR2, OR1
Cake: OR1, OR2, PL2, PL1, PP6, PP4
Present: TB3, TB1, BP6, BP4, PL2, PL1

IMG_9348.JPG
For full instructions on how to create this card, please check out my YouTube tutorial.

SUPPLIES
Items marked with an asterisk (*) were provided by a store or the manufacturer. All other items were personally purchased. Items below are shown in the order they appear in the video.

DISCLAIMER
Some products are provided by manufacturers for review and use. Affiliate links may be used at no cost to you.

Oh Manatee! – with Zig Coloring

Hi all! I’m stopping by today to share a fun card with you. To be honest, I wasn’t sure what I wanted create at first. I actually stamped all the little manatees and colored them in, not knowing. Eventually, I thought an underwater scene would be perfect for them and I ran with that idea.

I knew that I wanted the kelp to be a large part of setting the scene and I wanted to incorporate it with the animals. I thought it would make it super cute where if one of the manatees could peek out. This part was a bit difficult as I had to fussy cut it the kelp but in the end, it was totally worth it.

I used watercolor paper since it is thicker and in doing so, I wanted to use my Zig Clean Color Real Brush markers. I actually grabbed all the blues and drew wave-like lines all over the background. Then using a water brush, I just ran it over the lines and blended a little. It literally took me less than a couple of minutes to do this. I think it does give it a very soft ocean look since there are so many different shades of blue.

IMG_9189.JPG

What do you think? Anyway, I hope you enjoy the card.

→ SUPPLIES ←

Items marked with an asterisk (*) were provided by a store or the manufacturer. All other items were personally purchased. Items below are shown in the order they appear in the video.

→ DISCLAIMER ←

Some products are provided by manufacturers for review and use. Affiliate links may be used at no cost to you.

GSD- DIY Stencil & Masking Backgound

Hi all, I’m back to share another card using the Valentine Penguins. I really love this set, the penguins are just adorable!

This time, I’m using a super simple technique to create a unique background.

I started out using a heart punch that I had and punched a heart in a piece of paper. The negative space was perfect to color in hearts, using distress inks, directly to the card. Next, I used the punch and full adhesive post its to create masks. I masked off all the hearts I colored and used one of the masks and distress ink to create a negative heart space.

I think by using both the negative space from the punch and the actual image to mask, it creates a unique background. It’d be really hard to replicate.

IMG_9092

For an actual peek at what I did, I’m including my youtube tutorial below.

YouTube – GSD Valentine Penguin | DIY Stencil & Reverse Masking

SUPPLIES

Items marked with an asterisk (*) were provided by a store or the manufacturer. All other items were personally purchased. Items below are shown in the order they appear in the video.

DISCLAIMER

Some products are provided by manufacturers for review and use. Affiliate links may be used at no cost to you.

Love Cynthia – Hidden Slider

Hi everyone! I just had to share this fun card I made. It was one I created for my coworker who is leaving. She loves all the superhero movies, and why not make her into one! The best part is that she flies!

I used distress inks to color the background and the cloud on top. Using a white gelli pen, I scattered stars everyone. I die cut a retired Clearly Besotted item for the cityscape, so it was so easy to put this card together. The clouds on the top of the card hide the slider, so the little girl can move freely and look like she’s flying.

IMG_9080.jpg

Here is the video tutorial too:

Hope you enjoy this card. I think it’s one of my favorites so far!

SUPPLIES

Items marked with an asterisk (*) were provided by a store or the manufacturer. All other items were personally purchased. Items below are shown in the order they appear in the video.

DISCLAIMER

Some products are provided by manufacturers for review and use. Affiliate links may be used at no cost to you.

Warning! This Set Contains Magic

I’m back to share a fun, magical card, using the Planner Street set,  “Warning: This Set Contains Magic”. I’m definitely bit of a girly girl who loves unicorns and glitter. Naturally, when I first saw this set, I just knew I had to combine the two!

In creating this card, I started by coloring and fussy cutting three of the images and heat embossing the sentiment onto my pink background. I chose a glitter cardstock for the frame. After all, there’s no such thing as TOO much glitter.

Inline image 2I wanted the unicorn to move around in the card but only in the middle of it. By using clear thread to hold the unicorn, you can’t really see it and it makes the unicorn look magical since it moves on it’s own in the middle of the card. I added foam tape around the card, which will be hidden by the glitter frame. The string will be sandwiched between the layers of foam tape.

Inline image 3Since I’m using pretty small glitter, I want to make sure the foam tape isn’t sticky so I made sure to use a powder tool around the frame. Once it was ready to go, I added sequins and glitter. As all crafters know, glitter is naturally clingy and gets everywhere. It still got everywhere but it wasn’t as bad as I anticipated.

Inline image 5I attached acetate to the frame and placed the frame on top of the foam tape. Once that was complete, i just needed to decorate the front with my remaining images. To make things easier, I used a Xyron sticker maker which adds adhesive to the back of my images, essentially creating a sticker.

Inline image 6

Voila! This fun card has glitter and sequins shaking throughout AND the unicorn moves. It’s a super fun card, don’t you think?

Inline image 7Hope you all enjoyed this fun, glittery card! Until next time…

SUPPLIES

Items marked with an asterisk (*) were provided by a store or the manufacturer. All other items were personally purchased. Items below are shown in the order they appear in the video. 

DISCLAIMER
Some products are provided by manufacturers for review and use. Affiliate links may be used at no cost to you.