I started off this card wanting to stick with fall colors and I did just that but I definitely wanted the little girl to pop so I opted for a soft border. I ended up using watercolors to achieve this look and it looks amazing!
All my supplies for creating this card will be listed down below (with multiple sources when available) for your curiosity and convenience. Affiliate links used when possible.
It’s been a really long time where I was super excited about making a card — so excited that I stayed up late and woke up early to finish it off. Partially because it’s really been a long time since I dedicated time to making something just for me and partially because Ratatouille is one of my favorite movies. Yes, I am entering it into a contest and that’s what spurred it on but let’s be real, it’s been awhile since I got a chance to raid my stash looking for pieces to put a card together. Note: I am so sorry that some of these sets are no longer available as I had to use a bunch of different pieces to pull this card together.
Initially, I had a completely different idea for a card using the recent coffee card kit but I nixed it because of photography reasons (it is being entered into a contest after all and acetate is incredibly hard to photograph). I pulled a ton of items from my MFT stash and the Recipe for Happiness set is such a classic, which I’ve had for years but never used. I also pulled out Mice Day to Celebrate, which is also incredibly adorable and similar to Recipe for Happiness, been in my stash but never used. Then it just clicked. Ratatouille. I’ll make a scene from Ratatouille.
Paired with the coffee card kit (sold out but can be purchased separately) I purchased, I could easily use the pieces to create a restaurant scene versus a coffee shop. Long story short, I nixed the restaurant scene and went for a inside the kitchen scene instead and took some liberties with it.
Here’s a breakdown of how I pulled this card together.
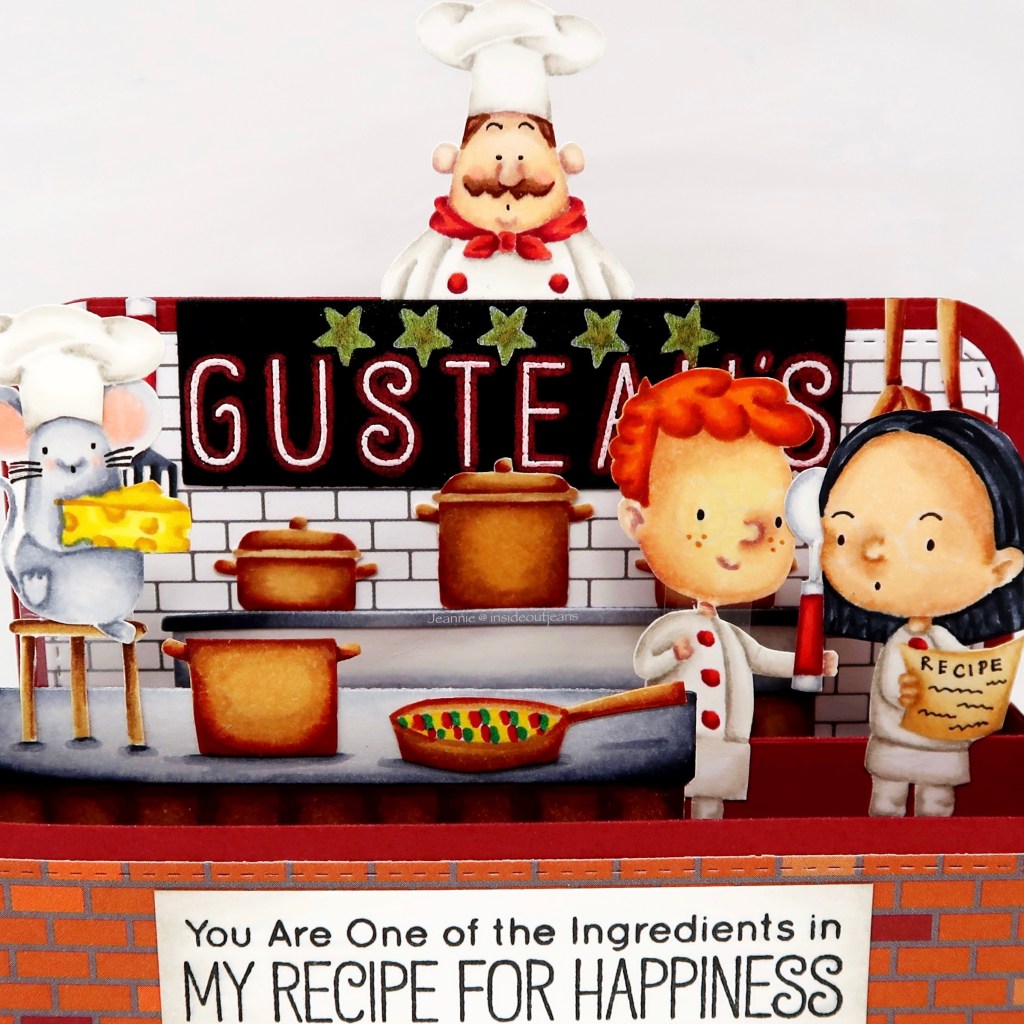
In the movie, there’s a sign for Gusteau’s which is shown multiple times and I thought it was iconic to make it recognizable. I used the Make a Sign Die-namics to stamp and heat emboss the Birdie Brown Alphabet & Numbers spelling out the restaurant name in white embossing powder. I took a red colored pencil to carefully outline it so it has a glowing look. I only used the interior of the sign and it was the perfect size for the name. For the stars, I had to search around for a set that had stars that would fit and the Blastoff Buddies stamp set, that I used for another card entry, had it! Of course, the famous Gusteau here will be the chef from the Recipe for Happiness stamp set.
Kitchen Items
For the kitchen, this was really easy to create since a lot of kitchen items came from the Recipe for Happiness stamp set. I used almost every single of of the smaller images to decorate the kitchen. The pans hanging in the back, the spatula, whisk, along with the pots and pans on the stove. For one of the pans in the front counter, I had to draw int the iconic namesake dish, Ratatouille. For the kitchen stove and counter, I used the Bistro Basic Die-namics. It was the perfect size for this card and I was so giddy!
Linguine & Collette
When I was thinking this part through, Linguine and Collette led me to do no line coloring for the entire scene so I could easily manipulate the images as there were no other chefs in Recipe for Happiness. Adorable Adventures had images of characters that were the closest for what I imagined for my scene. I used the “map” for Collette to change into a recipe card and I swapped out Linguine’s “walking stick” for a Recipe for Happiness spoon. For both, I didn’t add in their glasses, which was more true to character, and put them into a chef’s outfit with aprons to boot. I was so happy this turned out well!
Remy aka Little Chef
As mentioned previously, the Mice Day to Celebrate stamp set set off my creative spark but once I had most of the pieces together, this is where I struggled… all the mice in this set were just way too proportionally large, even if you played with the depth of the kitchen with the box card. It doesn’t really matter in the card making world but it did to me. I went through my sets once again looking for a critter that could work and lo and behold, in the Birthday Buds stamp set, there was a little mouse with a party hat holding cheese with a candle! It was perfect for this card and perfect in size. Since I was no line coloring, this was easy to just not color in the candle or the party hat, which I swapped out for the chef’s hat in Recipe for Happiness. It came together so well! I also decided that, like in the movie, he needed a little stool to stand on top of since, well, he’s a mouse. I used the stool from the Mice Day to Celebrate set.
To finish off this card, I used a sentiment from Recipe for Happiness and it was so fitting for the entire little scene. I was absolutely over the moon with how this card turned out! Yes, it will be bigger than a “mini slimline” size for a card because of Gusteau peeking over, but I don’t care. Card sizes shouldn’t limit your creative and you can always create a custom envelope for any size card!
Hopefully this post answers any questions you may have about this card and all it’s components! I’ll have all the supplies listed down below and again, some items are retired but if they were available somewhere, I will have them listed.
Sometimes when you have a really pretty, layered die, you can definitely keep it simple to pull together a quick card. Honey Bee Stamps has a ton of items in their “Lovely Layers” die cut line and this one is a great one for a mass production of Christmas cards, don’t you think?
All my supplies for creating this card will be listed down below (with multiple sources when available) for your curiosity and convenience. Affiliate links used when possible.
When I have a really pretty background, I feel really sad when I need to cover it up. My solution is usually to use a vellum die cut, which works well to not fully cover it up.
I thought it would be fun for a colorful accent border featuring these broomsticks. I know not all the colors blend perfectly together but if you’re careful enough, no blending is necessary. I thought it turned out perfectly.
All my supplies for creating this card will be listed down below (with multiple sources when available) for your curiosity and convenience. Affiliate links used when possible.
Water based markers like Tombows are really easy to create a quick background. I scribble it on watercolor paper, use a wet pen and move all the colors around. It’s a really fun way to use your markers like watercolors.
All my supplies for creating this card will be listed down below (with multiple sources when available) for your curiosity and convenience. Affiliate links used when possible.
Those McDonald Halloween buckets totally bring back childhood memories. I was able to collect all three but man, was it super difficult. I guess everyone wanted them a piece of their childhood as well — but here’s the next best thing in paper form and it’s super adorable and easy to assemble!
All my supplies for creating this card will be listed down below (with multiple sources when available) for your curiosity and convenience. Affiliate links used when possible.
Galaxy background always look a mess until they don’t. I use it here for a fun background with an added layered element that has windows for these cute monsters!
I kinda love stamp sets that allow you to create your own unique designs, which basically means that you have endless possibilities. Since that doesn’t need much explaining, I’m sharing a few tips along the way.
Before making this card, I made another one because I wanted to add all three of the squirrels from the Squirreling Around stamp set but I’m not sure about it. For this card, I tried a bit of restraint and just went with two. I really wanted the focus on them, so I did some tone on tone stenciling at the bottom of the card to let them shine.
Most of the time my sentiments are the last thing on my cards — but here, I stamped everything all at once to make sure that I have it placed properly. It helps set up where I want to stencil my partial background for a one layered card.
All my supplies for creating this card will be listed down below (with multiple sources when available) for your curiosity and convenience. Affiliate links used when possible.
It’s fall and everything is usually very muted BUT I couldn’t help but add some glitter with a subtle background for this card. I also love the pops of color of the traditional pumpkins but had to sprinkle in some green for pops of color.