Paper scraps? Die cut shapes? It’s a perfect pairing. I love that you can use any color you want and it works really well with any possible sentiment right in the middle! It’s a simple card and one you can easily mass produce and use up your scraps at the same time.
All my supplies for creating this card will be listed down below (with multiple sources when available) for your curiosity and convenience. Affiliate links used when possible.
When I started making cards, I used to make a point of sending out cards for birthdays and I would customize it to the person I was sending it to… but of course, after awhile, I just didn’t have the time. I’m trying this year to bring it back and along with it, sending out a card to someone who follows my cardmaking journey! Add your name here!
All my supplies for creating this card will be listed down below (with multiple sources when available) for your curiosity and convenience. Affiliate links used when possible.
I tend to always stick with an A2 card but sometimes, you just need a bigger card! I wanted to use the Mitten Shaker die but what good is just one mitten? I wanted to use two and that required a bigger card. Also — it’s it so cold right now? How cold is it where you are?
All my supplies for creating this card will be listed down below (with multiple sources when available) for your curiosity and convenience. Affiliate links used when possible.
I couldn’t resist using hot pink foil on black… but I really didn’t want the full panel of just hot foil. I decided to pair it with some heat embossing for a super subtle background. It really didn’t need anything else except for a sentiment, and why not a lovey dovey one!
All my supplies for creating this card will be listed down below (with multiple sources when available) for your curiosity and convenience. Affiliate links used when possible.
I took a coloring request from TikTok and here it is! Of course, you can color as your heart desires but this is how I would color a mason jar. And sometimes, I change it up as well. There are no rules with coloring!
It’s a little too long for both Instagram Reels and YouTube Shorts but you can find the video on TikTok:
Replying to @RaeRaeRachel How I color a mason jar with copicmarkers. Remember – you can color however your heart desires. The white gel pen really finishes it off for a glassy look. #coloring#stamping#prettypinkposh
All my supplies for creating this card will be listed down below (with multiple sources when available) for your curiosity and convenience. Affiliate links used when possible.
The holidays are over, but we all have those seasonal sets that we got over the past couple months. You kinda forget that you can use them for something other than the holidays by changing up the sentiment and I personally love using them for winter cards like this one!
All my supplies for creating this card will be listed down below (with multiple sources when available) for your curiosity and convenience. Affiliate links used when possible.
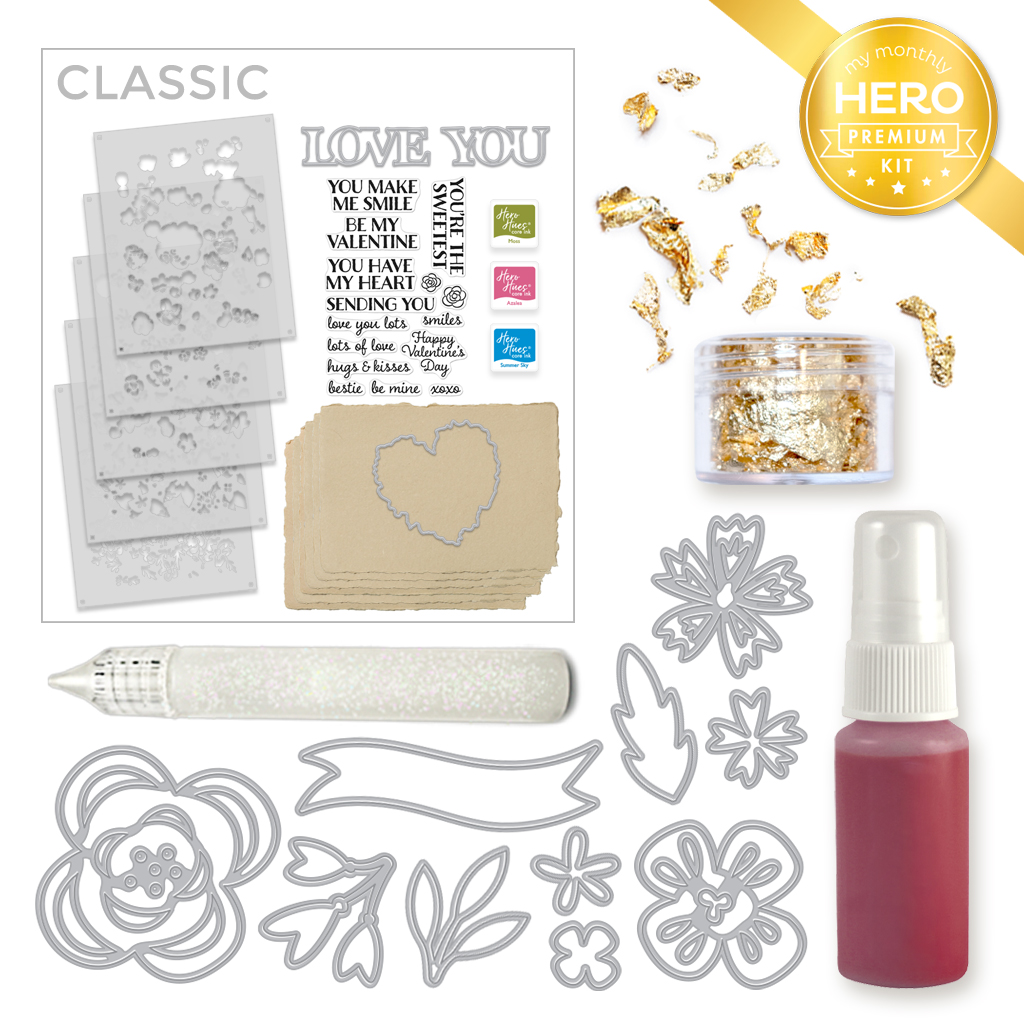
Hi crafty friends! Today, we are hopping along to introduce the January 2024 My Monthly Hero Kit from Hero Arts. There’s a ton of inspiration and the full blog lineup can be found on the Hero Arts blog. You should be coming from Channin‘s blog and your next stop will be Natasha. The full blog list will be updated below! This month’s collection focuses on letters and watercolor pencils! Here is a peek at the Classic Kit:
and the Premium Kit (along with the Classic kit items) includes:
10 Flower & Leaf Fancy Dies
Gold Leaf Flakes
Sparkle Clear Lacquer Pen
Pink Gold Metallic Spray
I have two cards to share with you today featuring this month’s kit and add ons!
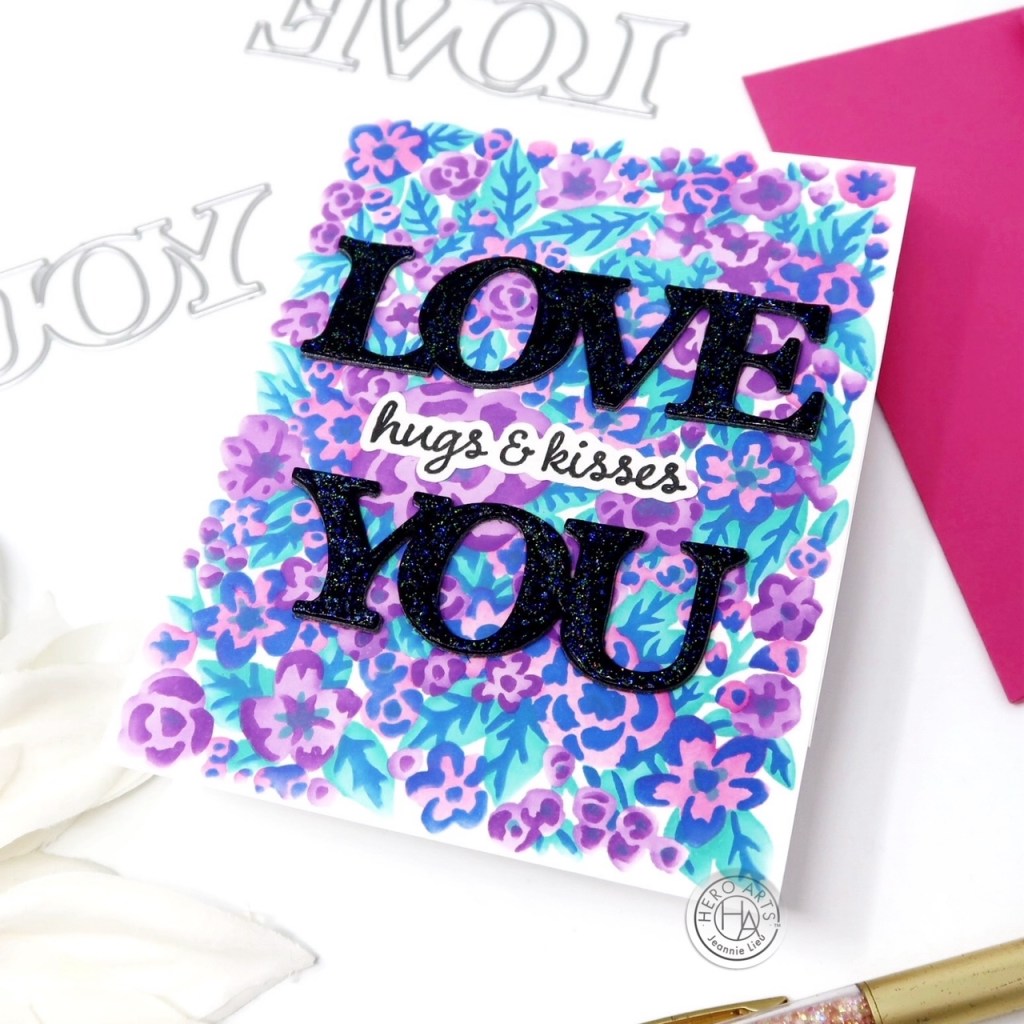
The first card focuses on the Classic Kit and one item from the Premium Kit. I created the base of my card using the 5 Floral Color Layering Stencils using the following Hero Arts Reactive Ink colors: Thistle, Grape Slush, Berry Smoothie, Pool Party, and Blue Hawaii. This turned out really pretty!
Then I decided to use the Love You Fancy Word die. Originally, I wanted to do an eclipse card but I thought the background was a bit busy and I wanted the words to really stand out. I die cut a couple of the words, stacked them and used Pitch Black cardstock right on top. I also stamped out a supporting sentiment from the Love Messages Stamp set. To finish off the card, I used the Sparkle Clear Lacquer Pen right over the Love You Fancy Word Die to add a bit of sparkle.
If you’re more visual, here is the corresponding reel:
Giveaway:
Hero Arts will give away a $50 gift card, drawn from the comments left across the hop. Enter by Sunday, December 10th at 11:59pm Pacific, and the winner will be announced on the Hero Arts blog the following week.
It’s just January but love cards can be sent at any time. I didn’t go for a traditional color palette of pinks and reds, deciding to change it up with blue. I really like it!
All my supplies for creating this card will be listed down below (with multiple sources when available) for your curiosity and convenience. Affiliate links used when possible.
Welcome to Pretty Pink Posh‘s January 2024 Release Blog Hop! Can you believe we’re already almost a week into 2024? Be sure to check out the latest release from Pretty Pink Posh. Before we jump into my project for the hop, there’s a total of 4 $30 gift certificates up for grabs (one winner each day) for this 3 day blog hop! Winners will be picked randomly along the blog hop. Comments must be left by 11:59 PM PST on 1/11/2024. Winners will be announced on the Pretty Pink Posh blog.
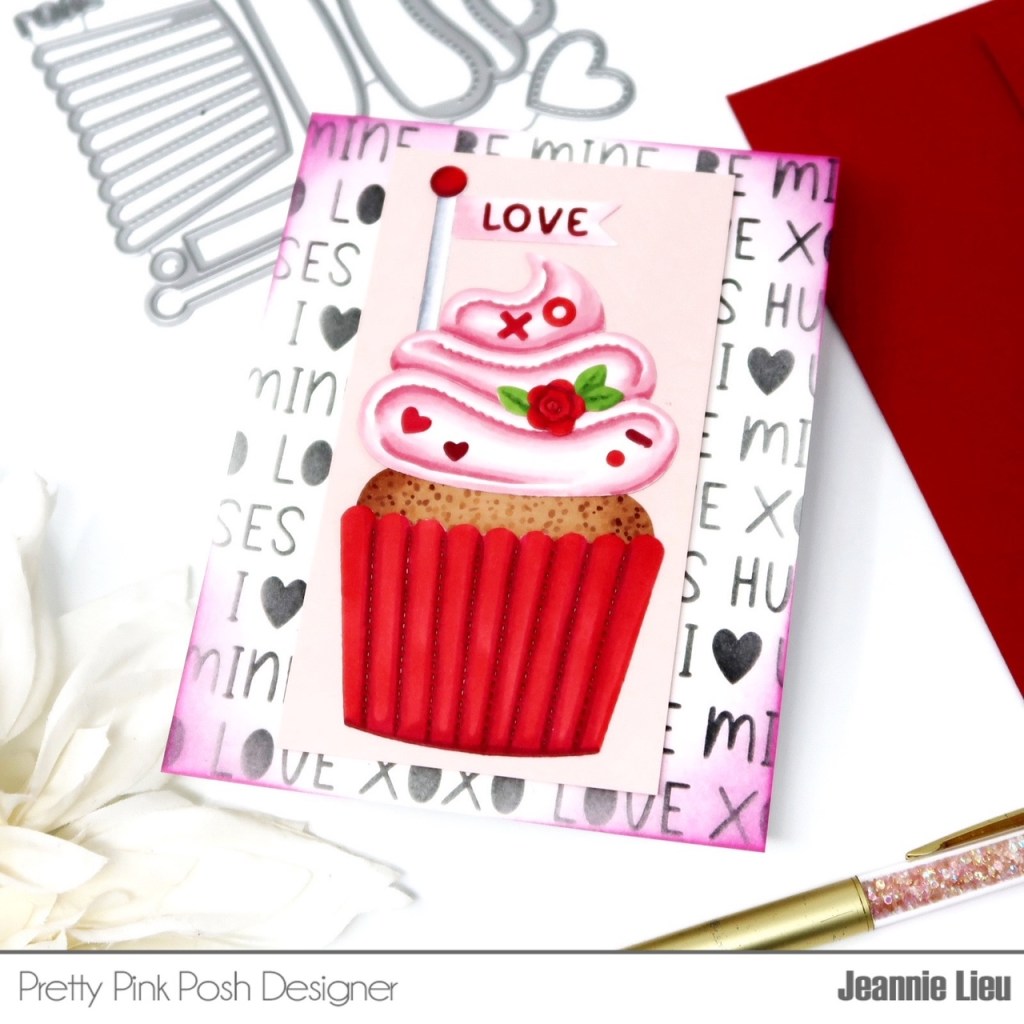
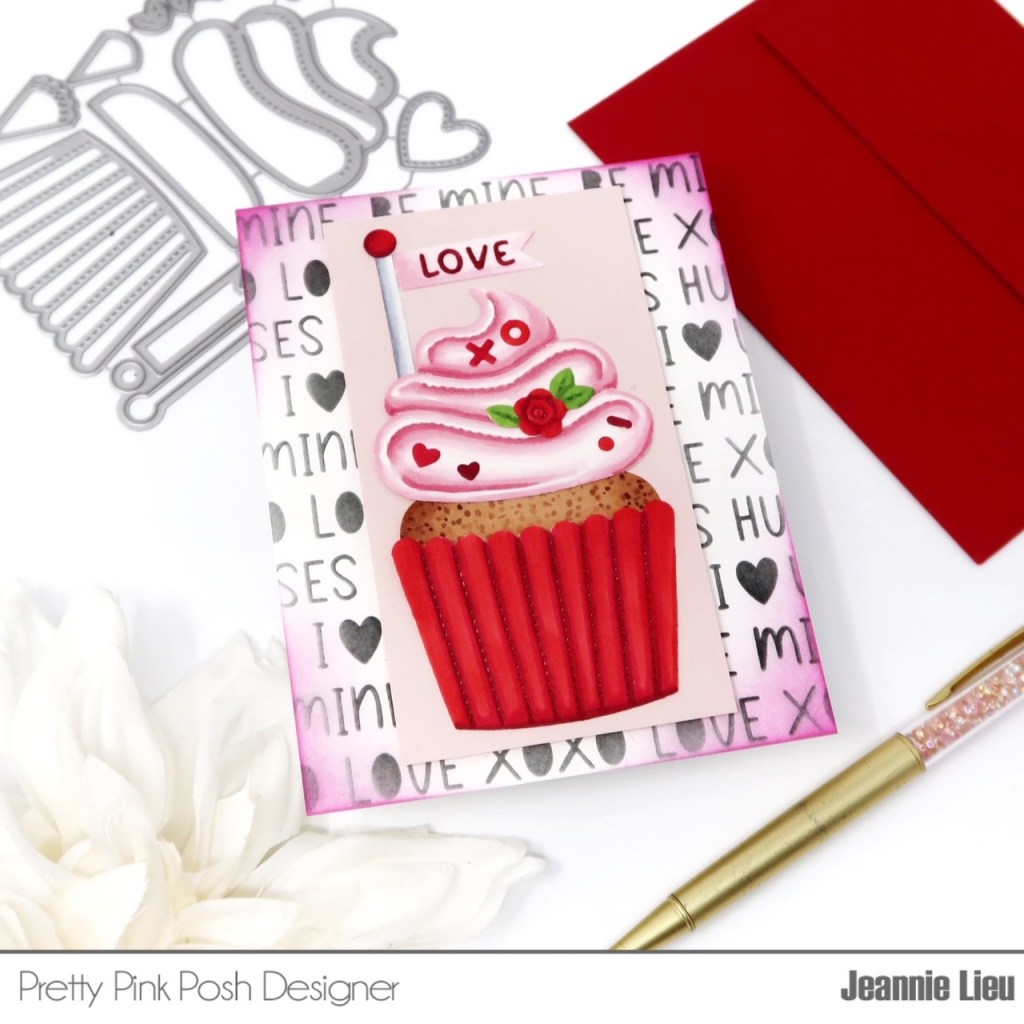
Hi friends! There have been so many amazing projects already shared in the past two days of the blog hop and there’s so much inspiration today as well! Be sure to check it all out and today’s lineup! For today, I’m sharing this pretty Valentine’s or Love card that I put together using some of the new items from Pretty Pink Posh’s January release.
With a standalone die set, I tend to like to die cut from white cardstock and then color instead of using scraps. Frankly, I probably should use scraps to use them up but I just love the added look of dimension by coloring using markers. A trick I use is to use double sided tape prior to die cutting so everything I cut will basically be a sticker, making it really easy to put the pieces together quickly.
Once all my die pieces are colored up, I’ll go ahead and put them together on a piece of pink cardstock to match the vibe of the card. I really love the Valentine’s Words stencil and I inked it up with black ink on white cardstock, but I thought it was a little too plain so I inked up the corners just to add a little bit of pink to it.
Here is a quick video of how this came together
Be sure to stop by the previous days of inspiration for the Pretty Pink Posh blog!
Winter isn’t over yet but it’s still cold and there’s still snow so I’m still making non-holiday winter cards. Usually, I use a no line ink but I decided to use a light pink to do some no line coloring. I just pick a similar pink marker and try to blend it out to white. It’s also light enough for my blues to go right over it.
All my supplies for creating this card will be listed down below (with multiple sources when available) for your curiosity and convenience. Affiliate links used when possible.
I love when you can incorporate large stamp sets to mix with sentiment stamps replacing the words. That’s what I did here and it was the perfect little space to ground the images.
All my supplies for creating this card will be listed down below (with multiple sources when available) for your curiosity and convenience. Affiliate links used when possible.
Merry Christmas, my crafty friends! I hope the holiday season has brought you so much joy!
All my supplies for creating this card will be listed down below (with multiple sources when available) for your curiosity and convenience. Affiliate links used when possible.