If you’re a crafter, you have a ton of paper scraps lying around, hoping for the day that you find the perfect use for them! This is an idea that uses them up in an easy way and lets you create a super easy card!
All my supplies for creating this card will be listed down below (with multiple sources when available) for your curiosity and convenience. Affiliate links used when possible.
If you know, one of my first card loves were scene cards and I loved using sets to really stretch my stamps. When I saw this release from Honey Bee Stamps, I knew I had to to pair a bunch of these sets together for a scene card. It came out perfectly (in my opinion!).
All my supplies for creating this card will be listed down below (with multiple sources when available) for your curiosity and convenience. Affiliate links used when possible.
Rainbow is my go to, especially for ink blending because it’s so pretty! Since this was a two layer stencil, I decided to use pastes to amp this up just a bit! I love how it turned out with that added texture.
All my supplies for creating this card will be listed down below (with multiple sources when available) for your curiosity and convenience. Affiliate links used when possible.
I went to Creativation back in March and my best discovery were these Sharpie markers — look at how it pops on black! It’s so amazing and paired with this stamp set — I felt like I could letter myself! I also just adore this mix of colors — so pretty and it makes for an easy card!
All my supplies for creating this card will be listed down below (with multiple sources when available) for your curiosity and convenience. Affiliate links used when possible.
I usually stick with one color if I’m going with monochrome colors but I kinda like using two colors. It’s colorful but kinda not. What do you think?
All my supplies for creating this card will be listed down below (with multiple sources when available) for your curiosity and convenience. Affiliate links used when possible.
A bit of a trick using ink blending can easily create a beach scene — just leaving a little bit of white between the brown of the sand and blues of the ocean. This Beach Break cover plate really steps it up with the little bits of texture it adds to the overall look, don’t you think?
All my supplies for creating this card will be listed down below (with multiple sources when available) for your curiosity and convenience. Affiliate links used when possible.
Ink over toner foil — it adds color to your card if you want something extra, taking a simple card and elevating it. Plus, I just like rainbow colors.
All my supplies for creating this card will be listed down below (with multiple sources when available) for your curiosity and convenience. Affiliate links used when possible.
This stamp set is perfect for a birthday card — you can add as many candles as you want! I did a rainbow coloring that I didn’t completely love but it was stuck in my head. To kind of cover it up, I used a white gel pen and dotted it all over to create a glittery look. Looks cool right?
All my supplies for creating this card will be listed down below (with multiple sources when available) for your curiosity and convenience. Affiliate links used when possible.
Using the colors – blue, red, and. yellow – generally should create the colors of the rainbow. Here, I kinda kept it separated and I’m really love the bright colors. I’m beginning to really love embossing folders, especially the very detailed ones. Add a little black distress ink and it really emphasizes the details!
All my supplies for creating this card will be listed down below (with multiple sources when available) for your curiosity and convenience. Affiliate links used when possible.
It’s summertime and limes/lemons are the perfect fruit to create a drink for the summer time! I also love a good shaker and stencils make for a great background — the repeating background kinda works perfectly for the shimmer mix!
All my supplies for creating this card will be listed down below (with multiple sources when available) for your curiosity and convenience. Affiliate links used when possible.
This card isn’t my usual card — I actually have a really hard time with pattern paper or pre-printed card fronts so it takes me more brainpower to pull items together. HOWEVER – these card fronts were really pretty and I wanted to use them! How do you think I did?
All my supplies for creating this card will be listed down below (with multiple sources when available) for your curiosity and convenience. Affiliate links used when possible.
Papers: Purple, Blue, and Green Shimmer Vellum, White Lava Holographic, TBD
There’s a ton of inspiration and the full blog lineup can be found on the Hero Arts blog. You should be coming from ‘s blog and your next stop will be . The full blog list will be updated below!
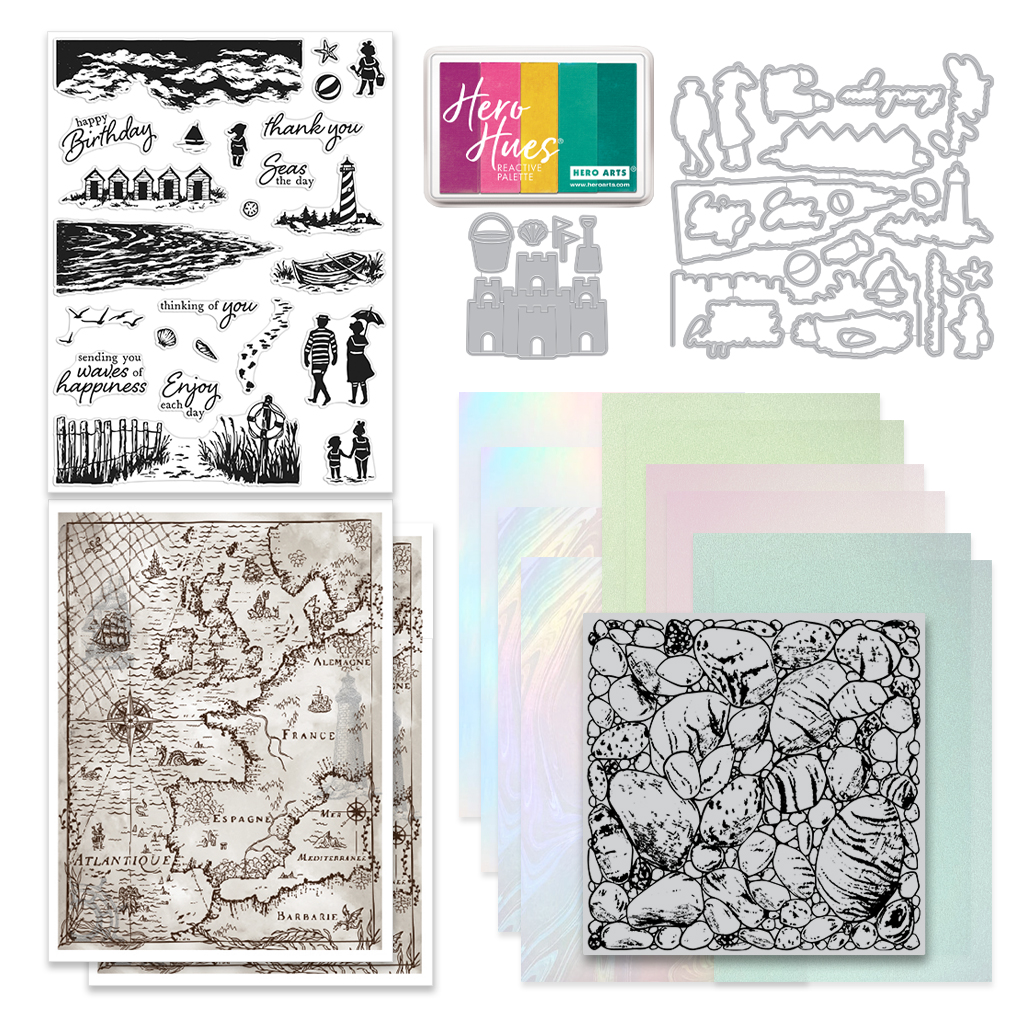
The first card focuses on the Card Kit of the Month. Hero Arts does silhouettes well and they are perfect for creating a little scene. The images also allows me to take advantage of white space for a card! I stamped out my ocean image with Hero Arts Summer Sky Core Ink and that is what my card revolves around. I next stamped out the sailboat, the birds and the sentiment using Intens-ified Black Ink. To add a bit of color to the card, I ink blend Butter Bar, Ultra Pink, Orchid and Summer Sky for a sunset look. I also realized after the fact that my “ocean” was actually meant to be clouds BUT I guess that just shows how versatile this set is!
My second project features the Clear Set + Dies of the Month, which features mermaids and seahorses. I really wanted to do a scene card BUT I opted to go for a simple one to challenge myself since I find the harder for me. I picked out three Hero Hues reactive ink colors: Blue Hawaii, Pool Party, and Splash along with a card panel of the Luxe Watercolor Paper to do some ink smooshing! I used a plastic bag to achieve this fun look — first by adding the ink to a palette or glass mat, spraying a little water and picking up the color with the plastic bag and transferring it to the watercolor paper. My tip is to not use much water so you can get some of that texture. I stamped the mermaid and seahorse, coloring them up with copic markers before using the coordinating die set to cut them out to add to the card panel, which I matted on Peacock cardstock.
Thanks for stopping by today and I hope you enjoyed the two cards I shared today using some of the new Hero Studio collection. Hope you were inspired to create!
Giveaway:
Hero Arts will give away a $50 gift card, drawn from the comments left across the hop. Enter by Sunday, July 7th at 11:59pm Pacific, and the winner will be announced on the Hero Arts blog the following week.