Aerial shots of any item requires me to set it on top of a desk and color. This one was easy to decide what to do but this set is sneaky, it’s really versatile — there’s a lot of uses for it! As easy idea for this one is to create a shaped card as well!
All my supplies for creating this card will be listed down below (with multiple sources when available) for your curiosity and convenience. Affiliate links used when possible.
I tend to use a ton of markers to color but there are times where I’m pretty lazy and want a softer look. Using lighter markers and using white space really works for lazy coloring! It’s definitely a softer look but I love it!
All my supplies for creating this card will be listed down below (with multiple sources when available) for your curiosity and convenience. Affiliate links used when possible.
If you’re like me, I like to pick and choose crafty supplies so that I can use them in a versatile way. Mixing and matching is probably the easiest way to do that and I love when you get a card that looks like it came from one set!
All my supplies for creating this card will be listed down below (with multiple sources when available) for your curiosity and convenience. Affiliate links used when possible.
Welcome to Pretty Pink Posh‘s August 2024 Release Blog Hop! Be sure to check out the latest release from Pretty Pink Posh. Before we jump into my project for the hop, there’s a total of three $30 gift certificates up for grabs (one winner each day) for this 3 day blog hop! Winners will be picked randomly along the blog hop. Comments must be left by 11:59 PM PST on 8/19/2024. Winners will be announced on the Pretty Pink Posh blog.
Hi friends! There have been so many amazing projects already shared in the past day of the blog hop and there’s so much inspiration today as well! Be sure to check it all out and today’s lineup!
For today, I’m sharing this fun card that I created using quite a few sets from the new release. I love how you can mix and match! It comes together perfectly for a fun Halloween card!
First, I started off to create my background using the Halloween Words Stencil along with Distress Mica Stains: Jack O Lantern, Fortune Teller, and Wicked Elixer. Using the sprays just allows me to quick stencil this up, without having it be “perfect”. I love how the colors mix together so well.
Next, I die cut all the items I want to use from the Big Halloween Cupcake, Spooky Mug Additions, and Ghost Holder die sets. For these, I just colored them in using copic markers. I love the dimension you can add and it also gives your images a “no line coloring” look.
To finish this card off, I stamped and heat embossed a sentiment from the Upright Greetings stamp set. This fit perfectly on the side of my card panel and finishes off this fun Halloween card.
Be sure to stop by the previous days of inspiration for the Pretty Pink Posh blog!
You gotta love elements that appeal to the little boys and girls who love everything construction! My nephew is one of those kids who is absolutely entralled and I think I’ll be creating more of these in the future! I especially love the border I created around the card for that added extra touch.
All my supplies for creating this card will be listed down below (with multiple sources when available) for your curiosity and convenience. Affiliate links used when possible.
This is one of the easiest cards to make and you just gotta ink, spritz and stamp! Distress oxides are really fun and because they can stamp, it definitely makes for a quick and colorful card!
All my supplies for creating this card will be listed down below (with multiple sources when available) for your curiosity and convenience. Affiliate links used when possible.
A large image can be used to fill up a background and it still makes a statement. I love the font for this sentiment — it pairs so well with the overall card.
All my supplies for creating this card will be listed down below (with multiple sources when available) for your curiosity and convenience. Affiliate links used when possible.
You can’t see it in the photos but this vellum really adds to the butterfly die cuts, giving them a magical look. I love that you can choose to not glue down the wings and it adds volume to a card that you normally don’t get.
All my supplies for creating this card will be listed down below (with multiple sources when available) for your curiosity and convenience. Affiliate links used when possible.
• Jungle HeroScape Clear Stamp Set, 6″ x 8″ • 12 Coordinating Dies • 5 Fancy Dies • Jungle Scenics Stencil, 6″ x 6″ • Olive Hero Wax • White Plastic Palette Knife • 3 Reactive Ink Cubes (Key Lime Fizz, Green Apple, Fruit Punch) • 2 Reactive Glitz Ink Pads (French Pink, Byzantine Green) • 5 Printed Sticker Sheets, 6″ x 6″
There’s a ton of inspiration and the full blog lineup can be found on the Hero Arts blog. You should be coming from ‘s blog and your next stop will be . The full blog list will be updated below!
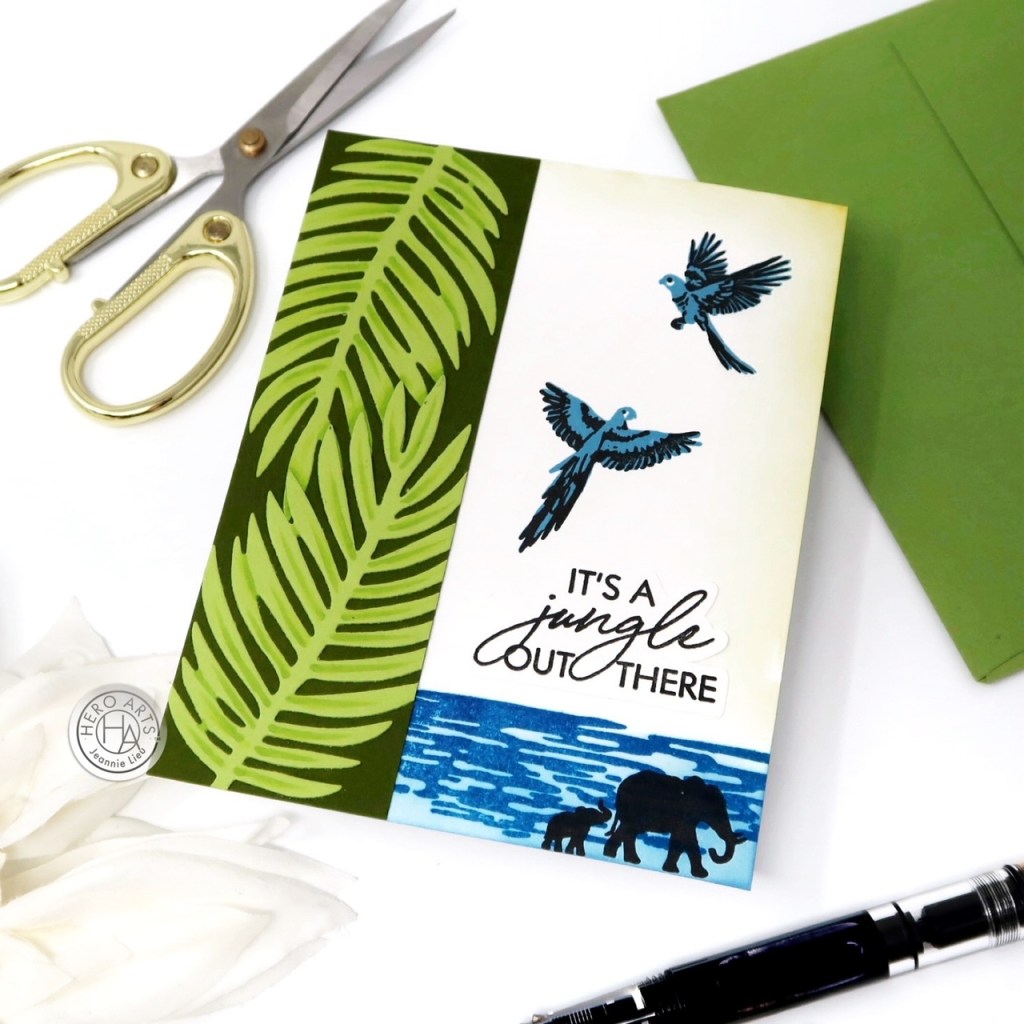
The first card focuses on the Card Kit of the Month. Hero Arts does silhouettes well and they are perfect for creating a little scene. I also wanted to play with creating a side bar with the dies that come in the card kit as well. I used the larger palm leaf die and cut two of them out of Kiwi cardstock placing them on top of a 1.75 inch strip of Palm cardstock. Then, I used a mix of Deep Ocean and Periwinkle core inks paired with Intensified Black ink to create the little scene on the right hand side. To add a little something extra, I lightly inked Butter Bar on the edge of the card for a bit of color.
My second project features the Fancy Die of the Month, which features Jungle Vines and Critters. I couldn’t resist taking my copic markers to the die cut window but I took a few liberties creating my own oval shape for the frame. Once I finished coloring, I just popped it on top of Pitch Black cardstock so my colored die cut would really pop. For the sentiment, I pulled out the Everyday Sentiment Strips along with the Sentiment Strips Fancy Die for a simple one. I thought that the “Wishing You All The Luck” works so well with this card.
Thanks for stopping by today and I hope you enjoyed the two cards I shared today using some of the new Hero Studio collection. Hope you were inspired to create!
Giveaway:
Hero Arts will give away a $50 gift card, drawn from the comments left across the hop. Enter by Sunday, August 11th at 11:59pm Pacific, and the winner will be announced on the Hero Arts blog the following week.
Changing up detailed backgrounds is as easy as using different ink pads to create an ombre effect. You can even use different colors but it just gives it something extra, don’t you think?
All my supplies for creating this card will be listed down below (with multiple sources when available) for your curiosity and convenience. Affiliate links used when possible.
I love coloring but sometimes, you just don’t need to. I do love tone on tone stamping right on top of a similar color of cardstock and to give it just a bit more, I use copic colors to add a bit of dimension. Also, yes, I know it’s early for fall but I don’t really card — it’s my favorite season and my favorite cards are usually in the coming months!
All my supplies for creating this card will be listed down below (with multiple sources when available) for your curiosity and convenience. Affiliate links used when possible.
Sometimes you have images you really love but the sizing doesn’t work so well together but it’s all a matter of perception, isn’t it? I set my palm trees in the background and colored it up so the ocean looked further back. Meanwhile, you can see the shell and florals up close. It was just a fun card to color up!
All my supplies for creating this card will be listed down below (with multiple sources when available) for your curiosity and convenience. Affiliate links used when possible.