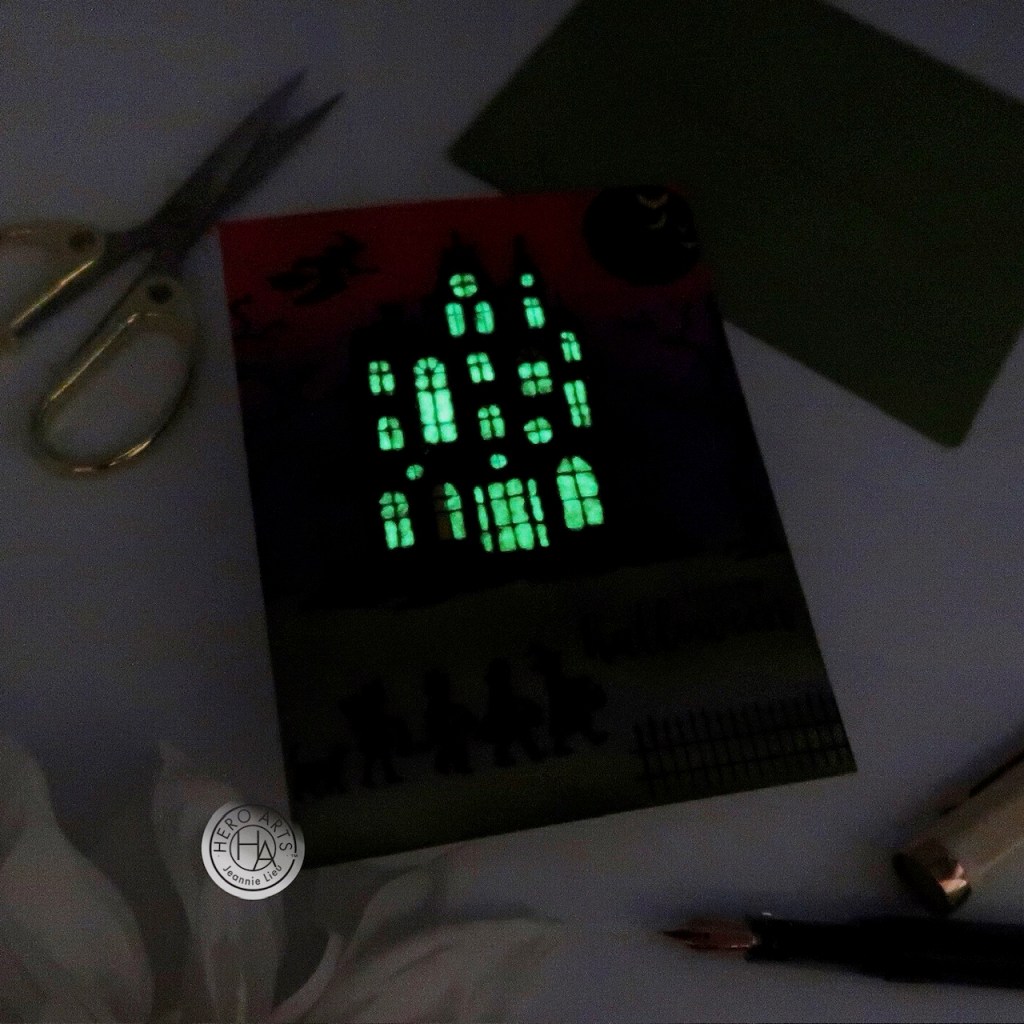
Halloween cards — I love them. It’s kinda when I bring out random tricks, like this one. I use ink blending to create a glowy look to the card and it really adds to the spooky vibe of the scene.
All my supplies for creating this card will be listed down below (with multiple sources when available) for your curiosity and convenience. Affiliate links used when possible.
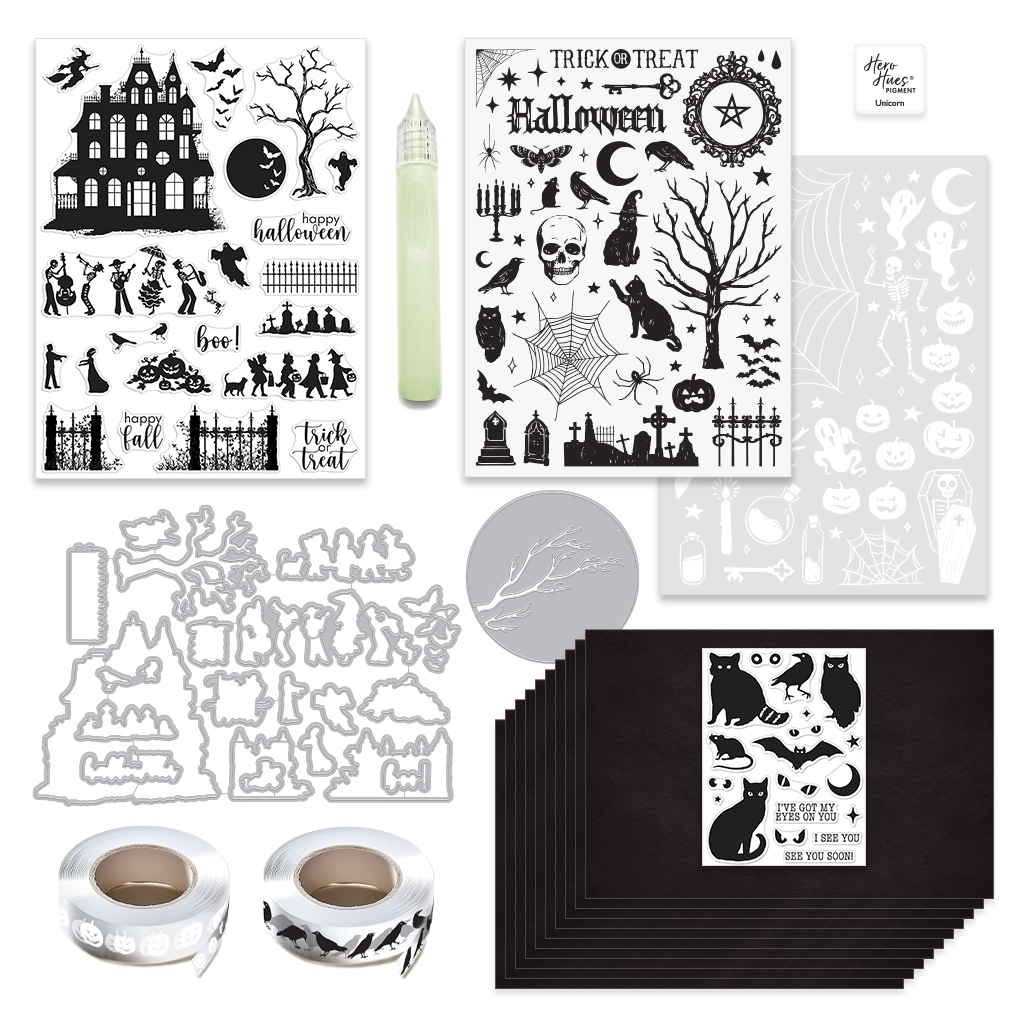
Let’s start by taking a closer look at the September Card Kit of the Month.
Includes:
CK0924C Haunted House 6×8 Clear
CK0924C2 Animal Eyes 3×4 Clear
CK0924D Coordinating Dies & Moon Fancy Die
Halloween B&W Hero Transfers – 2 sheets
Unicorn Ink Cube
NK483 Glow in the Dark Lacquer Pen
Black Watercolor Paper, 10 sheets
Clear Decorative Tape, 2 rolls (white pumpkins and black crows)
There’s a ton of inspiration and the full blog lineup can be found on the Hero Arts blog. You should be coming from Ilina Crouse‘s blog and your next stop will be Jennifer Kotas. The full blog list will be updated below!
I have two cards to share with you today featuring this month’s kit and one of the Extraordinary Extras.
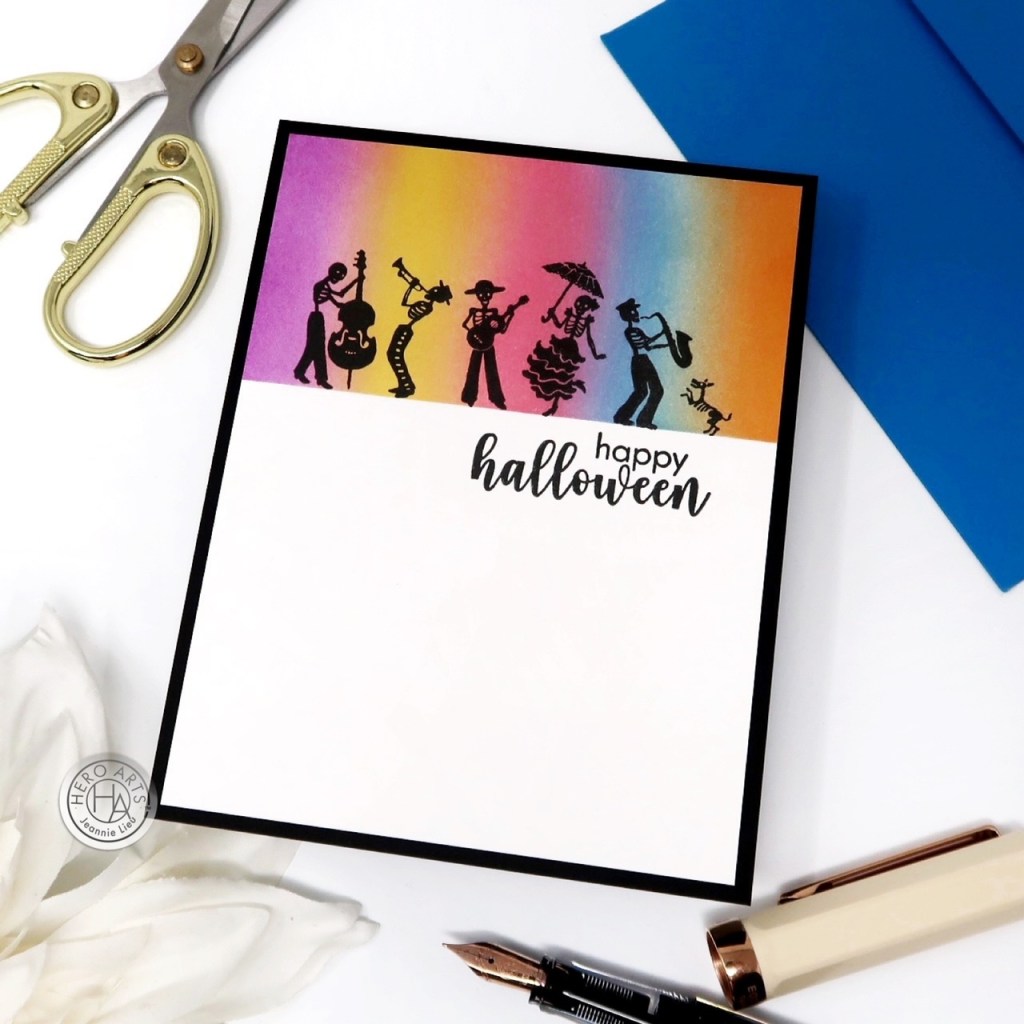
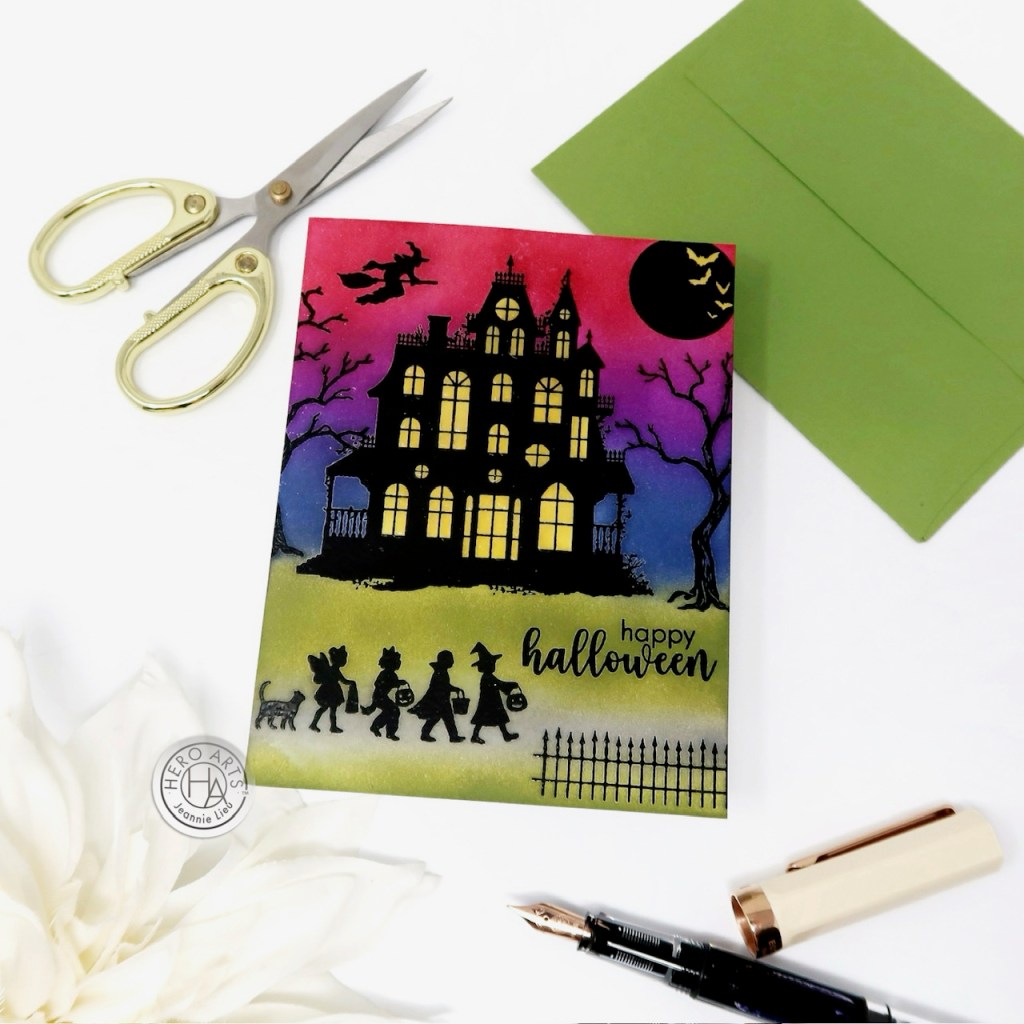
The first card focuses on the Card Kit of the Month. Hero Arts does silhouettes well and they are perfect for creating a little scene. I wanted to play with white space for a simple card. I masked off about two inches for the top, and ink blended five different colors for a fun and bright background. I used Grape Juice, Butter Bar, Azalea, Cornflower, and Papaya.
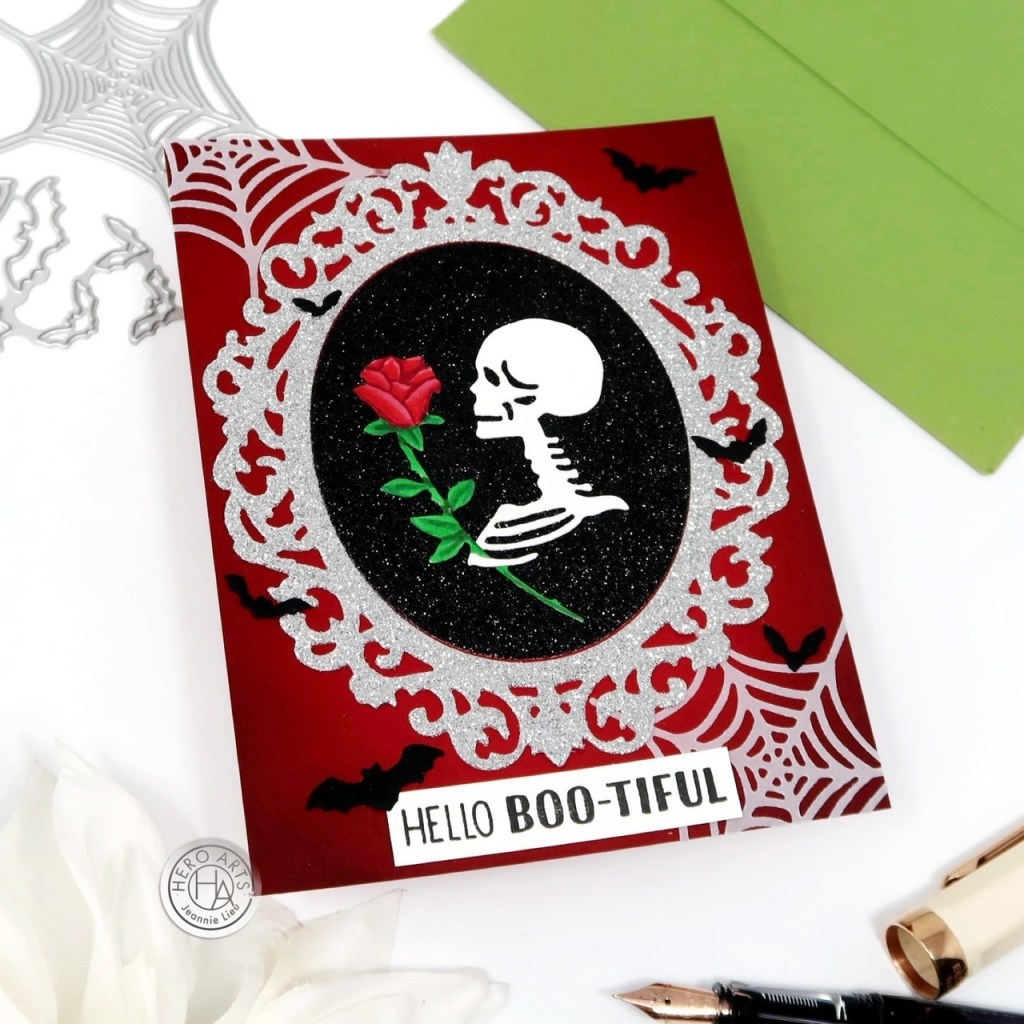
My second project focuses on the Haunted Romance Fancy Dies, which is one of the Extraordinary Extras. I also paired it with the September Fancy Dies of the Month called Mirror Portraits. I die cut items from using different cardstocks for a bit of variety, but I did use copic markers for the rose die cut from the Haunted Romance Fancy Die because I wanted the added details. Once I had all my pieces, I arranged them on a panel of Cranberry Cardstock, which I darken up the edges of with Charcoal Core Ink. I also stamped out a sentiment from the Halloween Messages stamp set to finish off the card.
Thanks for stopping by today and I hope you enjoyed the two cards I shared today using some of the new Hero Studio collection. Hope you were inspired to create!
Giveaway:
Hero Arts will give away a $50 gift card, drawn from the comments left across the hop. Enter by Sunday, August 11th at 11:59pm Pacific, and the winner will be announced on the Hero Arts blog the following week.
Solid stamps — it’s not always the easiest to get an even layer for stamping and even harder to get a nice ombre. When I don’t want to worry about stamping it choppy, I like to enlist the help of a gel press and brayer. It really helps get that even ink and perfect blend on a large solid stamp.
All my supplies for creating this card will be listed down below (with multiple sources when available) for your curiosity and convenience. Affiliate links used when possible.
Hi friends — We’re kicking off the countdown to the September Hero Studio release today and I’m sharing a card using the Card Kit of the Month.
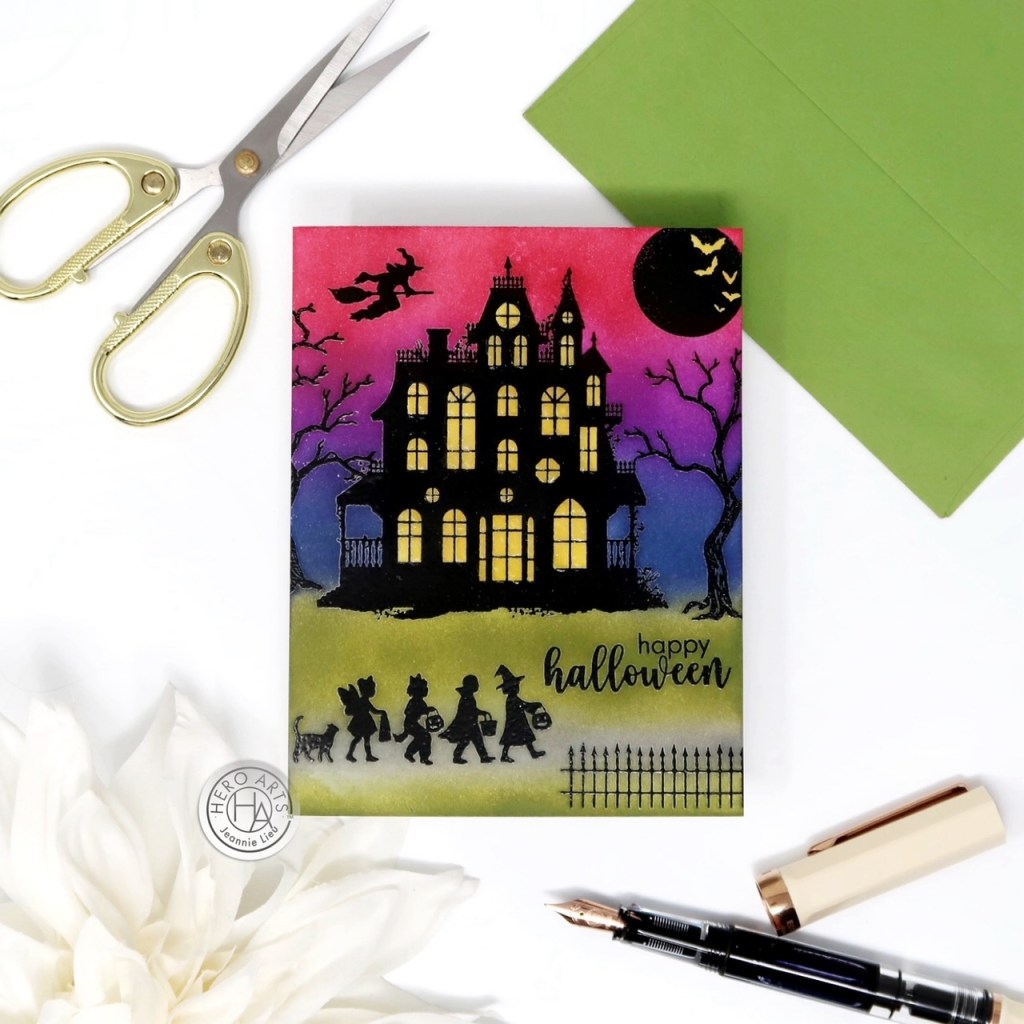
I wanted to feature the main stamp set in this month’s card kit. It’s full of silhouettes and it’s so fun for Halloween! I did a lot of stamping with Hero Arts INTENSI-ified Black Ink and Clear Embossing & Watermark Ink right on top so I could do a bit of heat embossing using Ultra Fine Clear Embossing Powder. It was a lot of stamping but there’s a huge variety of silhouettes to choose from to create a fun scene and I wanted to use as many images as possible.
Once I stamped and heat embossed everything, I pulled out a bunch of core ink colors to do some ink blending. I used Charcoal and Forever Green for the ground. For the lights in the house and the bats in the moon, I used Butter Bar. For the sky, I used Nautical, Grape Juice, and Crimson.
Head over to the Hero Arts blog for more inspiration using the Hero Studio collection leading up to the release! And then I’ll be back for the Hero Studio blog hop with a couple more projects to share!
I love potion bottles for cards — they are fun to color up and they are fun to light up! Lighting it up for Halloween is just chef’s kiss! It works so well and adds to the spooky feel!
All my supplies for creating this card will be listed down below (with multiple sources when available) for your curiosity and convenience. Affiliate links used when possible.
I’m loving all the elements that have been use to pull together this card, especially the baby wreath stencil that creates such a cute backdrop to this card.
All my supplies for creating this card will be listed down below (with multiple sources when available) for your curiosity and convenience. Affiliate links used when possible.
Embossing folders are so awesome. When you need a simple card, this is the quickest way to put one together. Use an embossing folder, use paste, add a sentiment!
All my supplies for creating this card will be listed down below (with multiple sources when available) for your curiosity and convenience. Affiliate links used when possible.
I love creating scenes but sometimes there’s a lot of white space that I don’t want to fill. I used a solid stamp to fill up the space and thought it would be fun to pull out my distress oxides.
All my supplies for creating this card will be listed down below (with multiple sources when available) for your curiosity and convenience. Affiliate links used when possible.
Happy Holiday Catalog Day! Hero Arts will be giving away two $50 gift cards, drawn from the comments left along the hop. Comment on all the blogs for more chances to win! You have until Wednesday, August 28th at 11:59pm PT to enter. The winners will be announced on the Hero Arts blog.
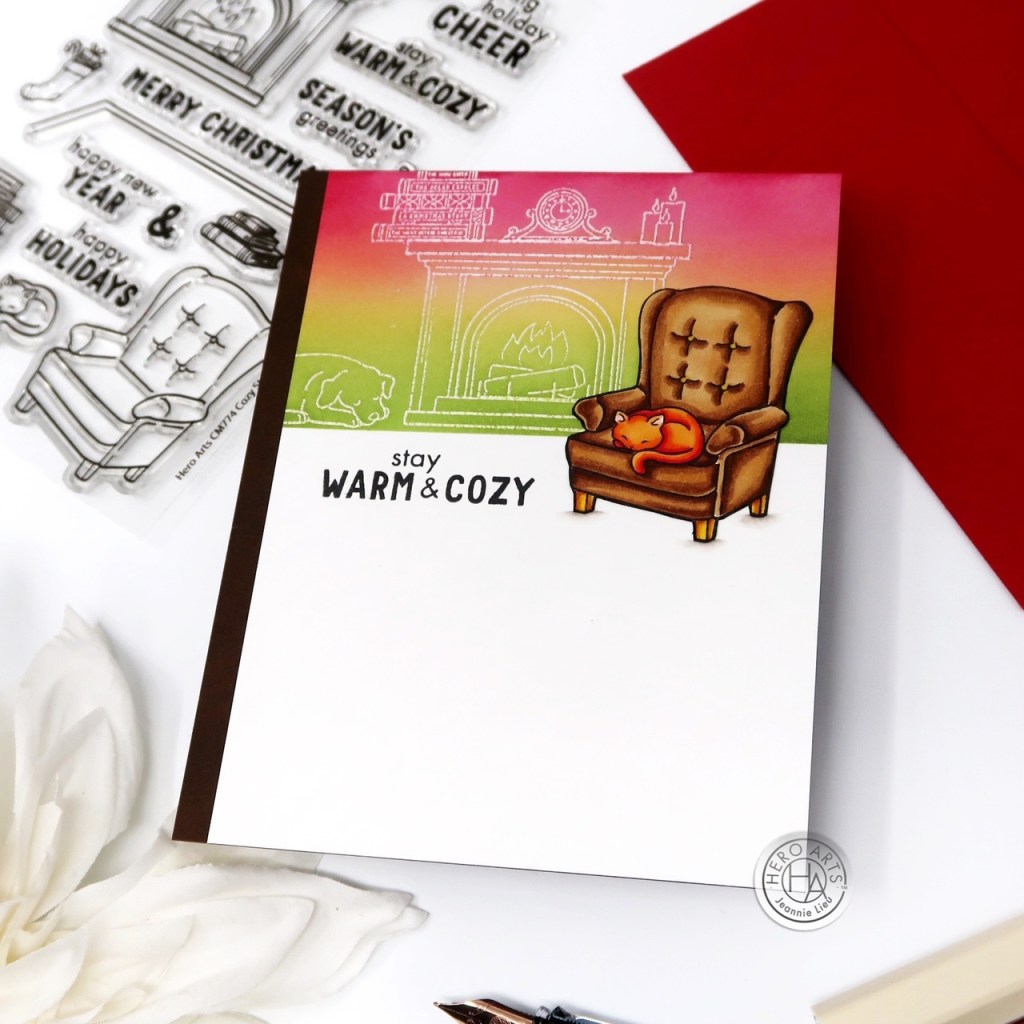
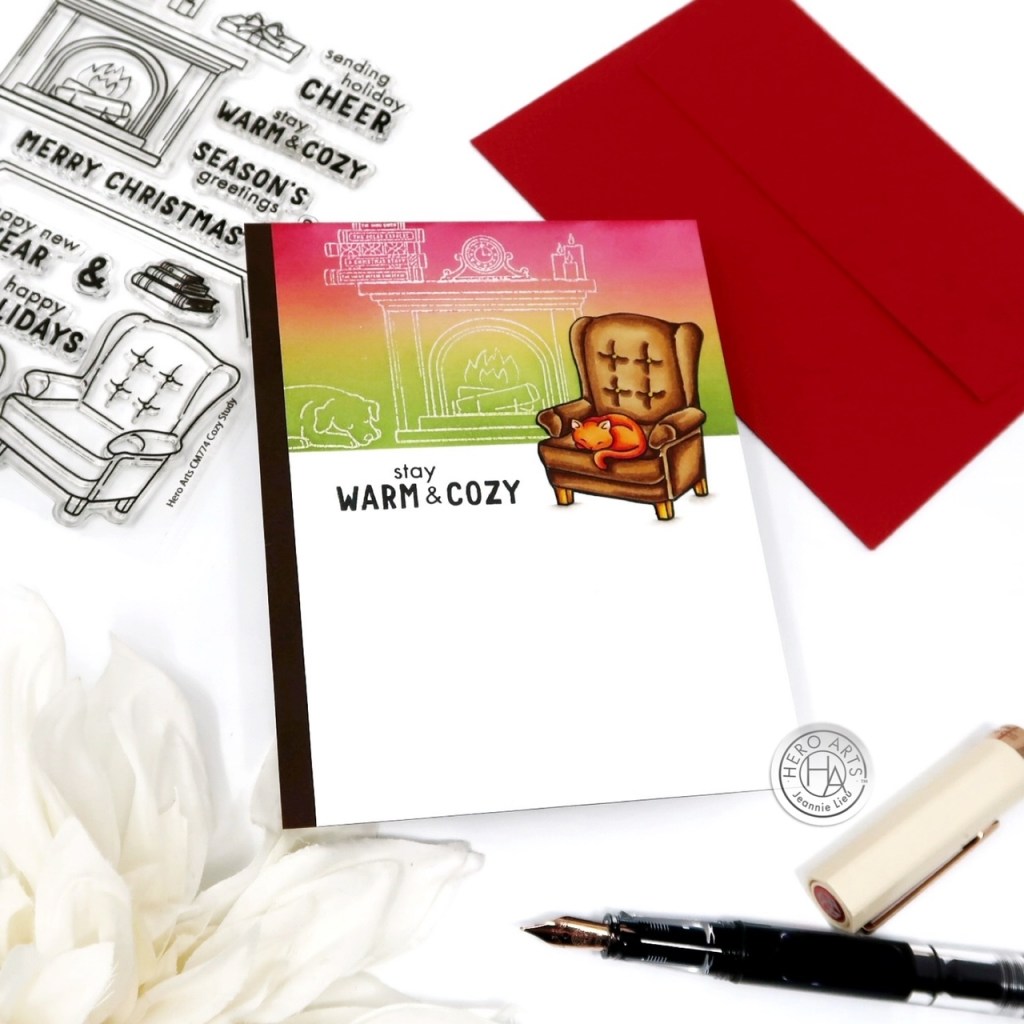
Today, I’m sharing a card featuring one of the sets from the Hero Arts Holiday Catalog release called Cozy Study. I tend to gravitate towards cards that can easily create scenes because of all the possibilities. You can create a full scene, use the smaller elements to create a background, or even create a mini scene — there’s so many ideas to work with!
For this card, I decided to create a subtle mini scene with a focus on one main image. I decided to mask off half my Deluxe Smooth White Cardstock card panel so I could focus my scene on the top half. I stamped the fireplace, dog, books, candle, and clock with Clear Embossing and Watermark Ink, then covered it with White Embossing Powder, and heat set it. Since embossing powder resists ink, I wanted to do some ink blending right on top to bring color to the top part of this card. I used the colors Spicy Mustard, Moss, and Crimson Core Inks along with the Hero Arts Tool Medium Blending Brushes. I’ll use a microfiber cloth to wipe off any excess ink as well.
My main image was going to be the cozy chair but I decided to also add the sleeping cat right on top. I wanted it to look clean, so I decided to do a bit of masking. I stamped the cat first with Intens-ified Black Ink, masked him, and then stamped the couch right on top. I’ll remove the mask, fussy cut the couch and color it up with copic markers.
I trimmed my card panel just a quarter of an inch so the panel would be 4 x 5.25 and added the panel right on top of an A2 piece of Woodland cardstock so the brown will peek out on the left hand side matching the chair. My last touch was to add the sentiment, stamped with Intens-ified Black Ink right next to the couch. My images and focus pulls to the top of the card, leaving white space but it works very well here.
Thank you for joining me today for the Hero Arts Holiday Catalog blog hop. I hope you have feel inspired with all the different projects and ideas!
Aerial shots of any item requires me to set it on top of a desk and color. This one was easy to decide what to do but this set is sneaky, it’s really versatile — there’s a lot of uses for it! As easy idea for this one is to create a shaped card as well!
All my supplies for creating this card will be listed down below (with multiple sources when available) for your curiosity and convenience. Affiliate links used when possible.
I tend to use a ton of markers to color but there are times where I’m pretty lazy and want a softer look. Using lighter markers and using white space really works for lazy coloring! It’s definitely a softer look but I love it!
All my supplies for creating this card will be listed down below (with multiple sources when available) for your curiosity and convenience. Affiliate links used when possible.
If you’re like me, I like to pick and choose crafty supplies so that I can use them in a versatile way. Mixing and matching is probably the easiest way to do that and I love when you get a card that looks like it came from one set!
All my supplies for creating this card will be listed down below (with multiple sources when available) for your curiosity and convenience. Affiliate links used when possible.