Mr. Snailman | Trinity Stamps

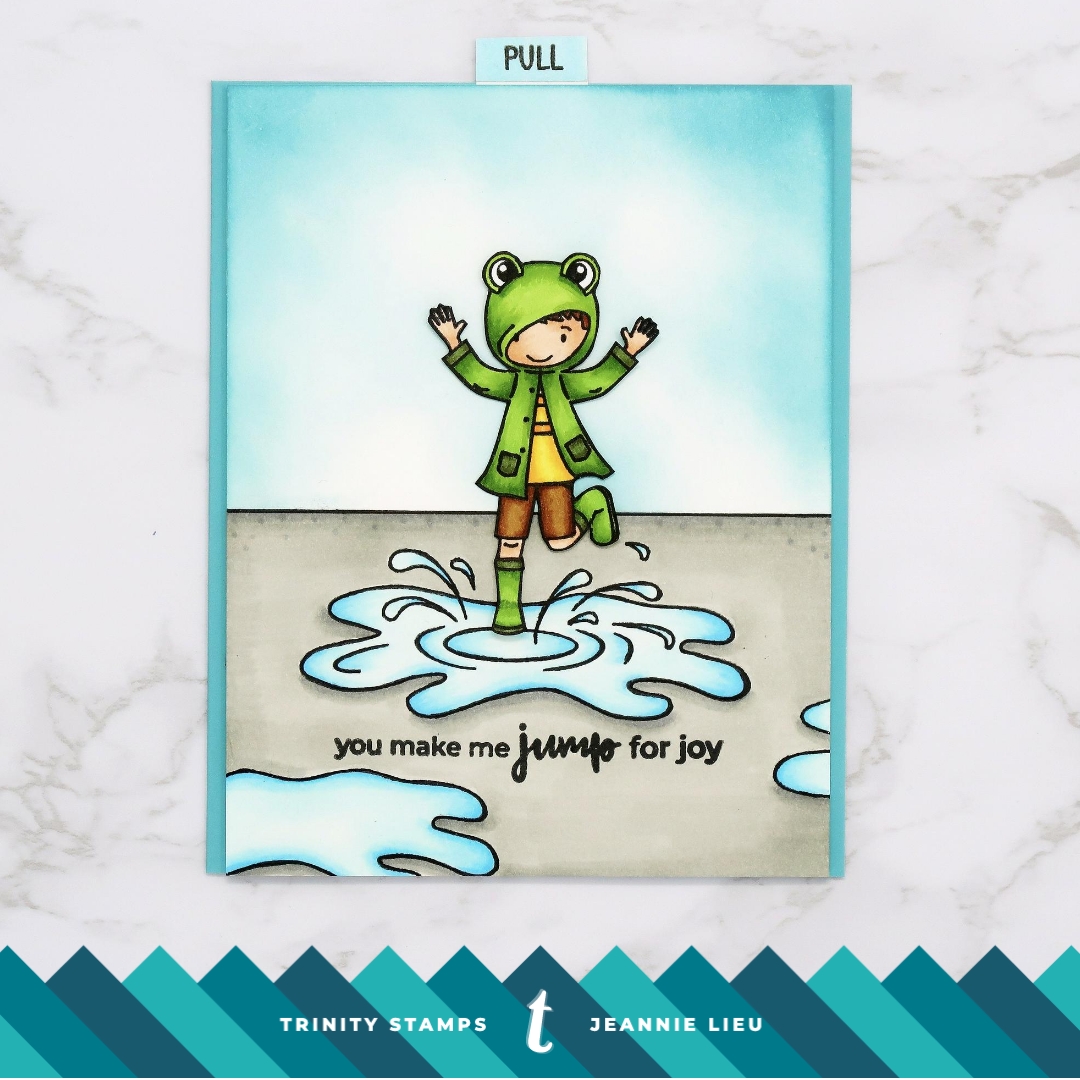
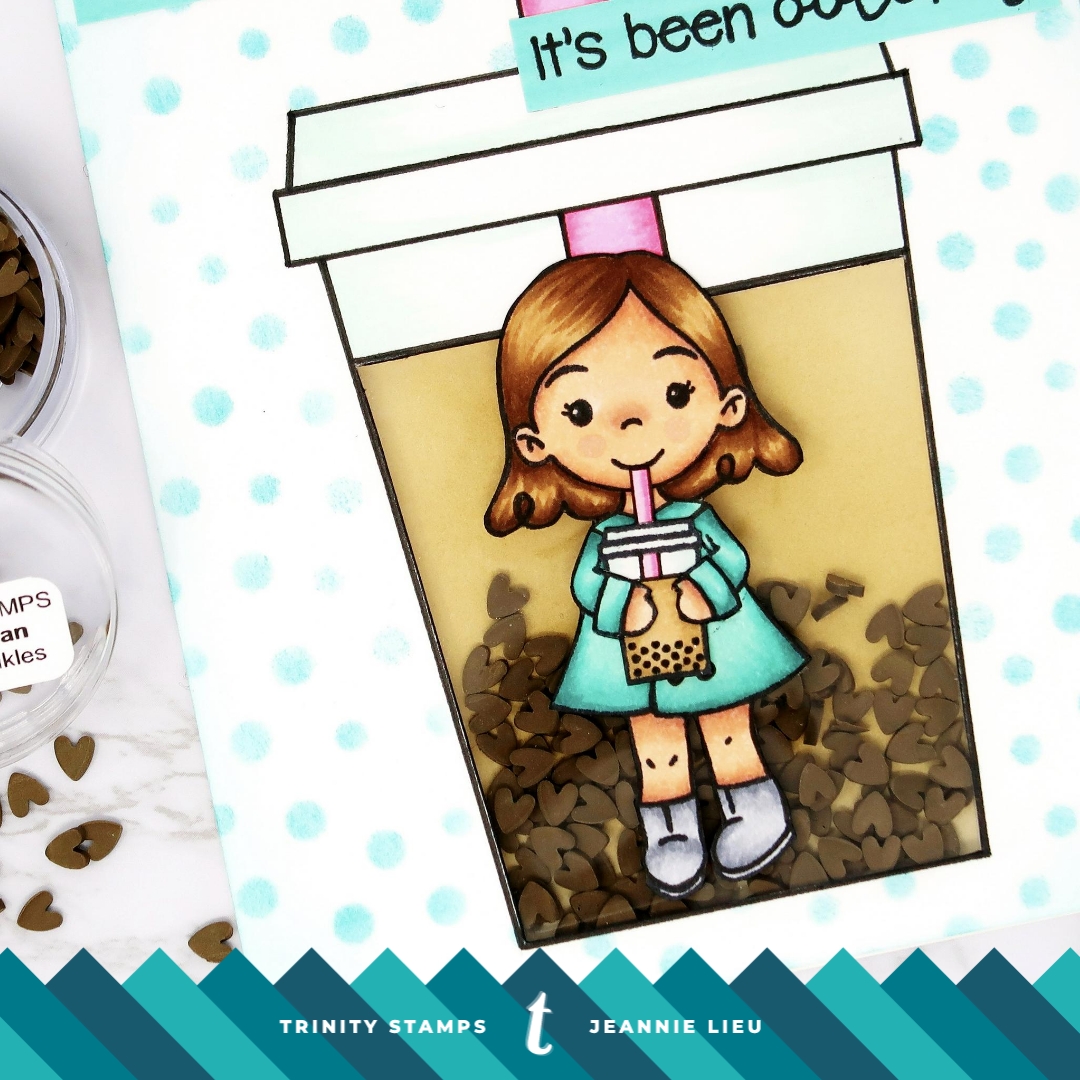
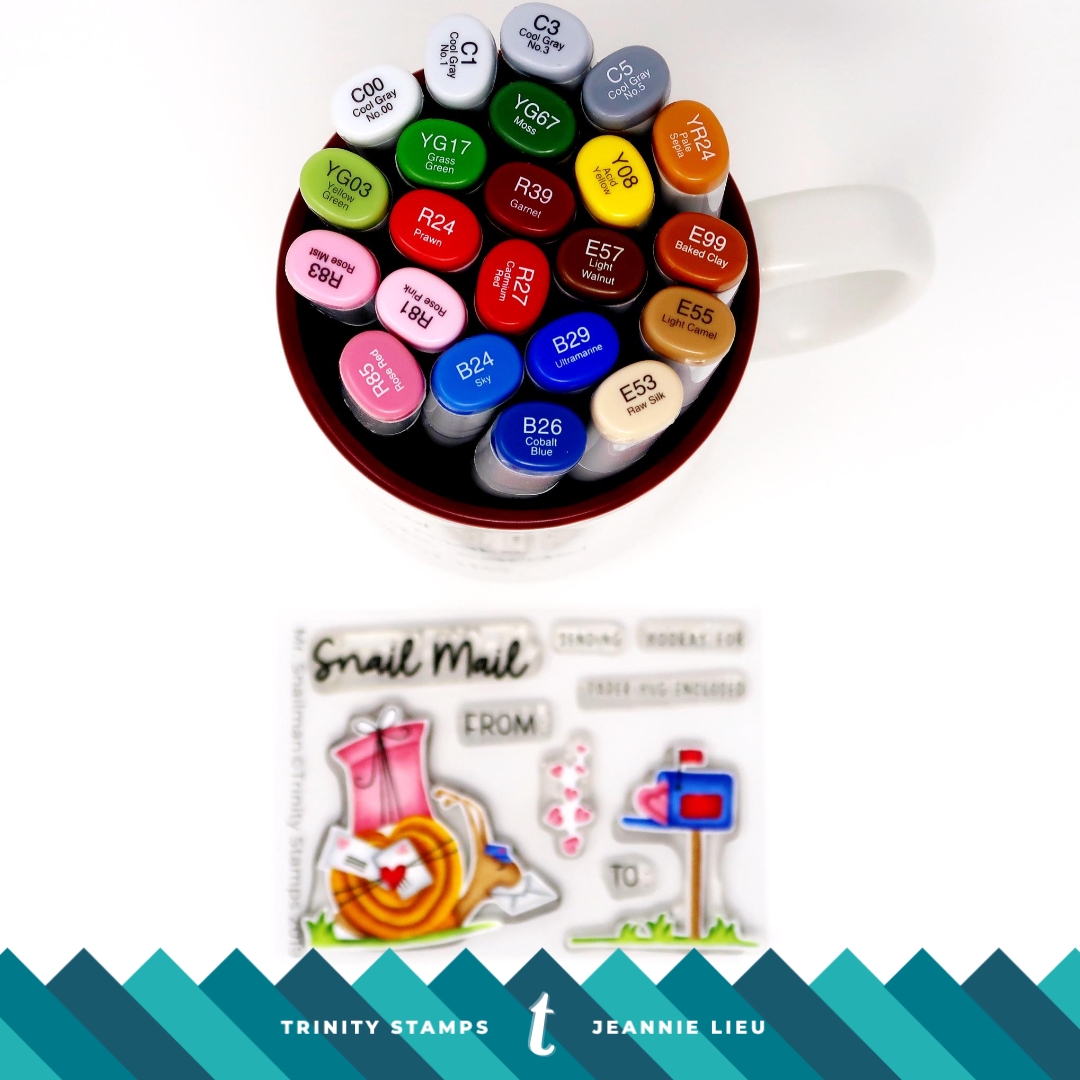
Hi everyone! It’s 2020 and this year, I’m making a new years resolution to send more happy mail out. I have a huge collection of cards and would love to not hoard them. So to kick off this resolution, I pulled out the Mr. Snailman stamp set to share create a fun & simple card. 

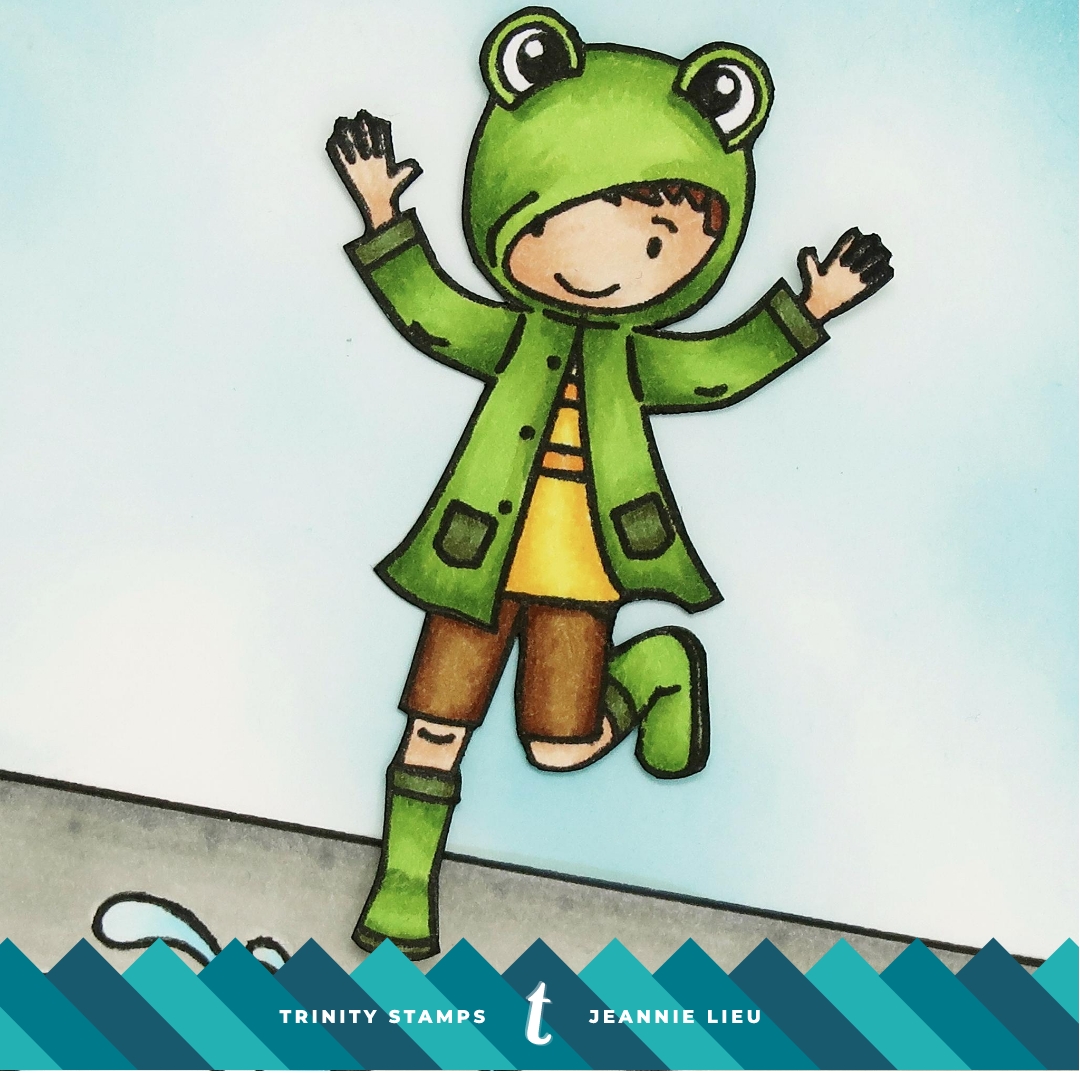
I stamped out my images using Ink on 3’s Fadeout ink because I wanted to do some no line coloring. Once I colored up all my images using copic markers, they were ready for a card.

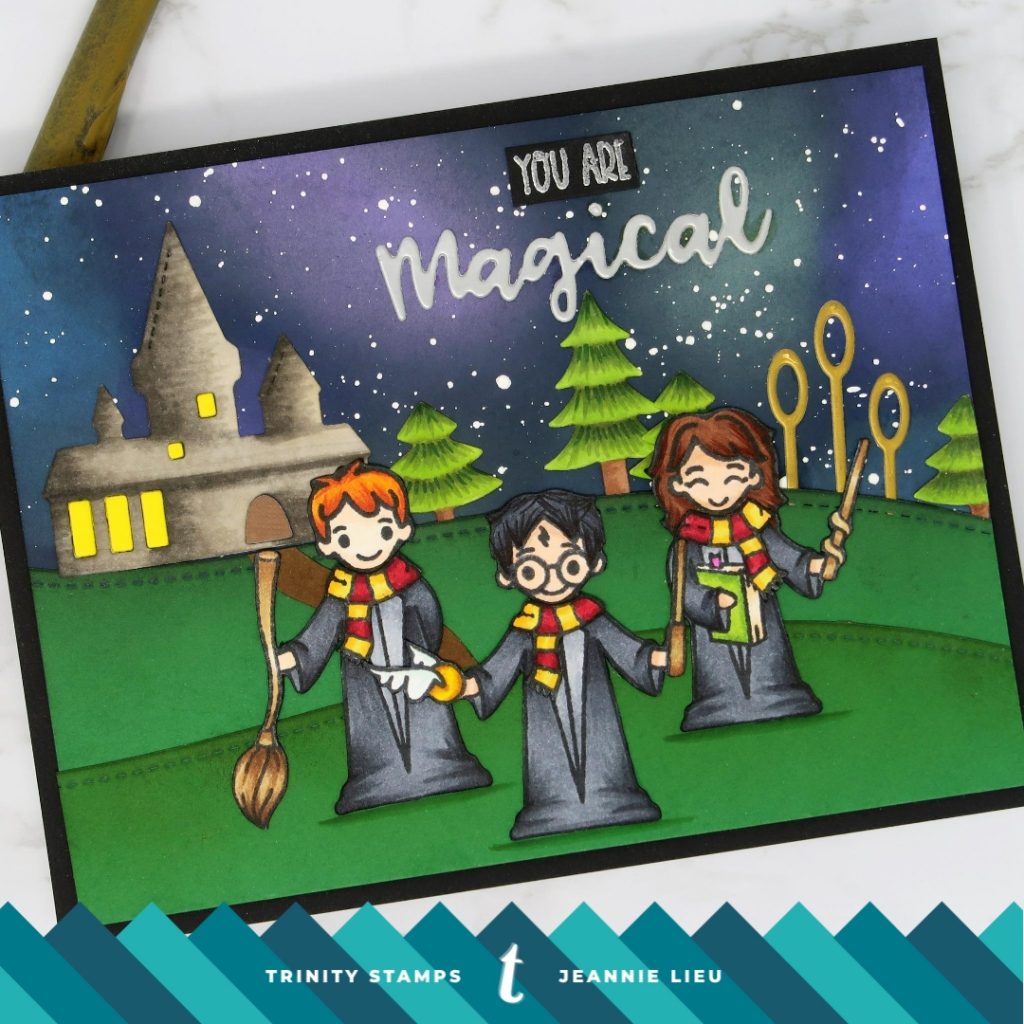
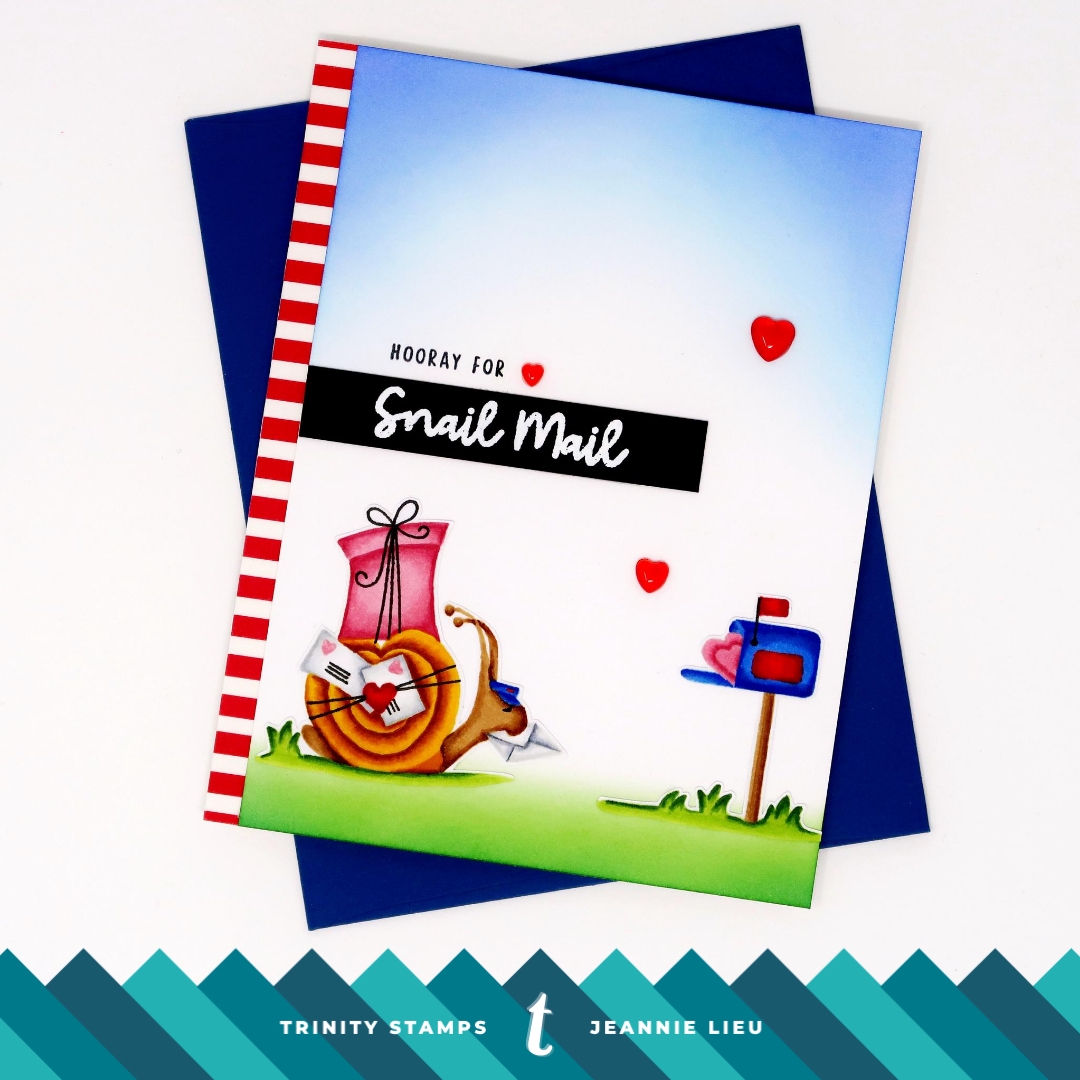
For the top and bottom of my card, I blended distress inks using the Blending Buddies to create the sky and ground. I then heat embossed the sentiment in white on black cardstock. To finish off the card, I added a few Cinnamon Red Hots – Jelly Drop Hearts embellishments around the sentiment. I also decided to stamp the “Hooray for” sentiment right on top and it really completed the card. One additional touch I added was that I trimmed my card panel to 4″ x 5.25 and lined my card base with some striped washi. It just matched perfectly! 

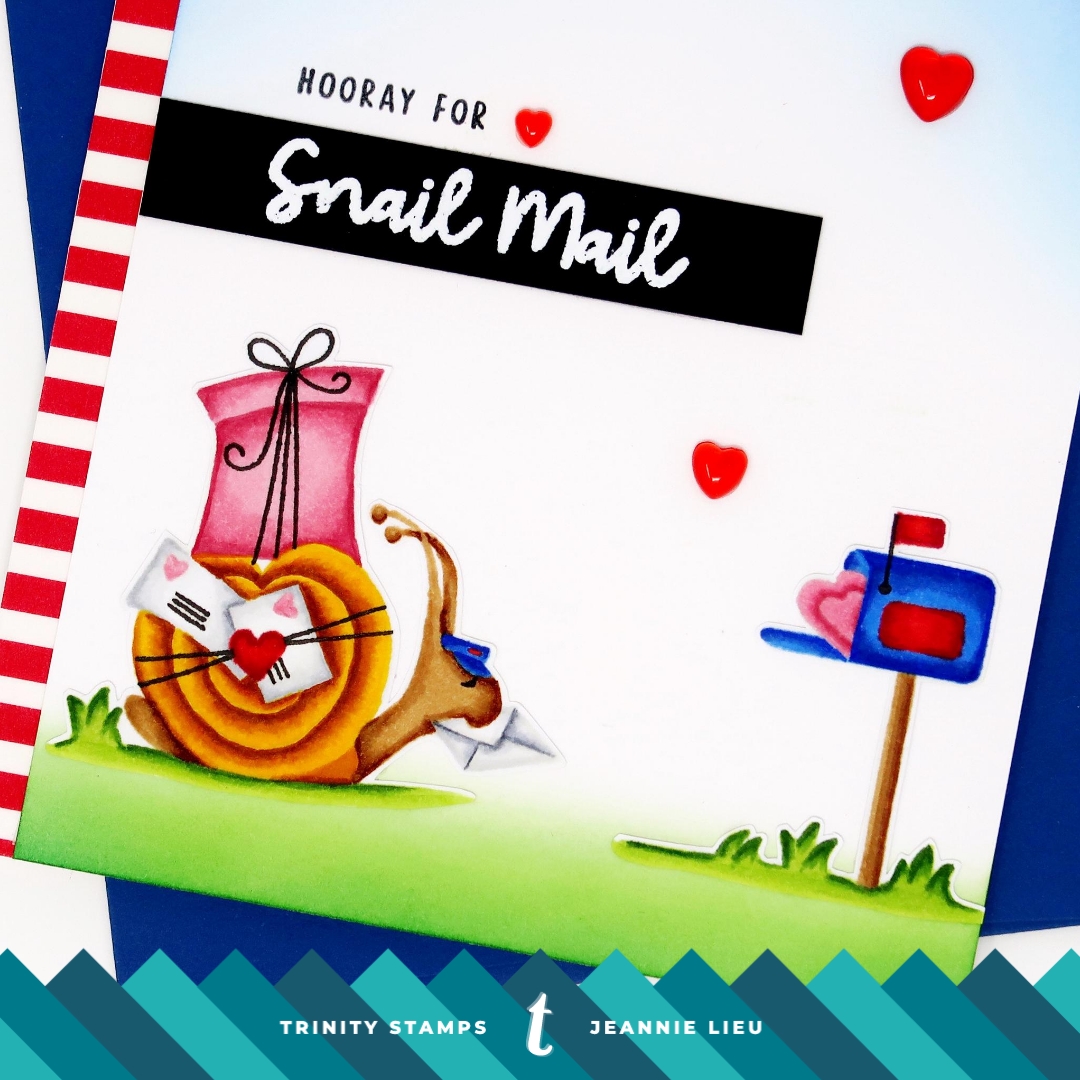
I just adore how this card turned out and it’s such a simple card to send out! Also, you can of course, stamp using black ink but I’ve just been practicing my no line coloring. 

Thanks for stopping by today and I hope you get inspired to create. Come back again soon for more inspiration and ideas! Happy Crafting! 

→ SUPPLIES USED ← 
Items marked with an asterisk (*) were provided by a store or the manufacturer for review and use. All other items were personally purchased. Affiliate links may be used at no cost to you. 

STAMP SET(S)
*Trinity Stamps – Mr. Snailman: http://shrsl.com/21f6o
INK
*Ink on 3 – Fadeout Ink:  http://bit.ly/2RulfMP
COLORING
Mini Distress Ink – Mowed Lawn: http://shrsl.com/1eplp
Mini Distress Ink – Pine Needles: http://shrsl.com/1eplj
Mini Distress Ink – Salty Ocean: http://shrsl.com/1epm7
Mini Distress Ink – Blueprint Sketch: http://shrsl.com/1eplx
Copic Sketch – C00: http://shrsl.com/17ydi 
Copic Sketch – C1: http://shrsl.com/17ydm 
Copic Sketch – C3: http://shrsl.com/17ydl 
Copic Sketch – C5: http://shrsl.com/17ydn
Copic Sketch – E55: http://shrsl.com/1ah36   
Copic Sketch – E57: http://shrsl.com/1ah37
Copic Sketch – R24: http://shrsl.com/1ah3c  
Copic Sketch – R27: http://shrsl.com/17ydv  
Copic Sketch – R39: http://shrsl.com/17ydx 
Copic Sketch – R81: http://shrsl.com/17yeg 
Copic Sketch – R83: http://shrsl.com/17yeh 
Copic Sketch – R85: http://shrsl.com/17yei
Copic Sketch – B24: http://shrsl.com/17ydy 
Copic Sketch – B26: http://shrsl.com/17ydz 
Copic Sketch – B29: http://shrsl.com/1cxzy 
Copic Sketch – YG03: http://shrsl.com/1ah3d 
Copic Sketch – YG17: http://shrsl.com/1erwt 
Copic Sketch – YG67: http://shrsl.com/1ah3h
Copic Sketch – Y08: http://shrsl.com/1gsj2
Copic Sketch – YR24: http://shrsl.com/1729y 
Copic Sketch – E99: http://shrsl.com/1fth7
EMBELLISHMENTS:
*Trinity Stamps – Cinnamon Red Hots Jelly Drop Hearts: http://shrsl.com/21f6y
TOOLS
*Trinity Stamps – Blending Buddy (Brown): http://shrsl.com/1yc1i
Wagner Heat Gun: http://shrsl.com/1esm6 
Anti-Static Powder pouch: http://shrsl.com/1ev6k

→ TO SEE MORE ← 
FACEBOOK: https://www.facebook.com/Insideoutjeans/ 
INSTAGRAM: https://www.instagram.com/insideoutjeans/ 
YOUTUBE: https://www.youtube.com/c/insideoutjeans

Cheers to 2020!

Happy New Year! Can you believe it’s a start of a new decade!? Time has flown by so quickly! One of my new years resolutions is to create more for myself. I have design teams and deadlines but I realized that I need to create for myself and that’s exactly what I’m going to do. Do you have any crafty resolutions for the new year?

Today, I wanted to create a card using I’m sharing a card featuring these critters I colored up for fun. I always revert back to Mama Elephant’s Party Animal stamp set at the beginning of the year since it’s so perfect to kick off the new year.

I stamped out these images using Ink on 3’s Fadeout Ink, which is perfect for no line coloring. I used a combination of Copic markers (colors listed below) to color everything.

I definitely knew I wanted to use Trinity Stamps’ Layered Fireworks stencils for the background but was worried it’d be too busy. I went for it anyway and stepped a bit out of my comfort zone. I gathered a ton of different embossing powders to help create this firework lit sky. Using Juicy Ink, I pressed on the stencil to get the ink on my cardstock and then used all the different embossing powders to fill up the sky.

I used My Favorite Things Stamps – Snow Drifts to cut out some masking paper so I could use distress inks for the sky and the grass. The embossing powder resists all the ink so once I was finished with the sky, I just wiped it down with a dry paper towel and all the colors were perfect for fireworks.

I went ahead and added all the colored critters to the card panel and added the Cheers sentiment from My Favorite Things Stamps. This finished off my card and I love how it turned out. It looks a bit busy but you know what, the more fireworks, the better.

Thanks for stopping by! Come back soon! 

→ SUPPLIES USED ← 

Items marked with an asterisk (*) were provided by a store or the manufacturer for review and use. All other items were personally purchased. Affiliate links may be used at no cost to you. 

STAMP SET(S)
Mama Elephant – Party Animal: http://bit.ly/2tm3Cof
DIES
MFT Stamps – Snow Drifts: http://shrsl.com/1ex4b 
MFT Stamps – Cheers: http://shrsl.com/21dqp
STENCILS:
Trinity Stamps – Layered Fireworks: http://shrsl.com/21drf
INK
Ink on 3 – Fadeout Ink: http://bit.ly/2RulfMP
Ink on 3 – Juicy Ink: http://bit.ly/31iUe1c
Mini Distress Ink – Mowed Lawn: http://shrsl.com/1eplp
Mini Distress Ink – Forest Moss: http://shrsl.com/1epkv 
Mini Distress Ink – Peeled Paint: http://shrsl.com/1epma 
Mini Distress Ink – Blueprint Sketch: http://shrsl.com/1eplx 
Mini Distress Ink – Chipped Sapphire: http://shrsl.com/1epke 
Mini Distress Ink – Black Soot: http://shrsl.com/1epky
COLORING
Copic Sketch – G05: http://shrsl.com/1szhc 
Copic Sketch – G17: http://shrsl.com/1szhg 
Copic Sketch – G28: http://shrsl.com/1erwv
Copic Sketch – Y02: http://shrsl.com/1fth5 
Copic Sketch – Y08: http://shrsl.com/1gsj2 
Copic Sketch – Y11: http://shrsl.com/17yej 
Copic Sketch – Y15: http://shrsl.com/1epsd 
Copic Sketch – Y17: http://shrsl.com/1f3qz 
Copic Sketch – YR15: http://shrsl.com/17ye2 
Copic Sketch – YR18: http://shrsl.com/17ye6 
Copic Sketch – YR24: http://shrsl.com/1729y 
Copic Sketch – E25: http://shrsl.com/172a2 
Copic Sketch – E27: http://shrsl.com/1erwo 
Copic Sketch – BG10: http://shrsl.com/17ye0 
Copic Sketch – BG11: http://shrsl.com/1ahqg 
Copic Sketch – BG13: http://shrsl.com/1ahqk 
Copic Sketch – BG15: http://shrsl.com/1wi8t 
Copic Sketch – BG18: http://shrsl.com/1ahql
Copic Sketch – E50: http://shrsl.com/1fbxs
Copic Sketch – RV02: http://shrsl.com/1ahqp   
Copic Sketch – RV04: http://shrsl.com/1ahqq 
Copic Sketch – RV06: http://shrsl.com/1epsk 
Copic Sketch – RV09: http://shrsl.com/1epsm 
Copic Sketch – B02: http://shrsl.com/1eprh 
Copic Sketch – B04: http://shrsl.com/1epro 
Copic Sketch – V12: http://shrsl.com/17yeb 
Copic Sketch – V15: http://shrsl.com/17yec 
Copic Sketch – V17: http://shrsl.com/17yee 
Copic Sketch – W0: http://shrsl.com/17ydq 
Copic Sketch – W02: http://shrsl.com/17ydr 
Copic Sketch – W04: http://shrsl.com/17yds  
Copic Sketch – W06: http://shrsl.com/1ex4i 
Copic Sketch – W08: http://shrsl.com/1fd7c 
EMBOSSING POWDERS:
Ink on 3 – Artic White: http://bit.ly/2X089tI
Ink on 3 – Chrome: http://bit.ly/35cECNJ
Ink on 3 – Strawberry Champagne: http://bit.ly/2Q8Lt6p 
Ink on 3 – Gold Rush: http://bit.ly/2SDR1aD
WOW! – Oasis: http://bit.ly/2F5ZKul
WOW! – Midas Touch: http://bit.ly/2METuhi
Hero Arts – Satin Pearl White: http://shrsl.com/21dr8
TOOLS
Wagner Heat Gun: http://shrsl.com/1esm6 
Anti-Static Powder pouch: http://shrsl.com/1ev6k 
Masking Paper: http://bit.ly/2u444Id

→ TO SEE MORE ← 
FACEBOOK: https://www.facebook.com/Insideoutjeans/ 
INSTAGRAM: https://www.instagram.com/insideoutjeans/ 
YOUTUBE: https://www.youtube.com/c/insideoutjeans

Trinity Stamps Winter Release Blog Hop

Hi everyone! Welcome to Trinity Stamps‘ Winter Release Blog Hop! This is a super awesome release and I’m pretty excited about it so I hope you are too! For our blog hop, please comment on each stop (full list below) and one lucky person will be selected for a $25 gift card to Trinity Stamps. You must comment by 11/7 at 11:59 PM PT on each of the blogs along the hop. Winner will be announced on the Trinity Blog the following Friday on November 8th.

Honestly, I had a lot of trouble figuring out which set I wanted to feature into today’s hop but I decided to go with the stamp set, Winter Friends. This is a super adorable set that also coordinates with a small stamp set, Have an Ice Day, which I didn’t use today but will feature later on.

When I first saw this set, I immediately thought of high fives, even though you can also stack! There’s just so many ideas but I went ahead with my first idea.

For the moose and the reindeer, I wanted them to face each other to high five, so I created the reverse image of the reindeer. I will use a stamp positioner to help me do this and the stamp set packaging. I went ahead and stamped the image onto the piece of packaging using my stamp positioner. Once the image was on there, I flipped it around and pressed it on my cardstock. This left a light image of the reindeer on my cardstock, where I went in with a copic friendly marker to outline the image so it was darker.

These two are absolutely adorable… so much so that I wanted to add the two other critter images from the set. For these two, I could have had them high fiving as well, but I decided that I wanted them jumping up! To create that look, I added their shadows slightly below them instead of directly under them.

For the background, I used a combination of heat embossing the small snowflakes all over with white embossing powder and I also stamped them using a silver metallic ink. I went ahead and masked all the images to add the background and also the snow with distress inks along with the Blending Buddy brushes. Those brushes really help put on the color and make blending a lot easier. Have you tried them out yet?

I just adore how this came together and I hope you’re just as excited about this new release as I am! Remember to go by and comment on each of the stops along this blog hop! Enjoy the inspiration!


Trinity Stamps
Brenda Noelke
Christine Burillo-Kirch
Davina Cantrell
Courtney Kreeber
Lisa Bzibziak
Emelie Hessler
Shanna Slater
Andrea Shell
Jeannie Lieu (YOU ARE HERE!)
Jenn Bena
Katie Brooks
Amanda Wilcox
Mary Polanco
Emily Mydlowski

Trinity Stamps 1 Year Anniversary

Hi everyone! It’s Jeannie here and I’m so excited to be part of Trinity Stamps 1 Year Anniversary blog hop!

For the blog hop, please hop around and leave a comment. One reader will be randomly selected to receive a $20 Trinity Gift Card and Birthday Surprise Gift. Also, if you plan on doing some shopping for the new release, there’s a promo happening:
KIND ONE Senti mini: Free stamp with a $50 purchase, Free Stamp and Senti Mini Die with $100 purchase. 

I hope you’ve been enjoying all the new items and get inspired to create. I have a project to share with you today using the new release! Since it’s a celebration, I wanted to create a sweet card wishing Trinity Stamps well wishes for hitting the one year milestone.

I chose to use two of the smaller sets to create a fun card. First, I stamped out the large sentiment from the Sweet Senti-mini stamp set at the bottom. I love how this includes add on options of “er” and “est” so you could choose to add it to Sweet. I used this as an anchor for the lollipops, from the Sweeter Than stamp set, right above it.

I decided to go with a fun rainbow theme for the color scheme. To complete the sentiment, I stamped the smaller words from the Sweet Senti-mini set onto black cardstock and heat embossed in white.

To finish off this card, I chose some matching Rainbow Connection Rhinestone Mix embellishments to place around the card. I really love that this mix has all the different colors so I was able to handpick the colors of the rainbow. Oh! and I had to glitter this up, so I added glitter to the sentiment and the candies. You can’t really see it from the photos but in person, it’s pretty darn awesome.

Thanks for stopping by! Remember to stop by on the next blog hop stop and leave a comment there too!

Trinity Stamps
Angelica Conrad
Barb Engler
Bobbi Lemanski
Brenda Noelke
Caly Person
Carly Tee Minner
Christine Burillo-Kirch
Courtney Kreeber
Daniel West
Emelie Hessler
Emily Mydlowski
Jeannie Lieu <— You are here
Jennifer McGuire
Jessica Frost-Ballas
Kathy Racoosin
Katie Brooks
Kelly Latevola
Lisa Cisneros
Laurie Willison
Shanna Slater

Trinity Stamps New Release

Hi everyone! Thanks for stopping by for the Trinity Stamps new release blog hop. One reader will be randomly selected to receive a $25 Trinity Gift Card and an embellishment goodie bag. So leave a comment along the blog hop (list below).

I hope you’ve been enjoying all the new items and get inspired to create. I actually have three projects that I shared sneak peeks of throughout the week.

The first card was a fun and interactive one using Puddle Jumpers. I used masking to split the images so they were both a standalone image. I wanted the little jumper separate from the puddle he was jumping in.

I added a hidden slider right behind the jumper so when you pulled up, he’d jump up and when the slider was pushed back down, he’d land right in the puddle.

I also added a few more puddles, added a ground and a sky. Usually when there’s some interactive element, I tend to keep the rest pretty simple.

For the second card, I used the Spring Fling Florals stamp set, which I absolutely adore since it allows you create your own bunches of flowers. It’s amazing and definitely going to be a fan favorite. For the card, I chose to stamp and mask a ton of these images to create a circular arrangement.

For the sentiment, I used the Thank You Sentimini set. It looked very simple so I added a few Unicorn Tears Rhinestone mix just to accent it. The background was really simple to create. I used a piece of dark grey cardstock and stamped a variety of the images all over to cover randomly.

I just love how this one turned out.

For my final card that I’m sharing today, I focused in on the Hello Sentimini to use for a card. Usually when cards are full of sentiments, I only will pull it out when I need something very specific. Here, I decided to utilize most of the sentiments to create a background by heat embossing in white and then using distress inks to create an ombre look.

I portioned off the card since I wanted that space for the large “hello” in the set. I just used an alcohol safe pen to help draw in the borders. The borders really help break up the card since the background with the sentiments are a bit busy. I also used a variety of sizes and colors of the Shiny Baubles to accent the hello. I really love this embellishment mix because of the different colors, so I was able to pick and choose the ones I wanted to use.

This is one of my favorite sentiment filled cards and I hope this idea helps step outside of the normal use for sentiments.

Be sure to stop by the entire blog hop to get ideas for what you could use the new products for. Of course, I’ll be creating more from this new release but I really hope you love it as much as I do!

Trinity Blog
Amy
Brenda
Carly
Carrie
Christine
Courtney
Donna
Emelie
Emily
Erica
Jeannie -> You are here!
JoAnn
Judy
Katie
Shanna

Thanks for stopping by! Come back again soon for some more inspiration and ideas!

Bubble Tea Blog Hop

Hi everyone! Thanks for joining me on this collaboration hop with the Coffee Loving Cardmakers & Trinity Stamps for National Bubble Tea Day. One reader will be randomly selected to receive a $25 Trinity Gift Card. Leave your comments on all of the participating blogs (list below) by Wednesday, May 8th at 11:59pm Pacific, then look for the winner announcement here on the Coffee Loving Cardmakers‘ blog the following week.

Let’s start off by saying that if you know me, you know that I’m a HUGE boba (also known as Bubble Tea) fan! So when it was brought to my attention that it was National Bubble Tea day… I just HAD to create a cute card that just goes with it!

Boba stamps are hard to find but super easy to create. You just need to draw in boba in any coffee cup. There is one in the Seasonal Sweetie stamp set and I took advantage of it. Yes, this set is more for Fall and Winter and I know we’re in Spring but I didn’t care. I wanted to have a little girl drinking boba! I manipulated her just a little to remove her scarf.

I stamped out the coffee cup, added a straw and added boba to her cup! It worked perfectly. I actually fussy cut the boba as well as the main girl. I used an Exacto Knife to cut around her hands so I could insert the boba cup. It worked out so perfectly.

For the main boba cup image, I just drew this out to the match the boba cup in her hand. It was a lot easier than I expected and so I wanted to make the drink into a shaker as well. I used the same Exacto Knife to cut the opening in the cup. I used some distress ink on the back panel to make it the color of milk tea. I totally decided to use the Trinity Stamps Coffee Bean Heart Sprinkles as the shaker bits.

For the background, I used distress ink and a confetti stencil, that made it look like boba all over. It also added interest to the background without taking away the spotlight.

I needed a sentiment to finish this off and the huge variety from Caffeinated Sentiments was perfect! The only word that was missing was boba, but I noticed it wouldn’t be too hard to piece together from the letters in the set. I went with something punny, and came up with “Let’s Get Boba, It’s been Oolong!”.

I really enjoyed creating this card and love how it turned out! Now off to go get myself a boba. My favorite is a jasmine milk tea with cream puff. I love mini boba but it’s so hard to find. What’s your favorite?

Remember to continue on the blog and hop around for a chance to win a prize! The next person on the hop is: Shanna Slater.

Enjoy her creations along with everyone else’s and good luck! 

A Magical Hello!

Hi everyone! My name is Jeannie and I’m soooo excited to join the Trinity team! I’m here to share my first card with you on their blog today. I hope you love it as much as I do and I hope I can inspire you to pull out your sets to use them as well!

Personally, I love when a bunch of sets can be combined together because you are able to mix and match to create a ton of different types of cards. For today’s card, I couldn’t help myself and used four different sets to create a fun scene card.

For my background, I used a piece of dark blue cardstock along with three random distress oxides inks to create a galaxy background. You just put splotches of color all over the cardstock and darken up the edges with black. It always looks like such a mess but once you add white splatters (I use Copic Opaque White Ink), everything comes together. Trust me!

Next, I pulled out the Castle Scene Builder Die Set to use for my card. I love this set for the small details in this set and all the pieces can create a great scene. For the die pieces, specifically the castle and trees, I decided to color them up to add details and texture. I used the landscape die to cut out two pieces to create two hills. This comes together to create a gorgeous scene to go along with the galaxy background.

For the magical wizards, I used two sets: Magical Wizards and Wizard Friends. I wanted to dress the trio in robes with the scarves. It took a bit of masking but I just love this set for all the little accessories and details. You can mix and match to create fun outfit changes! I originally didn’t add the scarves, but this is easily fix because I stamped them out, cut them out, and added them right on top.

After I finished coloring them up using alcohol markers, I put this scene together quickly. I just love how the Castle Scene Builder Die Set created such a magical scene!

To finish off the card, I die cut the “Magical” sentiment, from the Magical Sentiments set that has coordinating dies, out of silver cardstock. For the text, I chose “You Are” from the stamp set and heat embossed it using silver embossing powder on black cardstock. I kept it as simple as possible since there was so much happening but I’m loving how this turned out.

I’ll definitely be pulling them out again to share more of my ideas with you!

Thanks for stopping by and I hope you enjoyed this card.