Erin Lee Creative’s Shine Bright Kit

Happy Friday everyone! TGIF! I am so excited to share this card with you today — I think it’s one of my favorite cards I’ve made in a really long time. It features some items from the newest kit from Erin Lee Creative and this one is a stunner!

All my supplies for creating this card will be listed down below (with multiple sources when available) for your curiosity and convenience. Affiliate links used when possible. 

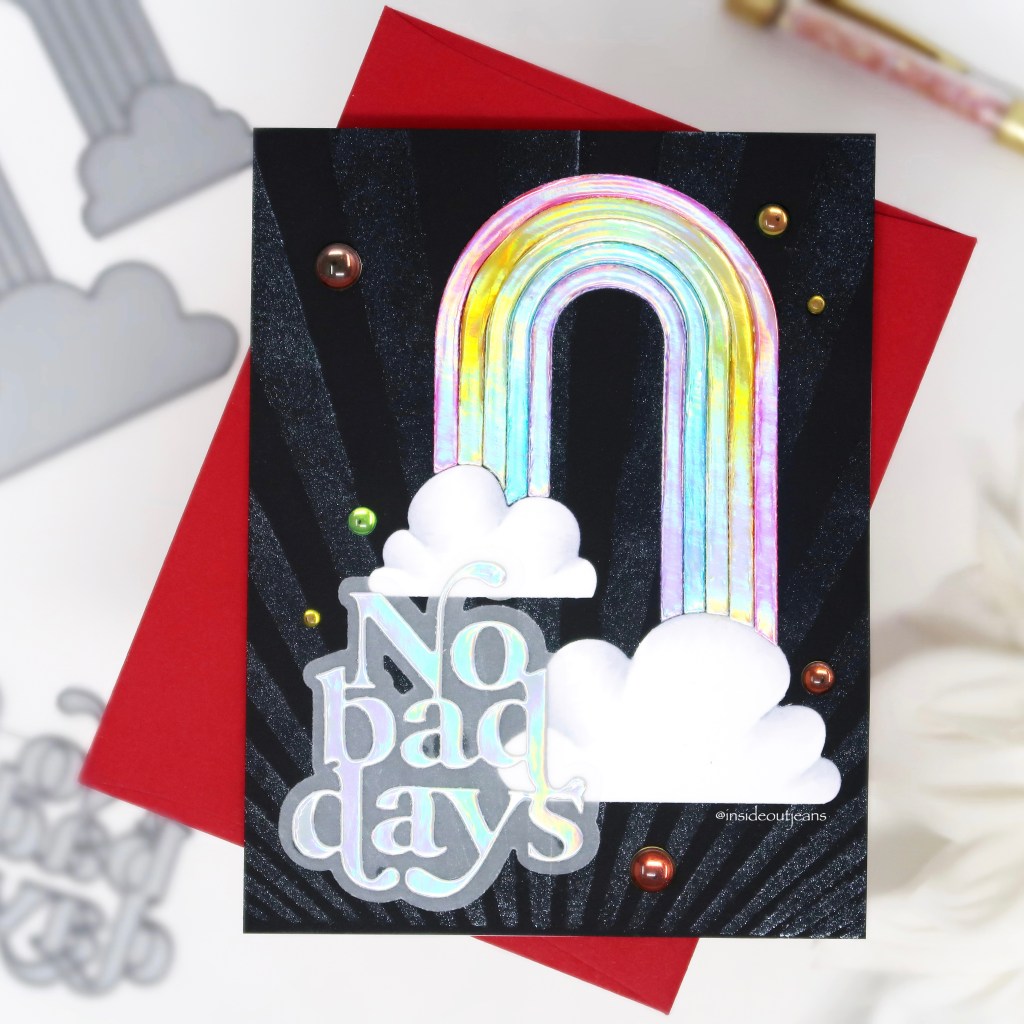
I had an idea that involved playing with the ever so popular holographic cardstock sold in her store and changing the color of it by using some inks. First, I die cut the rainbow using one of the dies that comes in the Shine Bright kit with holographic cardstock. Then, I used a rainbow array of colors from Ink on 3: Marilyn Red, Marigold Orange, Goddess Green, Peacock Blue and My Jam Purple. I pounced on the color for each rainbow stripe using a blending tool. To trap the color, I added Glossy Accents on top of each stripe separately and let them dry. Not only does it trap the color, it adds dimension to each of the rainbow stripes.

I went ahead and used that same Rainbow die to cut out the clouds out of white cardstock. I used some copic markers to add a bit of dimension to them.Also, in the kit, it has a standalone die and shadow for the No Bad Days sentiment. I cut out the words from holographic cardstock and the shadow from vellum.

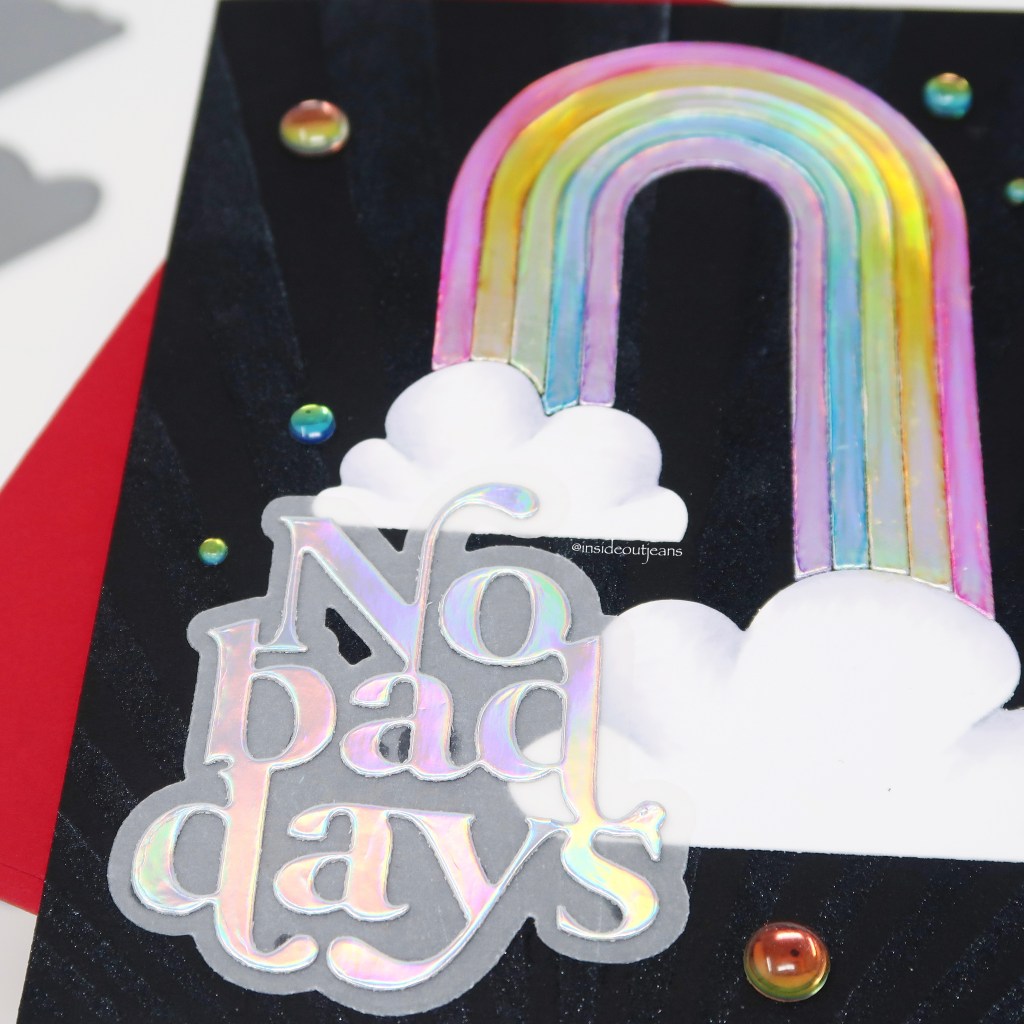
For my background panel, I used one of the sun ray stencils in the kit. There’s two that can be used to layer on top of each other so you’d have two different rays of colors. For my card, I decided only to use one with Ink on 3’s Liquid Pixie dust on black cardstock. Since it’s on dark cardstock, you won’t see it until it hits the light and adds that extra bling to any card.

I absolutely love this card and the kit that I used to create it. It’s so fun and I think it’s totally worth it! I’ll be sharing additional ideas in the coming weeks using this kit as well. I’m also participating in the Shine Bright instagram hop so if you want to see more wonderful ideas, please stop by here.

Thanks for stopping by! Happy Crafting! 

→ SUPPLIES USED ← 

Some products are provided by manufacturers for review and use. Affiliate links may be used at no cost to you.

Erin Lee Creative – Shine Bright Kit ($75)
–ELC: https://shrsl.com/2vyxz
Erin Lee Creative – A2 Rainbow Rays Die ($10)
–ELC: https://shrsl.com/2vyy3
Erin Lee Creative – Slimline Rainbow Add on ($19.99)
–ELC: https://shrsl.com/2vyy5
Erin Lee Creative – Be the light Stamp Set
–ELC: https://shrsl.com/2vyy8
Erin Lee Creative – Holographic Paper
–ELC: https://shrsl.com/2vpys
Glossy Accents
–EH: https://bit.ly/3eOmL53
–SSS: https://shrsl.com/2vpzg
–S.com: https://shrsl.com/2vpzm
–Amzn: https://amzn.to/3fxmO8y
Ink on 3 – Liquid Pixie Dust
–Io3: http://bit.ly/2BVDwtA
–EH: https://bit.ly/3w9VSlc
–SSS: https://shrsl.com/2vq01
Ink on 3 – Marilyn Red Atelier Ink Pad
–Io3: http://bit.ly/2QvloPx
–TS: https://shrsl.com/2cgl2
–SSS: https://shrsl.com/2lhcm
Ink on 3 – Marigold Orange Atelier Ink Pad
–Io3: http://bit.ly/2t30DRX
–TS: https://shrsl.com/2cgl3
–SSS: https://shrsl.com/2lhcd
Ink on 3 – Goddess Green Atelier Ink Pad
–Io3: http://bit.ly/3aXAZzk
–TS: https://shrsl.com/2cgl5
–SSS: https://shrsl.com/2lhch
Ink on 3 – Peacock Blue Atelier Ink Pad
–Io3: http://bit.ly/2O6cIgF
–TS: https://shrsl.com/2cgl6
–SSS: https://shrsl.com/2lhcb
Ink on 3 – My Jam Purple Atelier Ink Pad
–Io3: http://bit.ly/2SwsPFB
–TS: https://shrsl.com/2cgl7
–SSS: https://shrsl.com/2lhcj
Ranger Round Ink Blending Tool
–EH: https://bit.ly/2NEnfPh
–SSS: https://shrsl.com/2ph07
–S.com: https://shrsl.com/2nh8v
Domed Foam Applicator
–S.com: https://shrsl.com/2grxs
Copic Sketch – C1
–Blick: http://shrsl.com/17ydm
–EH: https://bit.ly/2Dou0D0
Copic Sketch – C3
–Blick: http://shrsl.com/17ydl
–EH: https://bit.ly/3fpJCEI
Copic Sketch – BV00
–Blick: http://shrsl.com/1f3oj
–EH: http://bit.ly/2uxAxay
Honey Bee Precision Glue
–EH: http://bit.ly/2XqIVDt
–SSS: https://shrsl.com/2pywr
–HBS: https://shrsl.com/2pyws
Tonic Glass Media Mat
–EH: https://bit.ly/2BNaJdM
–SSS: https://shrsl.com/2hblv
–S.com: http://shrsl.com/1epat
Gemini Jr.
–EH: https://bit.ly/2ZjsI3y
–SSS: https://shrsl.com/2hbm4

Colorful & Bright Sentiment Focused Cards

Welcome to the weekend crafty friends! Today, I’m sharing a set of cards featuring Pigment Craft Co.’s stamp set named, Dashing Sentiments along with their Dashing Sentiments coordinating die set. 

All my supplies for creating this card will be listed down below (with multiple sources when available) for your curiosity and convenience. Affiliate links used when possible. 

I actually started out by cutting out a ton of strips using the Mama Elephant Sentiment Strips out of a bunch of different colored cardstocks and used Stick it adhesive to adhere them to a piece of copy paper. I then stamped the Pigment Craft Co.’s Dashing Sentiments on the striped paper using Versamark ink and heat embossed it with Artic White embossing powder. Using the coordinating dies cuts, I cut them all out. I love these die cuts because I think they are so unique!

For my main card panel, I used those cut strips and trimmed them down even further and adhered them in a easy pattern. For my sentiments, I wanted to use a dark grey cardstock so it would help the sentiments pop. I also wanted to have a very subtle design on it so I decided to use Trinity Stamps A2 Quilted Coverplate die. The die cuts a quilted pattern and leaves empty the area of intersection (because there are coordinating stencils to go with it). I decide to not use the coordinating stencils and replaced them with a variety of embellishments to add a bit of bling to the card.

I just love how these turned out and honestly am so excited that I found this crafty company. I can’t wait to see their future products!

Thanks for stopping by! Happy Crafting! 

→ SUPPLIES USED ← 

Some products are provided by manufacturers for review and use. Affiliate links may be used at no cost to you.

Pigment Craft Co. – Dashing Sentiments Stamp

  –PCC: https://bit.ly/3d5N6MC 

Pigment Craft Co. – Dashing Sentiments Dies

  –PCC: https://bit.ly/39hdKAP

Mama Elephant – Sentiment Strips 

  — EH: https://bit.ly/3brZU0B 

Trinity Stamps – A2 Coverplate die: Quilted Cover

  –TS: https://shrsl.com/2pyia 

  –EH: http://bit.ly/2Xygtjf 

  –SSS: https://shrsl.com/2q1l8 

Trinity Stamps – Bubble Blower

  –TS: https://shrsl.com/2dt1e 

  –EH: https://bit.ly/2ZdBNLY 

  –SSS: https://shrsl.com/2hblm 

Trinity Stamps – Fairy Rocks 

  –TS: https://shrsl.com/2veyi 

  –SSS: https://shrsl.com/2veyu 

Trinity Stamps – Stunning Silver Baubles 

  –TS: https://shrsl.com/2veyj 

  –EH: https://bit.ly/3fcLKSP 

  –SSS: https://shrsl.com/2veyw 

Trinity Stamps – Unicorn Tears

  –TS: https://shrsl.com/2veyk 

  –SSS: https://shrsl.com/2veys 

Trinity Stamps – Bubble Blow Out 

  –TS: https://shrsl.com/2veyr 

  –EH: https://bit.ly/3skEicb 

  –SSS: https://shrsl.com/2veyy 

Stick It Adhesive
  –AMZN: https://amzn.to/3cnCd9D 

–S.com: https://shrsl.com/2vjp1 

  –SSS: https://shrsl.com/2vjp2  

–EH: https://bit.ly/39jlNNv

Scotch Foam Tape

  –EH: https://bit.ly/3dQwx5z 

Cheap Foam Tape: 

 –Amzn: https://amzn.to/3lU6nTW

Wagner Heat Gun 

  –EH: https://bit.ly/2NIsX2X 

  –SSS: https://shrsl.com/2hbls (new version)

  –S.com: http://shrsl.com/1esm6 

Inkadinkado Anti-Static Embossing Pouch

  –EH: https://bit.ly/2VzM4jP 

  –SSS: https://shrsl.com/2hblq 

 –S.com: http://shrsl.com/1ev6k 

Versamark Ink

  –EH: https://bit.ly/3gc618q 

  –SSS: https://shrsl.com/2hbln 

 –S.com: http://shrsl.com/1eone 

Ink on 3 – Artic White

  –Io3: http://bit.ly/2X089tI

  –SSS: https://shrsl.com/2rqd2 

  –TS: https://shrsl.com/2hblu 

Tonic Glass Media Mat

  –EH: https://bit.ly/2BNaJdM 

  –SSS: https://shrsl.com/2hblv 

  –S.com: http://shrsl.com/1epat  

Misti – New & Improved

  –EH: https://bit.ly/33obq9e 

  –SSS: https://shrsl.com/2hbl4 

  –S.com: https://shrsl.com/2f3so   

Gemini Jr.

  –EH: https://bit.ly/2ZjsI3y 

  –SSS: https://shrsl.com/2hbm4

3 Easy Die Cut Designs

Hi everyone! Ok, I’ve been really bad with keeping up with doing blog posts but I’m trying to get back into it.

Today, I’m really excited to be a guest designer for i-crafter today. I’m so grateful to have the opportunity to share my creations with you! For today’s blog post, I actually ended up creating three different cards showing off three different designs using the dies from the Box Pops, Flower Add On set. The possibilities are really endless! 

YouTube process video; supply list used for this proect is listed at end of blog.

For my first card, I used the leafy die, which was so perfect for a simple frame design. I quickly used watercolors for the background and added some splatter. While die cutting the leafy die, I also took the interior bits and ink blended them with similar colors and did some die inlay. 

To finish off this card, I used the “hello” sentiment from the Hello Flower die set in black. The leafy die cuts really make that sentiment pop! 

For my second card, I thought I would use this really pretty, intricate floral die to create a circular design. Once I die cut 8 of these florals, I inked them up quickly. For the sentiment, I used the sentiment from the Happy Birthday Wiper Insert and inked them up using the same colors for the florals while creating an ombre effect. 

To really have the florals pop, I put them up on kraft cardstock and thought they colors went so well together. The coordinating sentiment really tied together the entire card. 

For my third card, I decided to use a slimline design and again only used one die for this particular card. 

I took some watercolors and quickly created a rainbow background and placed each die cut in each color section. 

This is one of those designs that can be quickly created for a simple and elegant card. To finish off this card, I used the smaller hello in the Flip Card Dashed Circle die set and actually used a gold pen to give it a bit of elegance. 

I really loved how all these cards turned and hopefully, these examples gave you some ideas for the endless possibilities of this Box Pops, Flower Add On die set. 

Thanks for stopping by and I hope you have a crafty day! 

→ SUPPLIES USED ←
Box Pops, Flower Add On
–i-crafter: http://bit.ly/3r8PIPz
Hello Flower
–i-crafter: http://bit.ly/381CT1N
Happy Birthday Wiper Insert
— i-crafter: https://bit.ly/3rbUFqE
— SSS: https://shrsl.com/2tmpg
Flip Card Dashed Circle
–i-crafter: http://bit.ly/2OeV0dy
–SSS: https://shrsl.com/2tmpi
Scrapbook.com – Double Sided Adhesive (6 Inches x 81 feet)
–S.com: https://shrsl.com/2tr93
Ink on 3 – Goddess Green Atelier Ink Pad
–Io3: http://bit.ly/3aXAZzk
–TS: https://shrsl.com/2cgl5
–SSS: https://shrsl.com/2lhch
Ink on 3 – Marilyn Red Atelier Ink Pad
–Io3: http://bit.ly/2QvloPx
–TS: https://shrsl.com/2cgl2
–SSS: https://shrsl.com/2lhcm
Ink on 3 – Sweet Petunia Pink Ink Pad
–Io3: https://bit.ly/3lWdlrB
–TS: https://shrsl.com/2lhc6
–SSS: https://shrsl.com/2lhca
Ink on 3 – Bee Sting Atelier Ink Pad
–Io3: http://bit.ly/2GpXXRA
–TS: https://shrsl.com/2cgl4
–SSS: https://shrsl.com/2lhcn
Ink on 3 – Goddess Green Atelier Ink Pad
–Io3: http://bit.ly/3aXAZzk
–TS: https://shrsl.com/2cgl5
–SSS: https://shrsl.com/2lhch
Ink on 3 – Trinity Teal Atelier Ink Pad
–Io3: https://bit.ly/3m2BPzc
–TS: https://shrsl.com/2lhc4
–SSS: https://shrsl.com/2lhc2
Ink on 3 – Marilyn Red Re-Inker
–Io3: http://bit.ly/2RhIKbs
–TS: https://shrsl.com/2e68e
Ink on 3 – Marigold Orange Re-Inker
–Io3: http://bit.ly/3ax25gx
–TS: https://shrsl.com/2e68j
Ink on 3 – Bee Sting Yellow Re-Inker
–Io3: http://bit.ly/30LDdNr
–TS: https://shrsl.com/2e68k
Ink on 3 – Goddess Green Re-Inker
–Io3: https://bit.ly/2VIvihG
–TS: https://shrsl.com/2e68l
Ink on 3 – Trinity Teal Re-Inker
–Io3: http://bit.ly/3dACLYQ
–TS: https://shrsl.com/2tr8s
Ink on 3 – Peacock Blue Re-Inker
–Io3: https://bit.ly/3eHdgUt
–TS: https://shrsl.com/2e68o
Ink on 3 – My Jam Purple Re-Inker
–Io3: https://bit.ly/2WGQgit
–TS: https://shrsl.com/2e68q
Ink on 3 – Sweet Petunia Pink Re-Inker
–Io3: http://bit.ly/358pAus
–TS: https://shrsl.com/2tr8m
Ranger Round Ink Blending Tool
–EH: https://bit.ly/2NEnfPh
–SSS: https://shrsl.com/2ph07
–S.com: https://shrsl.com/2nh8v
Domed Foam Applicator
–S.com: https://shrsl.com/2grxs
Tonic Glass Media Mat
–EH: https://bit.ly/2BNaJdM
–SSS: https://shrsl.com/2hblv
–S.com: http://shrsl.com/1epat
Gemini Jr.
–EH: https://bit.ly/2ZjsI3y
–SSS: https://shrsl.com/2hbm4

→ DISCLAIMER ←
Some products are provided by manufacturers for review and use. Affiliate links may be used at no cost to you.

You are Loved!

Hi everyone! I’m off to Creativation for the weekend but I wanted to share this fun card with you today. I actually starting making this card with an idea in mind, however, that didn’t work out and I ended up with this instead. Sometimes (a lot of times) this happens and I figured it out regardless.

I was inspired by Simon Says Stamp’s instagram challenge of “something new” and I went with new techniques along with new items in my crafty stash.

I’ve play with alcohol markers before but I never really got the foiling to work for me. I wanted to try it again after seeing a few photos on instagram, I was inspired.

I used a piece of yupo paper along with a few alcohol inks. I wanted to go with monotone colors around pink and red since I had stamp images that were Valentine-esque. I used the following colors: Pink Sherbet, Purple Twilight, and the Pearl alcohol ink, Intrique, along with the Ink Blending Solution.

Let me say this outright: I am never happy with how the alcohol inks turn out. NEVER. I will keep playing with it again and again until I’m semi-satisfied. Even with this piece, I was not particularly stunned by it at all and I only stopped playing with it because I didn’t want to overwork it.

After a little bit of time, I added some Minc rose gold foil to the yupo paper. The foil stuck with the wet areas of the alcohol inks and this is where the magical happens. My panel that I was not so happy with, was gorgeous! Of course, there are some pieces that I wish stuck with foil but I was pretty happy with it. The only problem with this was that the original images that I planned to use with it, would not work with it because the background was too bold and busy.

I dug further into my recent purchases and remembered I had the Simon Says Stamp You are Loved die and this was perfect for it. I die cut the image out three times and stacked them. Additionally, I die cut the border image out of vellum so the sentiment would be the focal point. This worked out perfectly so I placed it on the bottom left hand corner and finished it off with some embellishments.

I hope you get inspired to create! 

Thanks for stopping by! Come back soon! 

→ SUPPLIES USED ← 
Items marked with an asterisk (*) were provided by a store or the manufacturer for review and use. All other items were personally purchased. Affiliate links may be used at no cost to you. 

DIES: Simon Says Stamp – You are Loved: http://bit.ly/384gIpf
INK: Tim Holtz Alcohol Inks: Pink Sherbet, Purple Twilight; Tim Holtz Alcohol Pearl Inks: Intrigue
MISCELLANEOUS: Heidi Swapp – Minc Rose Gold Foil: http://shrsl.com/228oq

→ TO SEE MORE ← 
FACEBOOK: https://www.facebook.com/Insideoutjeans/ 
INSTAGRAM: https://www.instagram.com/insideoutjeans/ 
YOUTUBE: https://www.youtube.com/c/insideoutjeans