Birthday Unicorn Shaker

Hi everyone! I’m back to share a card I created using Penguin Palace’s stamp set named, Birthday Unicorn.

I’ve already created some cards using this set because it’s so easy to work with and super versatile. However, I really wanted to do something bright, fun, and pink.

I wanted to create a shaker card for today. I used one of the Stitched Dome STAX Die-namics for my opening because I wanted something different from a circle, square or rectangle. Since I decided to use a pink background, I wanted to break up the color by using a piece of fun patterned paper for the bottom portion of the card. I added the sentiment using Versamark ink and Hero Art’s white embossing powder to a strip of black cardstock.

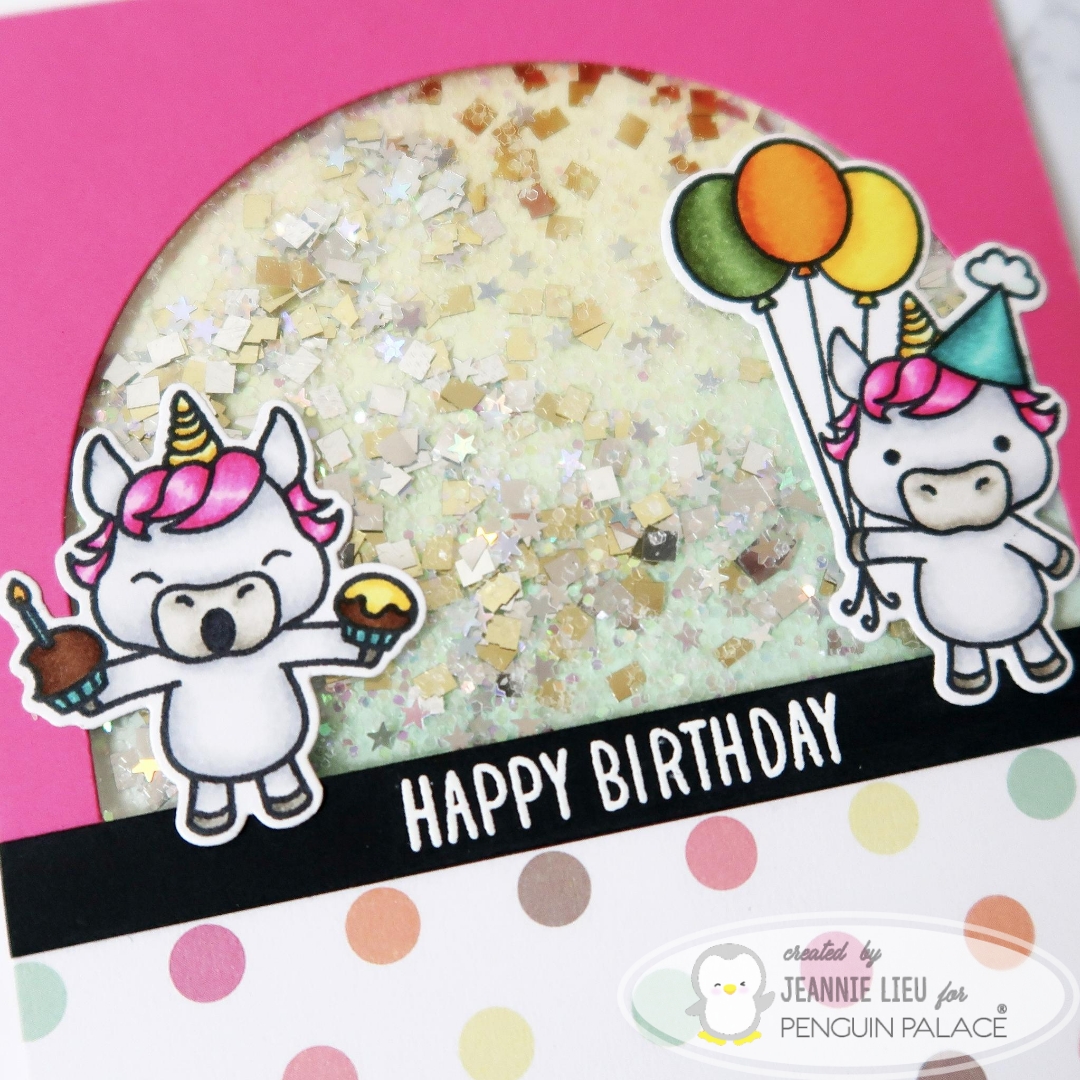
I added acetate to the die cut opening, placing foam tape around the dome area and around the card panel. Adding bits of glitter and shaker bits, I completed the shaker portion of this card.

I originally used one of the unicorn images but adding it to the card, it looked really empty so I stamped, colored and die cut another one. It really helped fill out the card and I totally love it!

Thanks for stopping by! Come back soon!

→ SUPPLIES USED ←
Items marked with an asterisk (*) were provided by a store or the manufacturer for review and use. All other items were personally purchased. Affiliate links may be used at no cost to you.

STAMP SET(S): Penguin Palace – Birthday Unicorn
DIES: Penguin Palace Perfect Cuts – Birthday Unicorn, Stitched Dome STAX Die-namics
INK: Memento Tuxedo Black Ink
TOOLS: Misti, Wagner Heat Gun, Versamark Ink, Anti-Static Powder Pouch
MISCELLANEOUS: Hero Arts – White Embossing Powder, 3M Foam tape, Acetate:

→ TO SEE MORE ←
FACEBOOK: https://www.facebook.com/Insideoutjeans/
INSTAGRAM: https://www.instagram.com/insideoutjeans/
YOUTUBE: https://www.youtube.com/c/insideoutjeans

Sweet Carousel – Spinner

Hi there! Jeannie back today and I hope you’ve been all enjoying the January release. Everything has been pretty amazing right? I’m blown away from the new sets!

When I first saw the Sweet Carousel set, I knew exactly what I wanted to do with it. Aren’t these images perfect for a spinner card? And what else do horses on a carousel do other than spin?

I set out to create a really simple version since these images were pretty large so I only needed one. I basically grabbed a piece of acetate to help me create a mirror image of the stamp. I stamped it one on cardstock and then stamped the same image on a piece of acetate. I used the image on acetate and pressed it against the cardstock, transferring the image. It wasn’t perfect but I ended up outlining the image again to darken the lines. Once I finished coloring them, I die cut the images using the coordinating Sweet Carousel dies. For the mirror image, I had to die cut on the backside of the image.

I used a piece of paper from the new Watercolor Foil paper pad (it’s so freaking pretty!) and I picked a color that matched the horse’s mane. I think it works really well. I used one of the Stitched Rectangles 2 dies to cut out a window for the carousel. I used transparent sewing thread, stuck it in between the two images and wrapped it around the top and bottom of the card.

If you spin the image and close the card, the card is ready to go. Once the recipient opens the card, the little carousel will spin. If you’re curious to see it in action, visit my instagram page… I’ll have a short video showing it in action.

Thanks for stopping by today! I hope you enjoyed today’s card.

→ TO SEE MORE ←
FACEBOOK: https://www.facebook.com/Insideoutjeans/
INSTAGRAM: https://www.instagram.com/insideoutjeans/
YOUTUBE: https://www.youtube.com/c/insideoutjeans

→ SUPPLIES USED ←
Items marked with an asterisk (*) were provided by a store or the manufacturer for review and use. All other items were personally purchased. Affiliate links may be used at no cost to you.

STAMP SET(S): Sweet Carousel Stamp*
DIES: Sweet Carousel Coordinating Dies*
PAPER: Watercolor Foil Paper Pad*
INK: Memento Tuxedo Black Ink, EK Tools Journaling Pens
COLORING: Copic Sketch
Greys: C00, C1, C3, C5
Pinks: RV02, RV06, RV09, R81, R83, R85
Reds: R29, R46, R89
Blues: B00, B02, B04
Yellows: Y13, Y15
TOOLS: Misti, Acetate
MISCELLANEOUS: Singer Clear Thread

Thanks for stopping by! Come back soon!

Love Train

Hi there! Today I’m sharing another card using Penguin Palace’s Love Train stamp set. I used the same concept as one of my previous cards (Spinning Bunnies). It has a hidden spinning mechanism.


The only difference with this card compared to my previous card is that I stamped the trains individually around a circle. I wanted variation among the trains.

I kept everything really simple. I used a clouds stencil and some distress inks for the background. For the front portion of the card, I stamped some of the landscape images in grey so it doesn’t distract from the spinning trains.

For the idea behind the concept, check out the corresponding video that explains the mechanism. It’s really simple.

Thanks for stopping by to check out this card. See you next time!

Hello Little One

Hi everyone! I’m back to share another card with you today using one of Gerda Steiner Designs’ stamp, Hello Little One. This is one of the images that was originally a digital stamp and now converted to a clear stamp. Personally, I love clear stamps over digital stamps because I want to be able to stamp directly to a card base.

In this case, I actually fussy cut the image out because it was easier for what I wanted to do. I created a distress ink background with a bit of an ombre effect. To spice it up a little more, I used a die that cut out stars and embossed. I put this over a piece of yellow cardstock so the color could peek through the stars.

Once I added this, I trimmed it down a bit so it’s a strip that runs across the card base. I added the sentiments on the top and bottom to finish off the card. 

I really like how this one turned out. Simple and sweet!